Follow-up on 2015 Wadder no.1

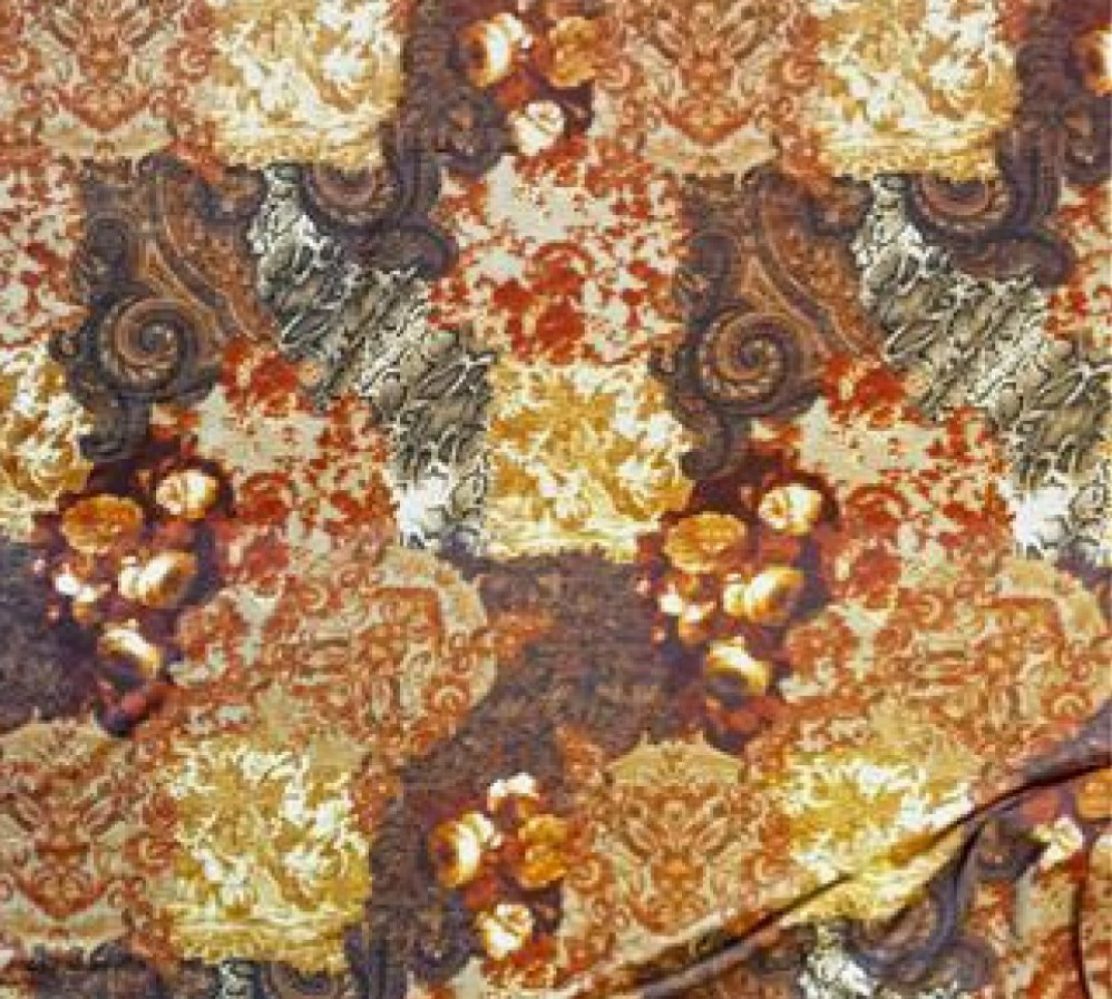
Thanks for all your compliments on the beach cover-up that didn’t quite work! It’s amazing how a beautiful fabric can make one fall in love with a garment warts and all isn’t it?

Although I haven’t fixed it yet I now have a plan.

  • As I hardly ever go on beachy holidays, I’m going to turn this beach cover-up into a dress/tunic that I can wear in London. I’ll have to add to the length. The pieces loped off the sleeves should come in handy now.
  • To make the dress/tunic more hardy I’m going to sew up the armpit-airing underarm – sleeve inner hem. The design worked for the sturdier fabric of the top that inspired this cover-up. But with more delicate fabrics the risk of sticking my head & arms into the wrong holes and tearing the fabric is too great. Once the holes are closed up there’ll be less chance of this happening.
  • As extra insurance, and to make this translucent fabric more city-friendly, I’ll underline it with a georgette, which might also make the dress more drapy and silhouette elongating.

I’m in no hurry though as it’s still chilly in London.

Instead I’m working on classy replacement Breton Ts that I can wear at home & work. The Burda 2010-02-112 I made a few years ago is well worn and grubby. Her sister Burda 2010-02-122 had already been donated because the neck opening was too big to stay on my shoulders. So I’ve been messing with Dartless T Block again and making a wearable muslin in a less prized stripy knit. I should finish the muslin today & hopefully be able share the experiment findings soon. I’m cautiously optimistic that this one will turn out well! šŸ™‚

Drab sewing

Nope, Sewing Mojo still not back from holidays yet. So I’ve been making do with drab home-furnishing sewing. Drab because it’s suppose to be dead simple. Just boring straight lines and rectangles. Yet it’s taking more effort than I expected.

See these curtains?

curain for the living room

How long would that take you to make? It’s not lined. So just joining pieces and hemming four sides per panel. The rings are plastic snap-on’s. So not even heavy machinery needed.

taming the curtain...or trying toBut the fabric is heavy. And my sewing space cramped.

Even with a flat sewing surface & the sewing cabinet fully open, I just couldn’t manage a straight line of sewing. The dinky home sewing machine with its dainty little feed dog & foot was just no match for these heifers of a fabric. They move whichever way they please.

You quilters & home decor sewers out there have my full respect now. How do you coax unwieldy pieces to stay in line?

TNT Trench Odyssey: Part 2a Fitting detour to Shoulder Pad Land

No sooner have we started than we make the first scenic detour. This one is to Shoulder Pad Land.

I’ve been told that fitting needs to be done with the relevant shoulder pad in place – if I plan on keeping the shoulder pads that is. And although I’m no fan of footballer shoulders (that’s American football, not the World Cup variety), I thought maybe a sliver might give the jacket a more professional tailored look.

So to buy or to make. Well, as I had already cut out batting for the shoulder pads ages ago I thought I’d go down the homemade route. Isn’t it sign of better tailored garments anyway? She says snootily.

The only problem though…I’m not sure these homemade ones would be washable. Now my RTW trench‘s shoulder pads, while low-quality looking, is at least washable. And I hate garments that are dry-clean only. That was one reason I bought that particular RTW trench – it is machine washable. On the other hand, I’m not sure I’ll be able to find ready-made ones that are thin enough for my taste. So maybe I will make these detachable rather than sewn in.

v8817I’m using OOP Vogue 8817 for these shoulder pads. But as usual, I’m deviating from the pattern instruction to try out some fancy-schmancy instruction from my sewing books. This time it’s from Cabrera Meyers’ Classic Tailoring Techniques: Men’s Wear.

The V8817 instruction looked like it would have produced a hefty pad even for the thinnest, supposedly 1/4″ version.

1-shoulder-pad_2

So I…

  • Removed one of the two layers of the smallest piece.
  • Strip all the batting of the thin non-woven cover layers. (Did I use the right type of batting I wonder. These cover layers make it impossible to have smoothly transitioned layers.)
  • Half each layer again.
  • Feathered the layer edges for a smoother transition between the different sized layers.

1-shoulder-pad_1

The result looks more like the photo in the tailoring book.

Per that book I also replaced the hair canvas top and bottom layers with muslin – seems like it would feel nicer as canvas can be a bit scratchy to wear. And for pad stitching I ran these parallel to the concave shoulder edge like in the book rather than perpendicular like instructed by V8817.

Here’s how the finished pad compare with the foam pad from my dissected RTW trench:

1-shoulder-pad_3

And that concludes our detour to Shoulder Pad Land. You can wake up now!

Me Made Holiday

So, how was your Me Made May 2013? I was very tempted to join in. But I simply donā€™t have enough projects that I can still wear to even do 1 Me Made a day, never mind outfits of Me Mades only for a whole big month. But I think I might just manage a Me Made Holiday.

I hereby promise to wear at least one Me Made garment a day during my 14 day visit to the US of A. Repeats allowed ā€“ I am hoping to have room for new fabric acquisitions after all! But I will try to at least wear them in different outfit combinations.

So promise made. Now time to panic. What should I pack? Should I rush a few more pieces through ā€“ like I did for my dream trip to the Maldives last year?

I thought maybe I could whip up a few more simple knit tops. You know, build on my recent Fitted T-shirt Block experiment. Two Steps Forward One Step Back instead of the usual One Step Forward Two Steps Back (thanks to flitting between different types of projects without really mastering any).

And I did get as far as drafting patterns and cutting out fabrics for

But in the end, after checking the holiday weather forecast ā€“ HOT ā€“ I decided to pack mostly previous summery makes. They were rather impractical for chilly London. So this would be the perfect opportunity to justify their existence.

I did have to fix a couple of them though.

  • v1159_4s2_6.jpgVogue 1159 Donna Karan Draped Front Dress needed the Vilene Bias Tape (stabilizing interface) removed from the armholes. I think I was mistaken to think that armholes need stabilizing to the same extent as necklines. Thereā€™s no big head to fit over, so theoretically they shouldnā€™t stretch out of shape as much. I think I was confused by previous Burda instructions for raglan sleeve T-shirts. Anyone know the correct rules when it comes to interfacing knit garment edges?
  • heidi-skirt-frontHeidi Skirt (not blogged yet)ā€¦relic from my NYC days which Iā€™ve refashioned numerous times for an ever expanding waistline. Well itā€™s that time again šŸ™ . And this time I had to resort to butted waist band ends with hooks & eyes too šŸ™ . Time to seriously hit the gym. But not until after my holiday of course!

I also ended up sewing the Wrap Cardi, but ran out of time to finish the hemming. So itā€™s basted and packed with a mini-sewing kit, ready to be hand finished during the trip.

wpid-IMG_20130531_092157.jpg

What about you? Do you panic sew your holiday wardrobe too?

Close but no cigar (aka Heavenly Burda 2012-09-123 part 4)

I could have shown you my finishedĀ Burda 2012-09-123 T-shirt. Except I couldn’t finish it. Because I had to send Saffy the sewing machine back to the hospital.

She came back last Saturday. Her unbalanced tension seemed to have been fixed. But oh no, what’s this, Needle Down setting no longer works! And I can’t live without the Needle Down setting. I don’t know about you, but whatever I sew, the feed doesn’t stay straight. I constantly have to readjust the seam allowance to keep the sewing on the stitching line. Stopping with the needle down and presser foot slightly up has saved many a sewing project here. Plus there are all those corner turning where it comes in handy too. So back to the sewing machine repair shop Saffy went today.

I’ve actually sewn up most of the T-shirt already. I just need to finish the stretch hemming on Saffy’s return. In the meanwhile I can show you the embellishment step.

You may recall from Part 1 that my take on this T-shirt is inspired by Dolce & Gabbana’s Fall / Winter 2013 Byzantine Princess collection


Photo credit: Style.com

2-embellish-f-1smallSo for the front, I went back to my art history lesson and pulled up this mosaic image of Byzantine Empress Theodora (who turned out to be pretty cool, an early feminist you might say).

  • First I turned the image into grayscale and fiddled with the contrast in a photo editing software.
  • Then I printed it out, scaling to the size I need, and traced the key outlines onto tracing paper.
  • Next using dressmaking carbon and a blunt plastic needle (used for sewing up hand knitting) I transferred the design onto the fabric which had the pattern pieces already marked out.
  • Finally I used 3 different metallic paints to fill in the outlines: Jacquard Lumiere 561 Metallic Gold for white areas, Jacquard Lumiere 552 Bright Gold for mid-tone areas, and Jacquard Lumiere 565 Metallic Bronze for dark areas. Then heat set with iron set at temperature for my fabric.
2-embellish-f-32-embellish-f-4

For the back I used the Urban Threads wings embroidery design as planned. I was good though. Rather than ripping the artist off, I paid for easily affordable $1 hand embroidery design.

  • I printed this out directly on tracing paper with the design scaled down to 90%.
  • Then this was again transferred to the back fabric piece with dressmaking carbon and an old dried out ball-point pen.
  • The lines were then traced with the Jacquard Lumiere 561 Metallic Gold and Jacquard Lumiere 552 Bright Gold fabric paint, and again heat set with iron.
2-embellish-b-32-embellish-b-4

Those of you with eagle eyes (and mind) would have noticed I committed a big sin in the process: Marking the fabric with carbon paper like there’s no tomorrow. And worse, pressing over the said markings without washing them out first. Yeah, I’m a rebel. So sue me! šŸ˜‰ Bred in NYC I like my Edginess. So I don’t mind if the carbon marking won’t wash out. If you’re of posher or more conservative taste, then do find some other way of transferring your markings and designs.

Anyway, I’m off to find some other project I can work on with just Bernie the overlocker and handsewing.

Stayed tune for the conclusion to this Heavenly T-shirt project coming in a week or two!