Fall-Winter 2014 SWAP … batch 4 designs

OK, talk about indecisiveness, this batch is the worst.
And I blame it on all on Chanel.

batch 4 designs
batch 4 inspirations

This one starts with the fabric. Dark olive bouclé from B&J I believe. I can’t remember why I got it. topshop-boucleIt may be been inspired by a Top Shop coat with fake fur collar that I wore to death. (The lining is in tatter. I’ve meant to redo the lining for the longest time. But who like doing such mend & alteration right?) Anyway, 8 years later and I still haven’t done anything with the fabric.

Now bouclé is a fabric with such heavy cultural baggage. Have you seen much that isn’t the Little French Jacket? And the Little French Jacket has been so done on the sewing blogsphere that I feel I’ve made thousands of them already even though I’ve made none. Besides, this green doesn’t really scream Chanel to me. I have another bouclé (a magenta) that I might eventually make into a Little French with a Twist. But only after the craze has died down. (Any chance of that?)

The only alternative I’ve seen a few times is biker style jacket. I’m not really feeling it with this color. So trolling through my magazine clippings I uncovered a couple of gems that seems like the perfect (literal) matches (I’m very imaginative that way wink wink). They’re the inspirations for Design 1 & 5.

  1. I really like Design 1 from Peter Som. I can’t quite decide if it’s edgy or dowdy. I like that tension. I’m even inspired to incorporate chamomile organza contrast binding into mine.
  2. Continuing on the slightly retro theme is Design 2 inspired by an Advance sewing pattern illustrated in Blueprints of Fashion: Home Sewing Patterns of the 1950s. I like the sack in the back with slim belting in the front. Best of both world? But Croquis is not looking lovely.
  3. Another retro look is Design 3 a proper 60s (?) suit for the Lady who Lunches. I’m sure I got that yellow suited inspiration photo from Tatler the UK society mag. But Croquis is looking tubby.
  4. Design 4 is my reluctant attempt to give LFJ a go. I won’t I can’t do bog standard LFJ uniform. This shrunken one featured in Vogue (?) at least is a tad rebellious. But not sure about the buttons on the breast pockets. Might be a bit too in your face. And I’m not sure it works in the dark color I have.
  5. Design 5 I like (probably partly because it’s shown on an Asian model that I can pretend to be). But I can’t see the rest of it. So I’m imagining that it looks something like Simplicity 2508. It’s a design that I can potentially add a detachable fake fur / shearling collar to (if I have enough left over from the fake shearling aviator hat!) But do I have enough of this bouclé fabric for a coat length jacket? Because I do also want to make…

Tada! Another princess pencil skirt. Don’t ask. I don’t even wear them that much lately. But I did make another textured (boiled) wool pencil skirt a long time ago that again I wore to death. I’m hoping for a repeat success. I’m thinking of continuing the chamomile organza contrast binding from the jacket / coat into the skirt.

And the candy cane stripe is just thrown in to remind myself I need to make more of those classy Breton Ts that I wear to death (again).

I’m leaning towards Design 1 or 5. If I wear the Breton  stripe T with Design 1 and the pencil skirt, would I look ready for Santa’s Elf Crew you think?

First conquest in NYC

And I hadn’t even check into the hotel yet! We arrived too early for check-in, so waited at Bryant Park. I stopped by Kinokuniya Japanese book store, where I picked up Ryuichiro Shimazaki’s men’s coats book.

I’ve been tempted ever since Peter of Male Pattern Boldness gave us a peak inside. The pea coat he made from the included pattern looked fabulous & oh so professional. But as it’s men’s coats, and I only really do selfish sewing, I stalled.

Then earlier this year, after seeing my me-made trench, my brother joked about getting me to make him a Burberry Wannabe. So I checked out this book in store to see if it’ll help. The detail shots and the photo styling sold it to me. That and the fact that nothing else in the store was calling my name. (Could be jet-laggedness. Or could be that my taste changed. Or maybe Japanese fashion changed. Or all of the above.)

All I have to do next is to learn to read Japanese and figure out how to do transatlantic fittings. Or so I thought.

Well, it turned out I needn’t have worried my pretty little head. My brother was smart enough to know that he could be waiting a long time to get a trench out of me. So he went ahead and save up for the real McCoy. It was just as well since he’s obviously a Burberry snob, and probably wouldn’t have been gratified by my run of the mill trench without all the neat details that goes into a real Burberry. I manage to get some photos of these details. Some of them are actually shown in the book as well.

Burberry Men’s Trench Details!

Shimazaki’s men’s coats book Pattern No.1 details

Shimazaki-Mens-Coat-book-pattern-1-detailsFascinating innit! Not sure I’d bother with all of them details myself. But the sewing geek in me just can’t resist peaking.

The Burberry trench itself does look quite good on my brother. I’ve read elsewhere some complaints / concerns about them being a bit too big and baggy. But this one has a smart slim fit. Maybe those complaints apply to trenches from the yore years when baggy was in. As for personalized fit, the only alteration the store could offer was sleeve length. That’s where being able to sew a wannabe might come in handy. There is only so much that RTW could cater for. We’ll see. Maybe someday this book will come in handy. If not for my brother, maybe for MR – if I could ever convince him to dress up outside work!

TNT Trench Odyssey: PS fitting process round up

Let’s talk about that little fitting wobble I mentioned last time shall we?

Overall I think tissue & fit-as-you-sew worked OK for this semi-fitted garment. I didn’t have much problem with fitting the front. Once the FBA was done on the front during tissue fitting, there was hardly any changes during fabric fitting.

Tissue
vs Pinned
vs Sewn

Sleeve attached

Shoulder narrowed,
sleeve head adjusted

The main problems I had were with the back above waist, shoulder & armhole areas, including the sleeve cap.

Part of it was due to my unfamiliarity with what to expect at different stages of fitting and how garment parts affect each other. As consumers we’re more used to judging the finished garments. It was difficult to know when to stop before I attached the sleeves for example. And I was surprised when new drag lines appear after the sleeves have been attached.

It was also a bit difficult to read excess tissue paper vs fabric. Paper being stiffer doesn’t show up drag lines as clearly as fabric.

Also, having tried sloper fitting before I probably should have tissue fitted on both sides rather than just one side. I could have cut wider seam allowance I suppose. But in curved areas & armsye for example, the extra SA might throw up false problems because it won’t lie flat or would make the armhole smaller or too high.

Tissue
vs Pinned

Comparing the tissue with pinned trench, the pinned version shows up a lot more wrinkles. It would have been easy to panic at this stage. Basting might have been a little bit smoother. But pinning did at least show up the bigger problems like my lower left shoulder & the possible need to lower both armholes (for my sloping shoulders) even on a jacket / coat which would have been designed with bigger armholes anyway.

Pinned, extra left shoulder pad
vs Sewn, extra left shoulder pad

After first sewing I was surprised that the extra shoulder pad which seem to fix my uneven shoulder problem during the pinning stage wasn’t enough to fix my uneven back. I had to redo sections of the princess seams taking in and letting out where needed. So even pin-fitting with fashion fabric isn’t fool-proof. Maybe with experience I’ll get better at pin-fitting. For now, I’ll have to be prepared to redo seams. So no ploughing ahead with seam finishing without checking the fit first!

Left vs Right adjustments
Left side with adjustments

The next hurdle is the sleeve vs pre-sleeve confusion. Minus the sleeve the shoulder looked alright (at this stage I had widen the shoulder about 1/2″).

Sleeve attached
 
Shoulder narrowed,
sleeve head adjusted

Once the sleeves were attached, the shoulder felt too wide. The weight of the sleeves stretches the shoulder a bit I think. So I narrowed the shoulder by 3/8″ (leaving a 1/8″ widening compared to original shoulder width). But after the sleeve head has gone in & the whole thing lined, the shoulder now feels a tiny bit tight. I probably should have widen it the 1/4″ that my sloper fitting had implied I need. It goes to show though, when there are many bits involved (like in tailoring), it’s best not to panic too soon and over-fit! The result is still wearable, but probably would be more comfortable if I had not panicked.

The sleeves, especially the sleeve head areas, I had to attach twice. There was a bit too much ease after my bodice shoulder-armscye area adjustments. I had to lower the cap a little bit more, and when adjusting the sleeve head curve, made the back curve shallower and front fuller. I kept the original shoulder alignment point on the sleeve, but shifted the underarm seam alignment point backward to accommodate my Forward Shoulder Adjustment without making the front to full to ease into the front armscye.


So is tissue & pin-as-you-sew worth it?

Most definitely! For fitted and/or tailored garments anyway. Saves me wasting yards after yards making muslins after muslins. Documenting the process made it more tedious this time, but I think I will continue to try this method.

It probably won’t work as well for looser drapy styles. And obviously not for knits. For those, developing slopers & blocks to compare new designs to probably would work better. And if the final fabric is expensive or otherwise precious, I guess there will be no option but to make test garments in cheaper similar fabrics.

TNT Trench Odyssey: All done! Sorta

Hurrah it’s all done. Well, at least a very wearable muslin is.

Let’s first charm you with the pretty pictures before I start boring you with nearly two weeks’ construction (& fitting) details

The Inspiration & Pattern recap

Style Shots & Mug Shots

3-style1-103-style1-83-style1-1

3-mug-f-33-mug-b-23-mug-f-5-23-mug-sL-23-mug-sR-2

3-style2-23-style2-43-style2-93-style2-11

3-style3-33-style3-63-style3-73-style3-8

What do you think? Do I give Emma Watson & Cara Delevingne a run for their money?

No? Oh. OK, better keep the day job then 😉

Fabric & Notions Used

As you can see, the velvets have disappeared.

After reading all your suggestions, and rudely checking out every trench out there on the rack & moving about, I decided to save the velvets for another make. On closer inspection, the caption on the Louis Vuitton inspiration does say “glazed linen” after all. And almost every trench I saw was made with softer, thinner fabric, typically plain weave, not twill weave. (Poplins maybe?) Plus I came across some luscious coated linens & cottons at the Cloth House on Berwick Street (#47 branch, basement). Perfect excuse for fabric shopping, no?

As for the wrinkles…actually this chino doesn’t wrinkle any more than all the trenches out there. It’s probably just me not being used to cotton / linen, and/or being an overzealous sewing enthusiast who doesn’t know where to focus one’s perfectionism on.

0-inspire_07-burberry-aw2013-10-inspire_07-burberry-aw2013-20-inspire_07-burberry-aw2013-3There was much agony about whether to continue with this fabric after the velvets dropped out. Then I checked out the grandaddy of trenches, Burberry. They currently have chic designs in rubber forchrissake! That has as little drape as my stiff-as-cardboard chino if not less. So I’m fine.

Size Used

8 + FBA instead of the 12 the sizing chart would have me sew.

Now I’m not 100% sure about this approach for a trench. I mean I wear trenches open as much as buttoned. While FBA gives me a great skimming fit while buttoned, I do wonder if there’s a bit too much bust shaping for the front to hang well unbuttoned. Given that I’m not a true busty gal – I’m one of those weird B-cup with big rib cage I think – maybe a bigger size with less bust shaping would be a better choice for coats like this.

That’s one reason this is a wearable muslin – I need more time to stew on this issue.

Changes Made

There was no great changes needed on this pattern as the unaltered tissue fitting photos & numerous makes by others can attest to. But since I’m after a TNT pattern, I went the extra mile. So don’t let my review put you off making this pattern!

Fitting changes

There was a bit of fitting wobbles after the pin-fit as well. But let’s save that melodrama for a round-up of my thoughts on the FFRP/JFRP tissue & fit-as-you-sew. For now, here’s the summary of all the changes I eventually made…

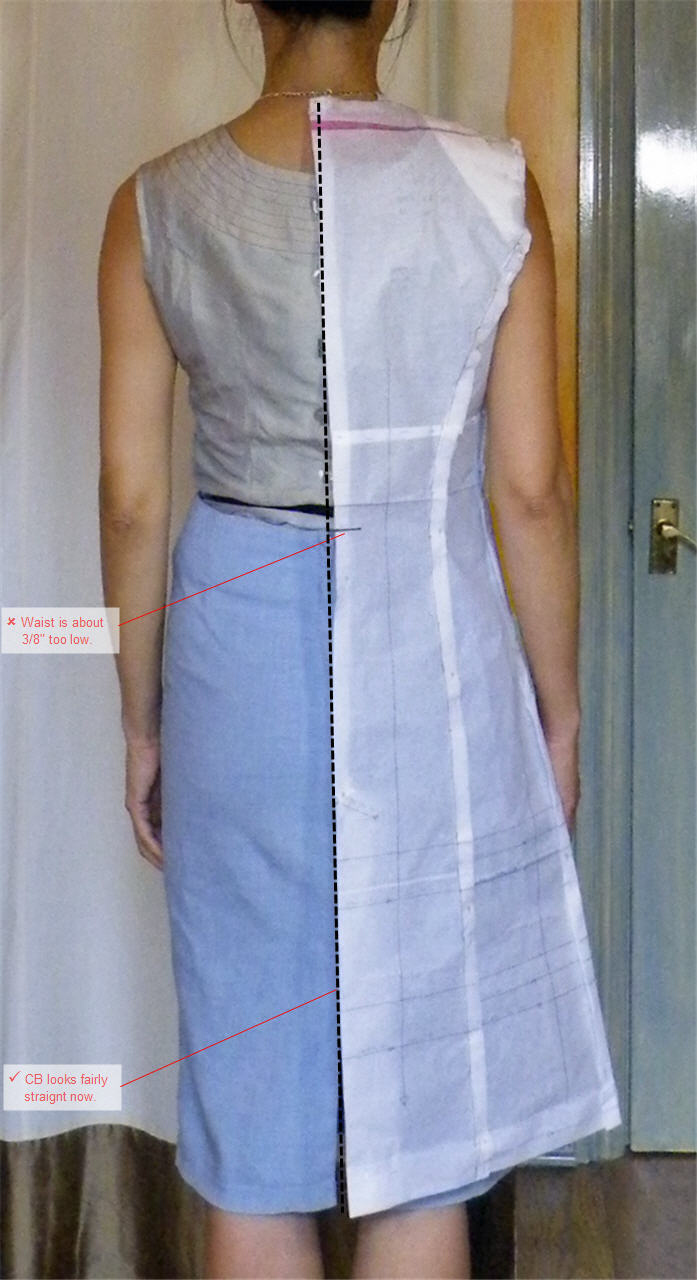
  • Rounded Upper Back Adjustment: +3/8″ CB length above shoulder blades, -1/2″ width total at CB neck edge.
  • Sloping & Forward Shoulder Adjustments: front shoulder -1/2″ length at armscye edge, side seam -1/4″ length at underarm, sleeve cap height -3/4″ to match / reduce ease to manageable amount.
  • Forward Head Adjustment: back shoulder +1/2″ length at neck edge, shifted whole front neckline down 1/2″, collar band +1/2″ width at back neckline to match.
  • Wide Shoulder Adjustment: +1/8″ width at shoulder armscye edge.
  • Princess Full Bust + Short-Waist Adjustments: side front panel +7/8″ width at my bust, -1/2″ length from side front, side back, & back panels.
  • Sway Back Adjustment:1/2″ CB length at lower back.
  • Short Person Adjustment(!): -3/4″ length just below hip.
  • Lower left shoulder & smaller left back: +1/8″ height to left shoulder pad, left side back panel -1/4″ width at armscye.
  • Larger right bum: right back princess seam +3/8″ width total below waist.

Design changes

  • Front princess seams: moved 1/2″ towards the front for hopefully a more slimming look.
  • Sleeves: -1/2″ length & converted into 2-piece sleeves for hopefully a better & more fashionable fit. Most of the fashion clippings I have tend to have the length just below the wrist bone. I guess that makes your arm look slimmer than if the sleeve ends at the wider palm area.
  • Collar: convert under-collar into 2-piece – the tailors do it & so should I!
  • Shoulder pads: used self-made 1/8″ pad to avoid a footballer look. (Had to add another 1/8″ to the left one though as I’m lopsided!)
  • Belt loops: moved up so they sit above my waist & moved / added extra so they’re just to the side of the princess seams. Again, hopefully more slimming than right at the side seams.
  • Buttons: added 2 more sets above existing ones. So I can button the front up on a cold day!
  • Pockets: replaced the pattern with much more sensible big self-drafted pocket pattern & moved these up a little bit so my hands can reach into them easily.
  • Modified patterns for turn-of-cloth: for that more professional finishing.

Verdict on the Instruction

The instruction looks V-E-R-Y long & complicated (143 steps!!!). But that’s because there are multiple variations covered. The steps themselves don’t look complicated. But if you’re following them, just double check you’re following the right steps for the version you’re making.

I of course ignored most of it! Instead I tried to cram advice from multiple sources all into one project. So highly NOT recommended. Perfect recipe for head scratching, delays, oops & redos. I got there in the end. Just. More reasons this is a wearable muslin.

2-c-inside-22-c-inside-12-c-inside-32-c-lining-12-c-lining-2
  • First let’s talk stabilizers. I interfaced the whole front. But on the facing I only interfaced the lapel & buttonholes. This was to reduce overall stiffness. Following the example of my Topshop RTW trench, I also interface the hems on bodice & sleeves, stabilize the shoulders with Dritz Stay Tape, and the back neckline & bodice armscye with Vilene Bias Tape. I was going to interface the sleeve armscye as well, but I couldn’t figure out how to do it without impeding the sleeve cap easing process. I didn’t draft separate interfacing patterns this time. Instead I tried Jackets For Real People‘s interfacing cutting technique: Cut 2 sides, shift over a full seam allowance’s width (5/8″), cut the remaining 2 sides.
  • Neither did I manage to draft separate lining patterns this time: It was just getting too overwhelming by that point. So the ease are all added at the easiest points – at underarm, hems, vertical seams. As suggested by Classic Tailoring Techniques: Men’s Wear I also added a bit of width ease to multiple vertical seams in addition to CB. I reckoned that if it’s coming from the land of traditional tailoring, there must have been decades of experience backing it. All the lining seams were overlocked as suggested by Kathleen Fasanella to keep down the fraying.
  • Like the  jacket I made for my niece, the lining for this trench was also bagged. I was lucky this time in that I had to cut a hem facing since I thought I was going to add the velvets so didn’t add hem allowance. This meant I could finish the tricky front-facing, hem, lining joint neatly before the whole bagging process. Again, I left the gap for turning the garment right side out in the lining – hem seam.
  •  The back vent I had wanted to do like the RTW trench as the finish looked neat. But I hadn’t studied the RTW carefully enough, so missed the fact that the lining CB seam slant from CB at the neck to one side at the vent so that the seam lined up with the edge of the vent underside. I just saw one continuous straight seam.
    2-c-vent-12-c-vent-22-c-vent-3So I mistakenly cut my lining with standard CB seam allowance without vent extension and had to patch an extension on afterward. In the end I was able to finish the vent neatly all by machine.
  • I tried to batch sew as much as possible. But not having done the prep work (sorting out all the pattern alterations ahead of time), it wasn’t really efficient. It only added to my general confusion. So not recommended unless you have very little changes to make during the construction process.
  • I did manage to sew a lot of the seams pin-free! It was quite scary, and when it came to the slippery lining, there were stretches of redos here & there. But practice makes perfect right? 🙂
  • And another thing I practiced on was hand-sewn keyhole buttonholes. I was going to use my machine’s automated one, but I couldn’t get it to sew the keyhole symmetrically. Even with paper-thick stabilizer underneath it still wanted to do its spirally thing rather than a perfect O.
    2-c-buttonholes-12-c-buttonholes-2So in the end I resorted to hand-sewing. Yes, all 13+4 buttonhole of it. The +4 is for the top 2-set of front buttonholes which are visible from both sides depending on whether the front is buttoned up or not. How’s that for self-torture? The instruction I used is a combination of Claire Shaeffer’s Couture Sewing Techniques and this forum post on Cutter & Tailor website.

Would I sew it again / Would I recommend it to others

I better! After all that effort.

I am however waiting for road testing results before finalizing my TNT trench pattern. It’s not just about the look you know. A garment like this must pass  rigorous practicality test! Is the pocket in the right place? Can I move in it? Is it easy to slouch in & still look chic the next day? Does it play well with other clothing? Is it easy to take care of? (On this last one I’ve already given up. Nil point. This fabric likes to get out of shape. No way am I going to try to steam everything back into place after laundering. Dreaded dry cleaning it will have to be.)

Once it pass the test, I’ll have to tidy up the pattern, maybe draft the separate lining pattern, & transfer onto longer lasting kraft paper.

I would definitely recommend the pattern to others though. So many people have had great looking results with it. Just make sure you at least substitute a larger pocket pattern if you are keeping the pockets.

As for this wearable muslin, I think it’ll be getting plenty of wear alright. While it’s not perfect, I think it looks good enough to fool the non-sewing folks. Now if only the weather here would only be a bit warmer…I don’t want to wait till spring to wear my new trench!

TNT Trench Odyssey: Part 3 Fabric Fitting

With any luck this will be the last fitting post you see before I sew!

Fabric Fitting:

So following FFRP instruction, I’ve interfaced the fabric & pin the main pieces together to check how the pattern fit in this particular fabric. While I don’t plan to wear this in the midst of winter, I do hope to wear this into mid-fall with a light sweater/jumper underneath. So that’s what I’m testing the fit with.

1-fitting_5f-2

  • Front:
    Looks OK to my untrained eyes.
  • Sleeve:
    • Looks a bit long.
    • Width-wise I had add back the 1/2″ I tucked out. 3-1/2″ ease made the sleeve a bit tight over the sweater. So I’ve let out 1/4″ on the oversleeve at the both seams. That takes the bicep ease back to 4″, which is actually what most of my RTW coats have. Doesn’t look too dowdy does it?
1-fitting_5sL-31-fitting_5b-31-fitting_5sR-6

  • Back:
    • My lower left shoulder seem to be causing havoc here. There’s a fold at my left underarm. The CB is swinging to the right. I’m wondering if that’s also partly caused by the lower left shoulder: The fabric is rather stiff, so may be swinging to the right rather than forming more folds the left side.
    • There’s also a little bit of drag lines at the right underarm. I think that might be me being naughty & not doing the 2nd part of Sloping Shoulder Adjustment – ie lower the armscye at the underarm as well. The unslashed seam allowance here exacerbate the problem I think, with the arm joint pushing the fabric downward forming those drag lines.

Fabric Fitting Tweaks:

1-fitting_5sL-61-fitting_5b-6

  • Lower left shoulder:
    I’m taking the easy way out & doubling the shoulder pad height (from 1/8″ to 1/4″). That fold under the left arm is now gone & the CB now seem a bit straighter.
  • Underarm drag lines:
    I’ve slashed the underarm seam allowance 1/4″ deep on both sides. The drag lines now seem to be reduced. I’m debating whether to lower the armscye or not. Once sewn, the SA will be trimmed a further 1/8″ anyway. So maybe no change is necessary? I don’t want the underarm to be too low as it might make the sleeve seem fatter.
  • CB still swinging to the right:
    Maybe I have a slightly bigger right hip? Maybe pinning & not pressing make stiff fabric like this misbehave? I think I’ll sew up as is first and check again. If the problem is still there I might let out a little bit at the right  back princess seam.

Decisions decisions decisions!

Fitting headache sort of over, time for headache of a different kind.

I’m a bit unsure about this fabric from the 2 decade old stash. It’s cotton twill of some sort (khaki chino?). Seemed like the right color and texture for a classic trench. But the beast is stiff with hardly any drape! More so than my RTW trench.

When you throw in interfacing on both the front & the front facing, it might just look like armor rather than chic trench inspiration I had in mind. And I have to use fusible interfacing. I tested sew-ins & I like the dimpled folds at the hem even less. Fusible at least gives me a smooth curved fold.

The contrast with the velvet hem might be too great. Both velvet are quite limp. And I won’t be able to stiffen these up with fusible interfacing. One’s silk and the other I think is rayon velvet.

trench-inspire-051-fitting_5

So dear readers. what would you do?

Does the main fabric look too stiff? Should I not waste the velvets on this one, make a short plain trench with this stiff chino & find a softer replacement for the version with the velvet border?

I’m already considering not interfacing the whole front facing. Maybe just the lapel area so it’ll look smooth. (Did I mention this fabric love to wrinkle too?) And the interfacing for the velvet I might double up – fusible on sew-in.

The other thing that I didn’t really think through is how to finish off the velvet part at the back vent and on the inside (front facing, hem). I could have used the main fabric on the inside. But it’s a bit too late now as I’ve already cut the fabric front facing the same length as the fabric front. Oops. Looking on the bright side at least the velvet will be nice to the touch against my knees!