Slim Pants/Trousers Block

I wish I could tell you that turning a 0-ease Pants Block into a Slim Pants Block is as simple as adding ease to the side seams & inseams. It was not. At least not for me. I did eventually get a block that I’m OK with. But it took many many muslins & I’ve lost count of the tweaks.

So no tutorial. Just some mug shots demonstrating the effect of key alterations I tried. You be the judge of what you would be happy with if you try to do the same. Keep in mind that variable natural lighting may have affected how the muslin looked in the mug shots. And of course the same alterations may have different effect on different body shapes. Hopefully you will get to your happy point more quickly than I did.

Since this is a long & tedious road, let’s start with the destination – then you can skip the journey if details send you to zzzz…..

Slim Pants Block (for non-stretch wovens)

the road from 0-ease Pants Block

Apology for not giving step-by-step rationale for why I tried certain tweaks. The road was too windy & the journey too long ago. Plus I’ve threw away the WIP patterns in a fit of tidying up. In general, I was trying to get rid of wrinkles and add enough wearing ease. I’ve listed all the steps I noted down. The one crossed out were tweaks abandoned, mostly because they didn’t seem to make any difference.

the prep before the journey

Comparing old RTWs & pants made so far…

  • Best fit seems to be the high street wide leg pants in drapy wool crepe. Torso & crotch was still quite fitted, but the legs were loose. There was hardly any puddling. Interestingly the back crotch fork area is stretched. Not sure if this was stretched during wears or if it was part of the design.
  • The designer fitted pants in stretch wool doesn’t fit so well. I got the usual draglines in the crotch & thigh area front & back. Even with stretch fabric, the thigh is still larger than my wearable muslins. But the drapy fabric helps make the legs look slimmer. BTW pardon my hot cross bum. Gotta sort out new undies now my behind has gotten more droopy & squishy }:-)
  • Both RTW pants have shorter crotch height, crotch length, shallower back crotch curve (not so scooped) than my wrap. Yet they still feel comfortable enough. Actually they’re closer to my crotch height measurement. For some reason the wrap derived 0-ease pants block ended up about 1″ longer in crotch height than by measurement.
  • My previous Burda 2015-11-107 fits better than the designer pants, but this was achieved through over-tight waist-to-hip + back princess shaping. Even then slight wrinkling in back thigh, not to mention weird pooling at front crotch – thigh inseam.

Research trouser fitting on Cutter & Tailor…

Granted, most discussion are about men’s trousers. But some of the basic fitting principles probably still apply. These influenced my decision to shift the knee match-points in most of my muslins & subsequent makes based on this Block. In my wrap, the front knee level is lower than the back knee level. I don’t actually manage to match the wrap knee levels precisely, I just try to reduce the difference as much as possible with iron work stretching-shrinking the side seam & inseam lines.

Pattern 1

Don’t ask. This was a stillborn. Didn’t even made it into muslining.

Pattern 2


0) 0-ease Pants Block
1) Add ease at side seam (1/2″ total at waist, widened to 1-1/2″ total at hip)
2) Add ease at darts / princess line instead, with bigger darts (same amounts)
3) Lowered crotch 1/4″
4a) Back hip tilt – pivot at side seam at hip level 1/2″
4b) Curvier & lower back crotch (dotted line)
5a) Back hip tilt – pivot at side seam at bum crease level 1/2″
5b) Add crotch inseam ease 1/8″
6a) Back hip tilt – pivot at side seam at bum crease level 1″
6b) Curvier & higher back crotch + Add leg ease at inseam (1/4″ with extra from thigh up)
6c) Right leg no shifting of match point / ironwork
7a) Straighten legs + Add more ease at inseam from knee up + Curvier Back crotch
7b) Right front add 1/2″ more ease above mid thigh with deeper dart


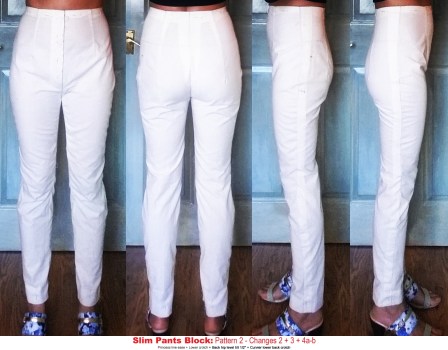


Pattern 3


8a) Add more ease at inseams (1/4″ – 1/ 2″) + Split darts into 2 per quarter + Increase Back dart width (1/4″ & shift side seam above hip to compensate) + Add more Front waist ease (1/8″ at side seam & decrease inner dart width by 1/8″)
8b) Right side raise waist 1/2″ at side seam
9a) Tried fitting book prominent calf adjustment (effectively deeper back crotch curve + lowered CB waist). No improvement.
9b) Legs straightened even more + Right side pivot at crotch at high hip level to increase side seam length
9c) Testing lengths & high-low waistline
9d) Final lengths for Wearable Muslin 1

⇒ Wearable Muslin 1

Gingham Capri with belt loop – Design Changes:

  • Lower F waist (1″ difference between CF & CB)
  • Contoured waistband 1-1/4″
  • Capri length
  • Fly front
  • Slant-front pockets
  • Belt loops

Assessment after days’ wear:

  • bum-thigh become saggy, waist seem to tilt front up & back down
  • knees baggy & twisted in front & excess pool in back just above knee – excess fabric from drooped back + angle of thigh vs calf too great & stacking of my upper over lower legs too wonky for slim but not skin tight fit to drape smoothly


Pattern 4


10a) More Back Hip Tilt pivoting at side seam bum crease additional 5/8″ (1-5/8″ total) + deeper curve (CB back to curved)
10b) Straighter CB above hipline
10c) Right raise waist 1/4″ at side seam
10d) Shift back thigh ease to inseam, increasing crotch length slightly + more ease from knee down, redistributed between F/B so both F/B knee down are straigher

⇒ Wearable Muslin 2

Gingham Capri without belt loop – Design Changes:

  • Lower F waist (1″ difference between CF & CB)
  • Contoured waistband 1-1/4″
  • Capri length
  • Fly front
  • Slant-front pockets

Assessment after days’ wear:

  • back crotch curve scoop seems too low


Pattern 5

11) Shallower back crotch curve + Less ease at thigh inseam

⇒ Wearable Muslin 3

Brown High-waisted Capri – Design Changes:

  • Lower waist equal 1/2”
  • Contoured waistband 2″
  • Capri length
  • Side invisible zip
  • Side-seam pockets

⇒ Wearable Muslin 4

Brown Mid-rise with Hem Zips – Design Changes:

  • Lower waist equal 3”
  • Contoured waistband 1-1/4″
  • Extended length
  • Fly front
  • Slant-front pockets
  • Hem zippers

Assessment after days’ wear:

  • Weird pooling at front crotch
  • Waist still seem to tilt front up & back down.
    In high-waist version, this caused waist to stick out in the back
    In low-waist version, this caused more bagginess in bum-thigh area
    This problem made these 2 rather uncomfortable to wear.
    Possible causes…
  • waist to high hip ease + contoured waistline (low front high back) that enlarged waist further = waistline sits lower than intended
  • waist ease + full tummy + flat lower back = waistline level even out front-back or even tilt towards skinnier parts – higher in front & lower in back, resulting in back crotch not sitting as intended, drooping causing excess length further down


More hypothesis to test…

  • Not adding ease at waist-to-high-hip OR assume ease means pants will hang lower on waist evenly, so shorten evenly above hip
  • Try 0 ease back + front with pleat – ie all ease on front ???
  • Don’t do high-low waist unless waist-to-high-hip is skin tight & relies on fabric give for ease in this area.
  • Wider legs especially back thigh to calf so fabric doesn’t have to bend to conform to leg shape & ending up with fabric puddle instead above the knee & front twist at the knee – wide enough cone to skim over all curves
  • Reduce back crotch scooping, stretch back crotch fork if possible, raise crotch level a little

Pattern 6


12a) Reduce Back Hip Tilt at crease level by 3/8″ (1-1/4″ total)
+ Add Front Hip Tilt at hip level 1/4″
+ Shallower Back crotch curve
+ Reduce Back inseam thigh ease
12b) Front Hip Tilt at hip level 3/8″ more (5/8″ total)
+ Remove Back ease above high hip
12 c) Testing flared legs
12 d) Testing high-low waist & different rise…settled on:
CB 3/4″ higher than CF
mid-rise = 1″ — 1-1/2″ — 1-3/4″ lower than high-rise (waist)
low-rise = 1″ lower than mid-rise
ditch the extra-low-rise (1″ lower than low-rise)
+ Reduce Front ease above hip to 1/2″ at waist when lowering waist


Pattern 7 (final)

I thought I was done after Patter 6. Unfortunately shortly after I grew my donut waist. So a bit more adjustment was called for.

13) Shift crotch inseam 1/4″ to Back tapering to nothing at mid-thigh
+ shave 1/8″ off thigh side seam
+ increase Front flare 1/8″ below knee at inseam & side seam
+ straighten CF crotch adding 1/4″ ease at Front hip
+ straighten CB crotch adding 1/8″ ease at waist & deeper curve

Assessment after days’ wear:

  • Although there’s still slight bagging under the bum, I’m calling it done.
  • At least front crotch now looks normal.
  • It’s not as slim as I would have like, but can’t be helped if I want to be able to sit down.

Finishing up

  • Traced these onto card paper.
  • Broken the Front & Back pieces into components so I can mix & match style – eg different rises, dart options, leg styles below knee. This also make the Block easier to store in a small place. I don’t have the luxury of a rack of hanging full Block/Pattern pieces.
  • No seam allowance so that I can trace the combination I want to create fashion patterns.

Unfortunately I made a mistake when tracing. Instead of the high-low waistline of Wearable Muslin 5, I traced even level waistlines. No wonder the two pants/trousers I made using this Block came out less comfy than WM5. I only discover this as I prepared the illustrations for this post. Oops. Thankfully with the component approach I only need to redo the above hipline components.
Choli Blouse Block Odyssey part 3

Firstly, thank you for your kind comments & understanding in response to my post about dialing down my self-imposed blogging perfectionism.

… now continuing from part 2 of my choli block quest months later …


Hypothesis Half-Popped

It started with such good intention…but I didn’t have the stamina – nor time – to test my hypothesis thoroughly. To recap, I thought that to secure low open neckline & increase sleeve mobility, I simply have to:

  • not have back neckline edge on shoulder blade peak; and
  • make the shoulder slope more square than my actual shoulder slope.

I was going to test this out in two ways…

1. Authentic choli pattern instruction found online

I used the Sari Blouse pattern instruction from Vani’s Blog. The pattern came out looking a bit large – especially the back (dotted line in the pattern photo above is my KK Top Block with wearing ease already added). This made me nervous about testing it out with one of my pre-embroidered Nakkashi choli fabrics. As I was in a rush to get one of my Nakkashi outfits sewn up for a trip, I didn’t bother making a muslin of this. Checking instructions on a few other blogs, this instruction seems fairly standard. Maybe this is the everyday fit rather than the Bollywood glam fit. And given that the instruction doesn’t call for a low open back, maybe it won’t work so well when you lower the back.

There is one YouTube video I found in English that offers a theory of what changes you need to make to lower the neckline. The narrower shoulder lines you see above is my attempt to apply that theory. But I was still too chicken to test on my pre-embroidered fabric.


2. Body warp with tilt-to-square shoulder alteration

I ended up retreating to my comfort zone of tinkering with my own moulage. This time I did use the body warp instead of the Kenneth King Moulage I drafted a while ago. I was hoping the more precise body wrap would yield a better fit. Well, more isn’t always better. It was a nightmare trying to figure out what to do with my lopsidedness. You can see in first two photos above how my left & right sides differ. I wouldn’t have minded the extra work if the result was better. It wasn’t. Once you add ease back in, much of the minor lopsidedness wasn’t visible anyway. I guess if your lopsidedness was more extreme, then the precision may help. So the conclusion? Either Moulage Drafting or Body Wrap will work. Pick whichever method is easier for you: Moulage Drafting requires lots of measurements & calculations, Body Wrapping may be uncomfortable while you’re being wrapped & you’ll need to decide how much lopsidedness you’ll bother to incorporate into your Blocks. If you go with Body Wrap, you’re probably fine to gloss over minor differences between your left & right sides if you’ll mostly make stuff with wearing ease. Don’t drive yourself crazy like I did!

Now back to my choli pattern & drafting for arms up position, you can see in photos 3 & 4 how I tilted the shoulder seam by adding a wedge radiating from the princess seam / back waist dart to the side seams. This lengthen the side seams, make the shoulder more square and the neckline more U-shaped. The difference in side seam & shoulder seam lengths with arms up vs arms down was about 1.5″ for me. I ended up adding at the side seam about half that difference – because it seems like a sensible compromise & also it makes the necklines conform better to the pre-embroidered necklines. I positioned the pivot points of the tilt / wedge at the base of the necklines where they start angling up because I think this is where the tension will be and body movement will make the neck opening spread out, causing the sleeves to fall off the shoulder.

The last two photos are the final bodice patterns. The sleeve pattern was drafted to Sari Blouse instruction found on Style2Designer blog.

So how did it turn out?

Hurrah I can raise my arms. Boohoo no luck on stay-put low / open neckline. I ended up having to add the dori back ties to prevent wardrobe malfunction.

So what went wrong?

I now think stay-put low / open neckline is impossible once you add wearing ease to the bodice. What I noticed is that when I move, the ease at the waistline allow the whole bodice & neckline to shift up, and this make the neckline too big for the new higher position. So the sleeves fall off the shoulder.

I checked the House of Blouse top with the stay-put neckline again, and indeed the bodice was quite tight. Too tight for my new spreading middle in fact! As soon as I let out the side seams, et voilà – same off the shoulder problem as my own make!

So there you have it (I think, for now anyway), if you want open neckline to stay on the shoulders, go with stretch Choli Blouse with 0 or even negative ease. If you insist on lovely pre-embroidered woven choli fabric with low open necklines, then stop being stubborn & keep that dori back neck-tie. That’s me told off then! 🙂

Choli Blouse Block Odyssey part 2

continuing from part 1 back in July 2017…


Going Native-ish

I began to wonder if my requirements are even possible. But surely billions of women from the Indian subcontinent over the centuries wouldn’t have put up with immobile sleeves that keep falling off the shoulder & bodice that offers no bust support! Time to go back to the sources & try to discern the underlying principles even if the surface instructions make little sense to me.

  • Looking at RTW & designer choli photos, some seem to show a bit of looseness / excess fabric near the underarm area.
  • Most of the Indian drafting instruction I found online has shoulder slope of 1/2″ to 1″ at most. According to Fit For Real People standard western patterns (Big 4 presumably) assume a slope of 1-5/8″ – 2″. And the Indian illustrations seem to indicate a more T-shape finished garment shape than sloping sleeves.
  • I decided to try a couple of  custom-made choli blouses from House of Blouse to see how an “authentic” fit may look like on me. Because it’s made to measure, you can actually pick & mix your design details. I pushed the envelope and went for very low back neckline with no dori back ties. One big caveat before we talk about fit: the measurements instruction was rather imprecise, so that may have affected the fit…

House of Blouse Choli 1

Regular length princess cut with Wide U Neck front & Classic U Neck back (no dori ties), back opening, bust pads, & elbow length sleeves.

  • Bust:
    • I was surprised that the bust pads actually created a more lifted look. I’m now tempted to try this in my own makes now.
    • Interestingly even with the princess seam, they added a centre front fisheye bust dart. It creates a nice shaping & probably holds the bust pads in place for better bust support.
  • Neckline:
    • Yeah! It stays on despite the wide open back, even when I tug at the sleeves.
  • Sleeve:
    • Cross-front feels a bit too narrow while cross-back a bit too wide. Can feel the back armscyes cutting into the arm joints. This may be a problem with incorrect measurement or my posture / posterior arm joint “feature”.
    • Total mobility. No problem with arms forward or up.
    • You can definite see the fold of excess fabric underarm & armholes feel quite high up against the armpits. In the soft fabrics that I choose this probably won’t be a problem. But I wonder if this would feel a bit uncomfortable in more heavily embroidered fabric like my Muslin 2 above.

House of Blouse Choli 2

Regular length 3-dart cut with Armband Sweetheart Neck front & Armband Sweetheart Neck back (no dori ties), front opening, bust pads, & 3/4 length sleeves.

  • Bust & sleeve: same as above
  • Neckline:
    • Problem here. It easily slips off the shoulders
    • I would assume they drafted this with the same measurements.
    • Not sure if they derive additional styles from a block like western pattern maker or each design is drafted from scratch using a different formula.
    • Not sure if the problem here is the Sweetheart neckline or the Armband design.
    • This problem + the excess fabric foldat underarm for sleeve mobility rather defeat the armband design.
    • As there’s not much excess seam allowance in shoulder & armscye seams the only fx I can do is to add dori ties to the back neckline to keep the sleeves on.


My current hypothesis

  • To secure low open neckline + increase sleeve mobility:
    • Don’t have back neckline on shoulder blade peak.
    • Pattern’s shoulder slope need to be more square than actual slope of the body. A bit of fold under arm is the price to pay for sleeve mobility without excess width. Try pivoting on princess line to shorten neckline & lengthen side seam at the same time. Draft for arms up (shorter shoulder length, longer side length).
  • To test this hypothesis I plan on trying 2 more pattern drafting approaches:
    1. Custom draft based on authentic choli pattern instruction found online
    2. Custom draft base on my moulage with the above shoulder slope modification

Flattened plastic wrap bodice front

Speaking of moulage… This time I will be basing my pattern on flattened plastic wrap. I’m not sure if my K. King moulage is 100% accurate as it’s drafted to a formula. Even though the muslin fitted like a second skin maybe it glosses over subtle concave areas like a slight hollow chest. This becomes more of a problem when you lower necklines or move the garment edges into these gentle valleys, thus exposing gaps. I’m hoping the plastic wrap would be more accurate. I have flattened & traced it, but haven’t rationalised the block yet. So you’ll have to wait a while for part 3!


Choli Blouse Block Odyssey part 1

Back in July 2017 before I gave in to the middle age slump…


With so many beautiful choli blouse fabric in the Stash I really need to get some pattern block for choli blouse sorted. And I have in fact been working on it for ages. So much so that I now have way too many pattern pieces, muslins (wearable & not), & mug shots to confuse me never mind you…argh! Long story short, no cigar yet. But I have a hypothesis with 2 more pattern drafting approaches to test. On to the nitty gritty…


My 3 requirements for Choli Block:

  1. Bust support lift & shaping: Depending on the back neckline design, I may not be able to wear a regular bra with my choli. So built-in bust shaping / support would be nice. But it needs to work for woven fabric & not constrict breathing.
  2. Stay-put neckline: Allow low / open front & back neckline without the top falling off the shoulders
  3. Fitted sleeve mobility: Allow arms up & forward without excessive sleeve width & winged effect on short sleeves


Experiments based on
K. King moulage > top block

Since I already had a top block that seems to fit alright I thought I’d get better results using that as the basis for my draft rather than follow the relatively less personalised authentic Indian instructions. (Typical Westerner!)

Well, it didn’t work out so well.

Wearable Muslin 1 >
Gajiwara 7384 Wannabe Choli with home embroidery

  • I tried to raise my ageing bustline unsuccessfully. It was only like 1/2″ higher on my pattern. But I think my custom embroidery shrunk the pieces despite being stretch taut on a frame frame. And because I was worried about metallic embroidery thread being scratchy I didn’t extend the embroidery far enough into the seam allowance to allow me to let out at the shoulder seams. I ended up with some draglines in the upper bust area for my big day. (Did let out what I could afterwards. But there wasn’t much seam allowance to fix it entirely.)
  • Lowered neckline (aka unintentional off-the-shoulder look) wasn’t an issue in this version as I used the cross-back ties that one finds in many authentic Indian choli.
  • But limited sleeve mobility was an issue despite a moderately shallow cap. The bit that feels most restrictive was mid arm joint height, as if the cap area wasn’t wide enough.

Wearable Muslin 2 >
Nakkashi 5036 gold embroidered Choli

  • I had to tweak my personalised pattern to fit the ready-made embroidery, which is presumably shaped to work with standard Indian pattern-drafting. Eg the allowance for back waist dart is smaller than my back waist dart, so some of mine had to be pivoted to the back cut-out area. In other areas I had to twist the fabric slightly to fit my pattern, or even patch a bald area with embroidered scraps.
  • Bust & neckline not an issue here as I didn’t attempt to lift the bust & this design has a back cut-out rather than lowered neckline.
  • Sleeve mobility wasn’t too bad, but comfort was my main issue here. I made the cap even more shallow & wider to increase mobility & tapered the sleeve width more sharply to minimise the winged look. The result was the heavily embroidered underarm areas getting too close for comfort. I felt like I was holding something with my armpits! Again had to suffer through it for a friend’s wedding, but redid the sleeve increasing the cap height (by shortening the sleeve seam length) & removed as much embroidery from the area as I could. Wearable. But now the sleeve’s more restrictive. So I wouldn’t reach for it naturally.

After armscye alteration…


More muslins & research…

  • Stay-put lowered neckline:
    • Tried the instruction for lowered F&B neckline from K King’s Moulage book. It was a method devised by his Indian teacher. Didn’t work for me. Actually made the shoulders slip off even more easily. Maybe I didn’t follow the instruction correctly?
    • My patterns had the back neckline at shoulder blade width, but the muslin necklines all spread out more widely. Perhaps it was too much to ask the neckline to stay put at the shoulder blade peaks?
  • Sleeve mobility:
    • Tried cutting sleeve on the bias. Sleeve looked marginally less wrinkly, but made no noticeable difference to mobility nor decrease the winged look.
    • Tried on a me-made choli based on older bodice block for comparison & was surprised to find that it actually had better sleeve mobility without excess sleeve width & winged effect. I had thought the shoulder slope & sleeve cap fit was off on that version, causing excess fabric folds pointing to armpits & draglines from centres of neckline as if the sleeves were pulling the neckline outward. Comparing the latest sleeve draft to that choli (don’t have the pattern anymore) that earlier sleeve shape was actually closer to my immobile fitted sleeve – cap taller & narrower than my latest drafts…WTF!?!?!

Dartless Raglan Fitted Knit Top Block the end

Warning, more boring hair splitting / fit tweaking ahead. So let’s get the style shots out of the way first. Then you can tune out if you’re so incline!

Problems recapped

My complaints about my Dartless Raglan wearable muslin Test 1 were…

  1. position of the raglan seams looked off and unbalanced
  2. armholes felt a bit tight
  3. more sleeve drape at underarm than I would have liked

Tests 2 & 3

First, I started with my latest revised Dartless Fitted Knit Top Block and its re-drafted from scratch sleeves (turned into Camden Kids Wannabe top). I had hope the new sleeve draft would magically make my mis-matching bodice vs sleeve raglan seam lengths go away. No such luck. So the question is how to increase the bodice raglan seam length and/or reduce the sleeve raglan seam length. The problem is partly caused by the sleeve cap height.

  • In Test 1 I reduced the sleeve cap height by allowing it to overlap the bodice armscye.
  • For Test 2, I tried simply extending the bodice raglan seams at the side seams. But this caused unsightly bagginess on the bodice under the armpits.
  • So for Test 3 I tried lengthening the bodice raglan seam by lowering the underarm 1/2 the overlap amount from Test 1, and shortening the sleeve raglan seam by raising the bicep the remaining 1/2 of the Test 1 overlap amount. This has the added benefit moving the position of the raglan seams so that it’s more diagonal and to my taste.

Test 3 Mug Shots

The Verdicts

Problem 1 (weird raglan seam positioning) I think I solved.

Problem 2 (tight armholes) is marginally better. I think my base block is probably just such close-fitting pattern that any derivatives will have the same claustrophobic armholes unless I lower the bodice underarm further and increase bicep width. My uneven shoulders also don’t help – I haven’t made any adjustment for this in these muslins…because I was lazy and hoped the stretch alone would be enough. Again, lowering UA would probably help if it continues to bother me.

Problem 3 (too much sleeve drapes at underarm) I tried to solve, but I don’t think it’s any better. Re-reading Stretch Pattern School’s instruction again, I think the problem is the fact that I removed the negative ease which keep the sleeve and bodice under balanced tension to prevent tension draglines. Once the negative ease was removed, the shallow cap / arms up horizontally sleeve draft inevitably shows the natural excess of fabric that bulk up under the arms when the arms are down.

Now this last observation about the effect of holding the garment under balanced tension is fascinating and mind boggling. I still don’t completely grasp the principles. But I have definitely seen in my recent test how frequently the muslins with more ease actually look worse (more draglines and seemingly random bagginess) than the tighter fitting muslins. Even breathing in vs out affects draglines from waist side seam to bust point. With breathe in (ie rib cage expanded & garment under more tension) the draglines disappear, but with breathe out (ie rib cage contracted & garment hangs looser) the draglines appear.

And as I mentioned before, the fiber content also seem to affect this, with rayon / cotton more accommodating and molding to the body, but then staying stretched and baggy under it’s steamed out. That’s even with decent amount of lycra content. The polyester-lycra I tried on the other hand recovers easily, but also shows the tension draglines more easily.

Mind twisting isn’t it? Hopefully with more experience I will eventually grasp the tension concept and know how to adjust patterns to create the fit I want for each garment and fabric. But for now I think that’s enough fitting tweaks for a while, don’t you?