TNT Trench Odyssey: Part 2d Tissue Fitting #3

So it turns out I was crazy enough to try both types of FBAs, though only in tissues. There is a limit to my patience however, so I won’t be repeating the same in muslin or fashion fabric. And I also ran out of patience to do only 1-2 change at a time. So this second round covers multiple changes.

Second alterations:

  1. Forward Head Adjustment  Fitting & Pattern Alteration style:
    Added 1/2″ to back shoulder at neck edge. Shifted the whole front neckline down 1/2″, so removed 1/2″ from front shoulder at neck edge & lowered CF neckline 1/2″. This is to take care of both the Shoulder seam that’s too far back at the neck edge and the neckline at CF that’s too high for a jacket.
  2. Wide Shoulder Adjustment:
    Added just over 1/4″ to shoulder, blending to original armscye at end of gather points.
  3. Full Bust Adjustment + Low Bust Adjustment  + Short-Waist Adjustment:
    A) Dart-based FBA on Front Copy 1:
    Added 7/8″ in width to front panel at bust level.
    B) Princess FBA on Front Copy 2:
    Added 7/8″ in width to side front panel at bust level.
    In both instances, I didn’t follow Jackets For Real People‘s instruction exactly. The waist already is already 8″ bigger than my waist. I didn’t want to add another couple inches. So instead of keeping the spread below bust point the same all the way down, I angled it back to original width at waist level.
    Also, instead of adding extra 1/2″ length that result from the FBAs to the front panel, I removed 1/2″ length from the side front, side back, & back panels instead. This is to take care of some of my Short-Waist Adjustment at the same time.
    For the Princess FBA I also didn’t bother lowering the bust fullness first. I wanted the princess seam line to be closer to the bust point. By simply drawing in my bust level (about 1″ lower) it brings the princess seam 1/8″ closer to my bust point. The side front panel doesn’t have a pronounced bust curve anyway. I measured both bust levels and they’re exactly the same width on the side front panel. So lower the bust fullness seemed unnecessary. But to be clear, the point where I pivot the vertical cutline toward the armhole is on my lowered bust line.
  4. Sway Back Adjustment:
    Removed an additional 1/2″ length from CB, tapering to nothing at side seam.

Once I finished all the alterations I’ll photograph & annotate the final pattern so you can see what these alterations look like on the flat patterns.
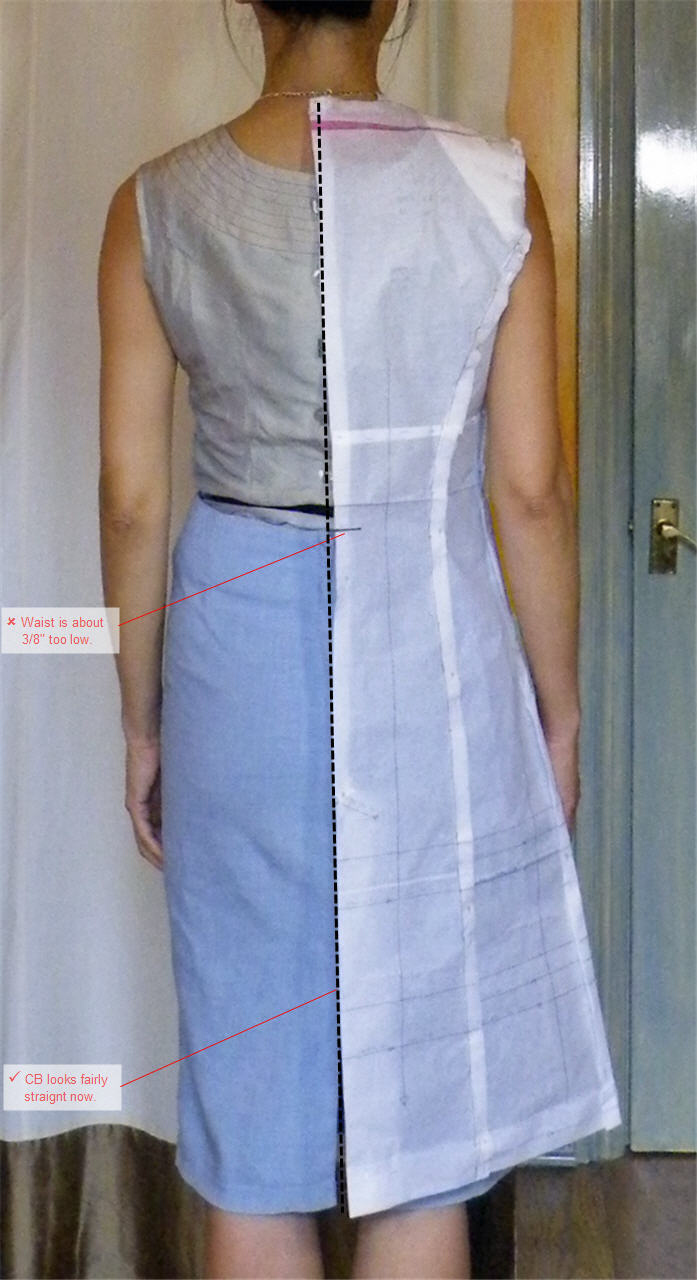
Tissue Fitting #3:

1-fitting_4b2-21-fitting_4f-11-fitting_4s-21-fitting_4s-31-fitting_4ah1-fitting_4f-31-fitting_4f-4

Fixed:

  • Shoulder seam now looks more balanced:  Armscye side aligns with the middle of my arm joint. Neck side aligns with the back of my ear (like mentioned on p163 of Fit For Real People under “Head Sits Forward on Body” heading!).
  • Neckline at CF now gives me a bit of breathing space!
  • Shoulder now wide enough to reach my shoulder joint. Could probably be even wider for a jacket. But I don’t like the big shoulder look since my shoulder is already a bit wide compared to rest of my body.
  • CF at bust level now reach my CF.
  • CB no longer swings to the side & side seam no longer swings to the front. Waist level and hem both seem to be at the same level at CF & CB.

Adjustments still needed:

  • Waistline now seem about 3/8″ too low all around. Not sure if it’s worth adjusting. Kenneth King’s Moulage CD book‘s instruction for jacket sloper shifts the waistline down by 1/2″ & out to the side by 1/2″. So maybe this 3/8″ lower waist is fine for a trench?
  • Front armhole seems a bit too bigger now. On the other hand, my arm joints seem to have quite a wide range of motion. Garments I made before that have reasonable looking armhole end up feeling too tight / restrictive in the front when I reach forward & in the back when my arms are by my sides. Maybe I’ll try on the sleeve pattern before deciding what to do. My arms are also on the thin side. If I leave the armhole this wide, I might end up with sleeves that are too wide too.
  • CF seems to swing out to the side. But I’m not sure if that’s normal & caused by the cleavage (valley between the Girls!). Many of the After photos in FFRP & JFRP have the same swing to the side on the front tissue pattern, but the final garment shots look fine.
  • Still need to check if hip at the right level. The hip is already 6″ bigger than mine, so I think I might not need to do any width adjustments.
  • Still need to check if pocket holes are at a comfortable height. I’ve already decided long ago to replace the pocket pattern with my own. Many reviewers on Pattern Reviews complained about the pockets being too small. My RTW version was also too small. I wonder if it’s something to do with the front buttons & the positioning on the princess seam rather than side seam.

Now the winner of the FBA contest is…

As you can see from the photos above, they’re six of one half-a-dozen of the other. They both look about the same.

design-comparison-2design-comparison-11-fitting_4f-2

The dart-based FBA maybe has slightly better shaping at the bust. But that’s only because the princess seam on this pattern doesn’t run through the bust point. I could maybe shift the princess seam a bit towards the front / bust point to improve the shaping in the princess FBA version.

The dart one seems to give a slimmer looking waist by comparison to the wider looking bust & the sharper angle of the princess seam above the waist. But the princess one creates a stronger vertical line, which could be slimming & make one look slightly taller. So I guess it’s down to what visual effect you’d want.

Me, I decided to take Mezzo Couture‘s suggestion and go with the princess FBA version this time. I already got a darted version in Vogue Patterns 1233 dress which I can convert into a trench. But I will cut a wider seam allowance in the side front panel. This will allow me the option to move the princess seam closer to the bust point during the fashion fabric fitting stage and see which I prefer.

TNT Trench Odyssey: Part 2c Tissue Fitting #2

And you thought ‘tomorrow’ would never come! Lesson of the day: Don’t promise what you can’t keep! Now without further ado…

First alterations:

I thought I better not attempt too much at a time. I’m not familiar enough with fitting to know how one change might affect the fit in other areas. So I’m trying to work through the order recommended – though I vaguely remember some inconsistencies in different sections of the FFRP book.  I read somewhere else that tops hang from the shoulder, so fitting needs to start with shoulder, neck & upper back. That’s what I’ve done first.

  1. Rounded Upper Back adjustment:
    Added 3/8″ at CB 1″ below neckline, tapering to nothing at armscye.
  2. Sloping & Forward Shoulder adjustments:
    Remove 1/2″ from front
    (B = -1/4″ SS + 1/4″ FS = 0, F = -1/4″ SS + -1/4″ FS = -1/2″)

Tissue Fitting #2:

1-fitting_3b-11-fitting_3f-21-fitting_3s-21-fitting_3s-3

Fixed:

  • CB neck now reaches the base of my neck.
  • Shoulder seam at armscye side now aligns with the middle of my arm joint.

Adjustments still needed:

  1. Shoulder seam at neck side still seems too far to the back => Forward Shoulder type adjustment on the neck edge?
  2. Neckline at CF is right at the base of my neck. For a jacket that I might want to button-up (by adding extra button & button-hole to the lapel edge like in my RTW version) this might make the front neckline feel a bit too tight / high. Might just lower the whole front along neckline & CF.
  3. Shoulder is slightly too narrow => Wide Shoulder Adjustment.
  4. CF at bust level still doesn’t meet my CF => Full Bust Adjustment.
  5. CB swing slightly below mid-back & side seam swings to the front => Sway Back Adjustment.
  6. CB waist is 3/4″ too low & CF waist about 1/4″ too high, assuming FFRP is right that standard waist seam should be at the bottom of your waist elastic (belt in my case). Hem is also higher in the front than back. Part of this may be due to sway back issue. But it may also be due to the FBA needed? I know I am slightly short-waisted, but I think I will do the FBA first before deciding how much to shorten the bodice by and where.

Now the FBA. I’m a bit confused about which type of FBA to do.

Jackets For Real People illustrates two types of FBA in Chapter 8: A dart-based FBA and a princess FBA. The dart-based FBA is done on a jacket with a side front panel and there’s a note on p42 saying “this is not a princess style. The front has a side panel and is altered like any darted front.”

How do you tell if a jacket is a “side panel” jacket rather than a princess line jacket? The bust apex on M5525 size 8 is like 1-1/4″ to the front (rather than on the princess line) and the side front panel isn’t very curved at the bust level. So is this a true princess seam or is this a “side panel” scenario? So my options are…

Option 1: Do a dart-based FBA on the front panel. This will end up with a small dart on the front panel only. The result would look a bit like Vogue Patterns 1233 – a dress that looks a little bit like a trench which I bought as a back up pattern for trenches.

1-fitting_3f-31-fitting_3fba-1

Option 2: Do a princess FBA on the side front panel. I’m worried that there’ll be a bit of bagginess on either sides of my girls due to the deeper bust shaping that’s 1-1/4″ to the sides of my girls.

1-fitting_3f-51-fitting_3fba-2

Which FBA would you do? And am I mad enough to try both?

TNT Trench Odyssey: Part 2b Tissue Fitting #1

OK, let’s get serious now. Let’s talk about fitting. And let’s get one thing straight: I hate making Muslin muslins. You know, the type that goes to the landfill afterward. I know it’s sometimes unavoidable. But what’s left of my green conscious won’t allow it for every single garment.

So I’m giving Palmer / Pletsch’s Fit For Real People tissue fitting + fit as you sew technique a proper go. If I can make it work – learn to read the tissues, learn to mentally prepare for fabrics behaving differently – then at least I’ll end up with wearable muslins.

A word of warning before I get started. This is like the 2nd time I’ve tried this technique. So I’m no expert. I’m just sharing my experience so we can learn together. And if you’re already expert at this, please share your wisdom!

Tissue Fitting #1: unaltered bodice

As instructed I pinned the tissue pieces together without any alteration and check the back width first.

I’m using size 8, which is officially two sizes too small for my current measurement. But I was once size 8, and I’m working with the hypothesis that I’d get better results using this with FBA & other girth adjustments where needed.
1-fittine_1b-3

  • Size 8 back seems wide enough.
  • CB seems surprisingly straight. I normally get bunching at lower back / waist, so I was expecting CB to be too long so swinging to the side at the bottom. There is a slight swinging, but not as much as I’d expect.
  • CB waist is too low though.
  • CB neck is also lower than base of my neck. But I’m not sure if I should alter this. How do you tell if the neckline is meant to be lower? Some McCall / Vogue patterns indicate lowered back neckline on the back pattern. This one doesn’t. But at least a couple of pattern-making books I have mention lowering the back neckline slightly for jackets & coats.

1-fitting_1f-2
As the back width is wide enough, I’m OK to check the front width.

  • Finished bust is suppose to be 36″, which would already give me a 2″ ease. But CF at bust doesn’t come to my CF without pulling & creating drag lines. I measure about 1″ difference. Also, as this will be worn over other clothing, I reckon I’d need more bust ease anyway. This trench is suppose to be semi-fitted, which supposedly should have 3-5″ ease. I’ll aim for 4″ & maybe sew a wider SA if it seems too loose at fabric fitting stage.
  • 1-fitting_1s-2Armhole seems a little bit big at the shoulder seam & also to far to the back. From previous sloper fitting attempts I know I have slopping shoulders & forward shoulder (too much computer work). So definitely need adjustments here. Rest of the armhole looks OK to me considering that this is a jacket – ie need bigger armhole to fit over other garments.
  • From the side you can see the bust point is too high up and too much to the side.
  • Forgot to check if the side seam is straight. Oops.

First alterations I’m going to make:

  1. Rounded upper back adjustment
  2. Sloping & Forward Shoulder adjustments

Results tomorrow!

T-Shirt Block: Burda 2012-09-123 part 3

Muslin No. 2

muslin2-planThis time I chose a fabric more like the muted gold one that I’m going to use eventually: The Cerise 4 way Stretch Soft Touch Lycra Jersey from Tissu Fabrics. The key ingredient is of course spandex / lycra. This one is slightly more light weight and more drapy though. So not so great for very fitted top which would show any lumps and bumps that we acquire along the way. Unless you’re wearing Spanx of course. Anyway, not great look for ladies of certain age. But as this is a color that I’m not too sure about, I don’t mind using some up for making muslins.

As for the pattern…


The green lines are original size 34. The red lines are my adjustments.

I made a few more changes:

  • Taken 3/4″ off front shoulder seam in the hope it’ll pull the upper back up and keep those sway-back wrinkles at bay. Let’s hope this won’t choke me in the front neck instead!
  • Raised the underarm part of the arm scythe back up, and adjusted the arm scythe curves slightly.
  • Narrowed the sleeve by removing 1/2″ from both sides. Actually, I compared the pattern to my most recent measurements for wrist, elbow, bicep, and high arm width (front crease to back crease). That’s how I determined I can comfortably remove 1″ from the sleeve along the whole length.
  • Shortened the sleeve by 1″ and reduced the cap height by 1/2″. Adjusted the arm scythe curves by slide & pivot method, joining up my new width and height reference points.

Here’s how it sewed up – or hand-basted together…

OK I cheated again. The less wrinkly underarm side had additional adjustment:

  • Lowered the underarm part of the arm scythe back down 1/2″.

It was too dark to take photos last night after my first basting. And I was too impatient to wait overnight before attacking that underarm wrinkle. As a compromise I only changed one side so you can see the before & after picture in one go. BTW it’s more visible in real life. Light condition is still not great for photo-taking, so it might not be so visible in the photo.

Final pattern for Burda 2012-09-123

pattern-alt-2

Again, green is original size 34, red is my final pattern, orange is Muslin No. 2 take 1. The few final adjustments are:

  • Shortened the sleeve a further 1″. Measurement-wise Muslin No. 2 should be correct. But maybe because this Cerise fabric is light-weight, drapy 4-way stretch, it succumbed to gravity and grew lengthwise.
  • Redrew the shoulder piece seam line so that it’s more slanted. I’ve removed quite a bit from the front shoulder, so I was a bit worried that a short almost horizontal piece might emphasize my relatively broad shoulder.
  • Widened bust area by 1″ total and sleeves underarm area by 1/2″ to match, so that I’d look less like a slightly over-stuffed and lumpy sausage. I also widened hip by 1/2″ total on the final copy of the pattern, but forgot to update this working copy.

And my Fitted T-shirt Block

pattern-Tshirt-Block

Although the final Burda 2012-09-123 is almost basic as you can get, it nonetheless has one design feature left: The slightly widened and lowered neckline. I want my T-Shirt Block to be like a second skin, with the minimum ease necessary, so that I can base a variety of designs on it, including turtlenecks. So the final changes added are:

  • Lengthen shoulder seam towards the neck by 3/8″.
  • Lengthen CF upward towards the neck by 1/4″.

So there you are, T-Shirt Block done. And Dolce & Gabbana inspired Burda 2012-09-123 in muted gold ready to roll. Once Saffy the sewing machine comes home of course.

Now what do you think I should do with the Cerise Muslin No. 2? Unfortunately I only added 3/8″ for seam allowance, so I can’t make it much looser. One possibility I’m considering is cutting a new front and make it into Burda 2013-02-113

bs-2013-02-113_techbs-2013-02-113

The back hip might be slightly too narrow. But maybe the extra fabric in the front will loosen the fit and hide the bulges. Lengthwise the Muslin is long enough to reach my hip – I tucked it up in the photo to see how a high-hip length fitted T-shirt would look like.

If you have any other suggestion for this Muslin No. 2 please share! Muchas gracias 🙂

T-Shirt Block: Burda 2012-09-123 part 2

OK, let’s get down and dirty. First off…

Size Selection & Pattern Alteration

pattern-alt-0I used my TNT cowl T pattern McCall 6078 to compare the Burda sizes with. 34 came closest, though according to sizing chart I’d be between 36 & 38 by bust measurement. I think Fit for Real People mentioned Burda 34 is equivalent of Vogue size 8, which is what I’m now using as my go to size with FBA.

Overlaying size 34 Burda 2012-09-123 (translucent tracing paper) on my adjusted M6078 (opaque paper), I decided for the back pattern to follow the M6078 shoulder line and side seam, trace the neck and arm scythe seam lines but cut on the Burda pattern cut lines.

The front was harder to compare since M6078 is cowl neck. So bust up is probably wider than a standard T-shirt block would require. So the only change I made initially is to graded out to size 36 at the underarm to match M6078.

Muslin no. 1

OK, these aren’t the initial results. I forgot to take pictures. These are after I made some further tweaks:

  • Lower CB neck slightly.
  • 1/2″ sloping shoulder adjustment on front.
  • Truing the side seams by adjusting the front side seam curve to match back side seam curve – making sure that CF and CB are parallel (front pattern is now about 1/2″ wider).
  • Lowered underarm part of arm scythe by about 3/4″.

I thought I’d fit the bodice first.

All in all I thought it fitted relatively well. I think I’m giving up on the sway-back adjustment for knit. I just can’t seem to completely get rid of those wrinkles in the lower back.

Then sleeves on. And what’s this?

They weren’t kidding about sleeves stretching things out were they? And I thought I was being clever fitting the bodice first to avoid any problem there throwing off the sleeves. Maybe that theory would work better with woven.

Part of problem might have been the wrong choice of fabric. This mid to hefty weight 100% cotton interlock jersey from Tissu Fabrics / Tia Knight stretches and stay stretched…Until the next time you wash it maybe. Then it’ll probably shrink on you. It is however quite lovely to touch and to sew with. The color range is also fabulously vibrant. Bright enough to need sunglasses.

But I don’t know. It’s not really me. I just can’t think of what to do with a fabric like this with little drape, a bit of heft, yet not stable enough for a light jacket or something.

m6612-style1-1I had used up some of the Turquoise for an earlier T-shirt Block attempt based on McCall 6612. I don’t feel chic in the result. So it’s only worn at home as a slob out top. Hence I’m not feeling motivated to use up what’s left of the Turquoise. I’m not even motivated to finish this first muslin.

And I still haven’t touched the 3 meters of the Bright Orange! This might be the rare occasion when I give away the fabric, send it to a better parent who know how to cultivate it to get the best out of it.

BTW the colors in the shop photos aren’t quite accurate. Even my Turquoise photos here look different from real life. It’s a bit duller and less blue. But the Bright Orange is brighter and not so yellowish and warm. That’s the peril of internet shopping. But I did read somewhere that Tissu Fabrics do send out swatches. Trouble is I’ve just never been patient enough to wait for swatches through the post!

Anyway, the pattern is now further adjusted and ready for Muslin no. 2. Stayed tuned.