FFRP Odyssey: Bodice Part 3

So back to fitting. I started out with all intention to follow FFRP to the T. I ended up with a puddle of fudges. It started well. Sort of.

Here’s my no alteration try out of a size 10:

The back width seems OK at upper back – where the horizontal line is. There’s a bit of gap at the armhole – symptom of “slight rounded back” I presume.

Further down at shoulder-blade / lower armhole level it feels like the paper is cutting into my arm. There’s also excess paper / vertical wrinkles right by the armhole. So I’m assuming that I need to narrow the back there.

B-Cup Front


According to standard pattern instruction I would be a B-cup. So I try a B-cup front first. And as you can see, at the bust level, the pattern CF doesn’t reach my CF. At the chest level it does. So this size 10 pattern should be the right size. You can also see wrinkles radiating from bust to armhole with gap at the armhole – symptom of “fuller bust” supposedly.

D-Cup Front

Here I try a D-cup front, and the pattern CF now reach my CF.

Actually, I have a confession to make. When I first tried on the patterns, I tried B-, C-, and D-cup fronts. And none of them would reach my CF at bust level. My bust point was also lower than the bust points on the patterns.

So I reasoned that maybe the bust fullness was in the wrong place, and I wasn’t going to get the CF to reach until I shifted the bust dart down so that the fullness and bust point is at the right level for my aging bust. And that’s what I did.

But as you can see in this photo, when I tried again with an unaltered D-cup front, it now seems to reach CF OK. Which brings us to a couple of hurdles I encountered:

Hurdle 1: Fitting Order

Does fitting sometimes feel like that Whack-A-Mole game to you? You fix one bit and that throws off another previously OK bit, and so on and so forth. It does for me. So when fitting and pattern-making experts say that fitting order matters, I take notice.

But the problem is, what IS the correct order? Even P/P’s instruction varies from page to page, FFRP book vs McCall 2718 pattern.

  • FFRP p77-80:
    Back width > Bust cup size > Width around waist / middle > High round back > Waist length > Shoulder slope & position
  • FFRP p115:
    Back width > Waist length > Bust width > Waist length
  • M2718:
    1. Tissue:
      Bust cup size > Bust dart position > Very round back
    2. Gingham:
      Bodice length > Waist width > Neck size > Shoulder slope > Shoulder width > Back width > Slightly rounded back / Erect back > Sleeve cap height > Shoulder position

Then there’s Kathleen Fasanella‘s torso fitting analysis in her Entrepreneur’s Guide to Sewn product Manufacturing. She says you need to get the back neckline right first “because if your basic block doesn’t rest snugly in between [the first thoracic vertebrae – the first bone that doesn’t move with the neck] and the seventh vertebrae above it, you will always have fitting problems.” She says most back neckline is too deep and too wide. She then gives a generic instruction for fitting order:

Center back neck > “move down and forward in the natural direction & slope of the skeleton”

(It’s not a book about fitting per se, so she doesn’t go into great step-by-step details. Her points are mostly about key mistakes that she thinks people are making.)

Add in my initial problem of CF not reaching even in a D-cup until I shifted the bust dart down and I have a ball of confusion on my hand.

In the end I fudged. I started with

Back width (at blade / lower armhole level) > Bust level > High round back > …more fiddling with back… > …fiddling with front…

Hurdle 2: Learning to Read Paper

Tissue doesn’t sit on you like fabric does. Especially if you only have half a bodice on! One minute it’ll look like the pattern reaches where it’s suppose to reach, next minute it has shifted again and now looks like you don’t have enough width / length / whatever!

That’s how I ended up with like gazillion versions of the back, and at least 3 versions of the front.

I haven’t entirely given up just yet. I think some key lessons of tissue fitting is learning how to read the paper, knowing what the limitations are, and knowing when to stop and move on to fabric fitting – either fitting muslin or fitting-as-you-sew with fashion fabric.

P/P has benefit of experience fitting thousands of people. They no doubt know how to read tissue pattern like the back of their hands. Some people may also be naturals and intuitively know how to read tissue pattern. I don’t. But I’m hoping that  it can be learned. I think it will be worth the effort because I really don’t want lots of useless fitting muslins hanging about.

So, once I get the gingham fitting right, I’ll transfer adjustments back to tissue. Then I’ll try on the tissue again so I can see what a properly fitted pattern look like in tissue. I can then learn what fake-symptoms I should ignore because it’s just a problem of paper and half a bodice.

That’s the plan anyway. And you know how plans always work out! 😉
Fabricholic Confession: Stash Count Update

I need to catch up on blogging about the progress of my FFRR bodice fitting. But allow me to take a quick digression. I mean, surely you must be as bored with my slow fitting progress as I am!

So on to more exciting stuff for a few minutes. Or in my case a whole weekend: Recounting my fabric stash!

What prompted this recount is the arrival of yet another goodie package. We’re planning on a beach holiday soon and I got nothing to wear. I thought a proper make of Vogue Pattern V1159 would make a nice holiday dress.

I will write about V1159 once I’ve finished a proper make. Suffice it to say for now that thick sweatshirt like material does not a drapy dress make. See…

But it was the only 2-way stretch material I had for this muslin fitting. (Or “4-way stretch” in British parlance. I would never know why they call it “4-way stretch”. As if it’s possible to stretch to the right without stretching to the left, or up without stretching down. Weird Brits! 😉

And of course if that was the only 2-way stretch material I have, I would have to order more to do a proper make! Step in Tissu Fabrics, aka Tia Knight on eBay. I got 6 cut of fabrics from them, with about 16 more on my wish list. I’ve read good things about the store and they didn’t disappoint. Quality seems on par with RTW garments. Shipping was next day. And as I ordered from the website instead of eBay, I got the free shipping for the over £50 orders.

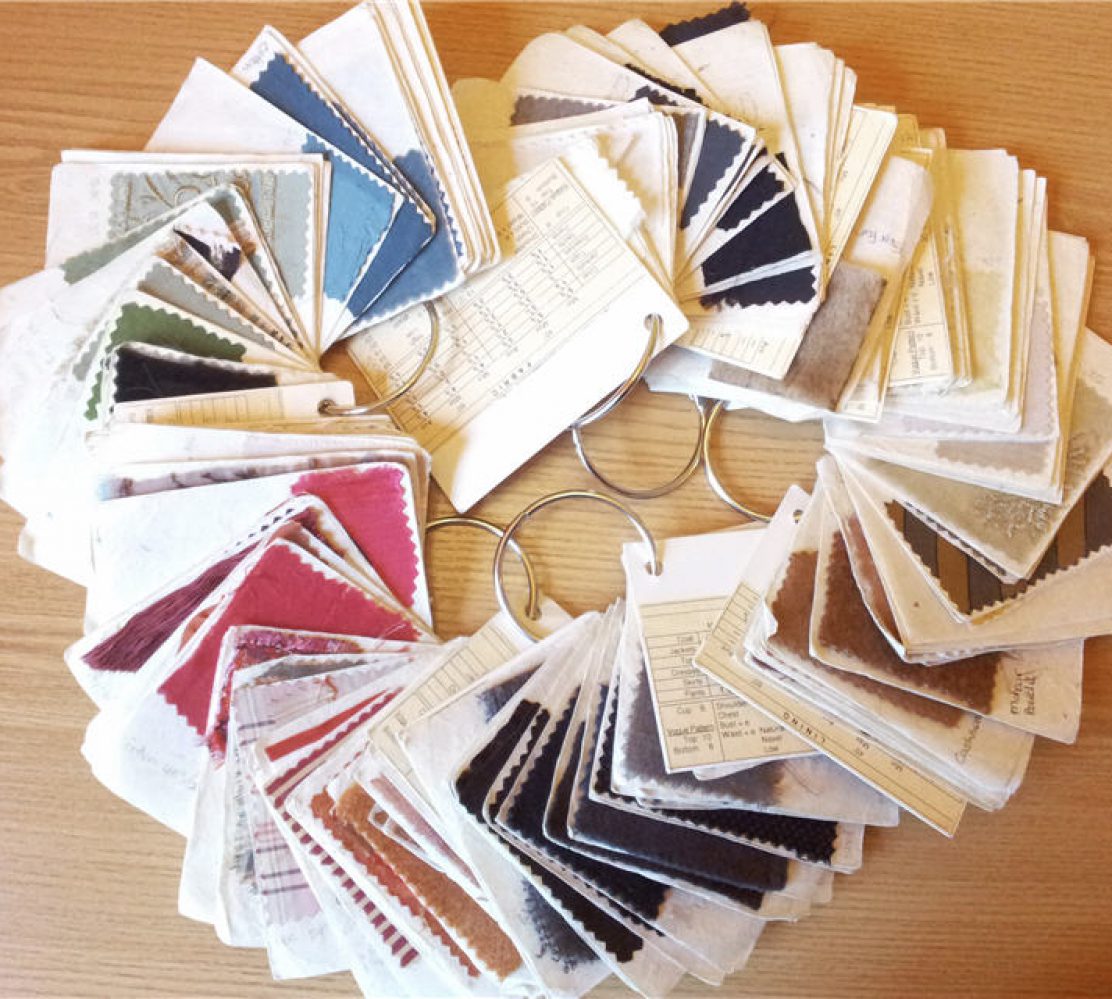
I had previously compiled little swatch books of my stash. But I have failed to keep them up to date because I didn’t want to swatch new arrivals for fear of not having enough when it comes to frugal pattern layouts. The swatch books are also becoming too bulky to carry around when, erm, doing more fabric shopping.

I also lost track of which fabric I’ve pre-shrunk. So in yet another effort to get on top of an unruly stash, I started a spreadsheet this past weekend.

And this is what I found:

  1. I wish I have a fabric dictionary with sample swatches. It’s awfully hard to figure out what to call each fabric.
  2. I wish I have a color dictionary with sample color chips. It’s also awfully hard to figure out what to call each fabric color.
  3. I have 11 yards of this dupioni / shantung in a weird very pale blue-cream color that doesn’t even flatter my skin tone. What was I thinking of???!!!
  4. I’ve been forbidden to complain about my other half’s occasional trips down to the poker club because I recently dragged him all the way to Walthamstow Market for gingham, then discovered I already had some leftover in my stash.
  5. My stash count is now up to 220 cuts of fabrics. Or about 590 yards. See, your stash isn’t so bad after all!

Lost in Transit

I’m not a happy bunny today. Fabrics I ordered for my sloper fitting (and more) have gone MIA (Missing In Action).

And you know how I feel about fabrics. At work I was asked to introduce myself to a new team and one of the questions was your “interests / hobbies / what makes you tick.” I was going to write “sewing”. But on further thought, I have to admit’s it’s really “fabrics”.  Selfish as it may seem, if I get hit by a bus tomorrow, I think I’d want to be buried with all my unused fabrics. All 200+ pieces of them.

So this order was placed online a month ago with Calico Lane. They looked like a legitimate shop and claimed they’ve sent out part of the order three weeks ago. But fact is I’ve received nothing. And I guess being a small business, they’re not set up to refund me promptly. So I’ll be out of pocket probably for another couple of weeks – they’re waiting for the Post Office to reimburse them before they’re able to reimburse me.

I guess that’s the peril of internet shopping. Time to get my lazy self down to Goldhawk Road or even venture out to Walthamstow for some instant gratification. Cargo Cult Craft has compiled a handy guide to sewing supply shopping in London. And I’ll be checking out Did You Make That’s guide to her favourite fabric shops in Walthamstow as well.

Burda Style, it’s complicated

Being formerly American, I’m fairly new to the world of Burda Style magazines. Most of my past pattern purchases have been Vogue Patterns. But since I started lurking on other sewists’ blogs a year ago, I started buying the odd issues. I did consider subscribing, but (A) it’s not any cheaper, and (B) our love affair has not been true and constant. Towards the end of last year there were a few months of love-ups. But recently it’s been mostly blah disappointments.

That’s until the current issue. I saw this picture in the July 2012 issue and I just had to get it:

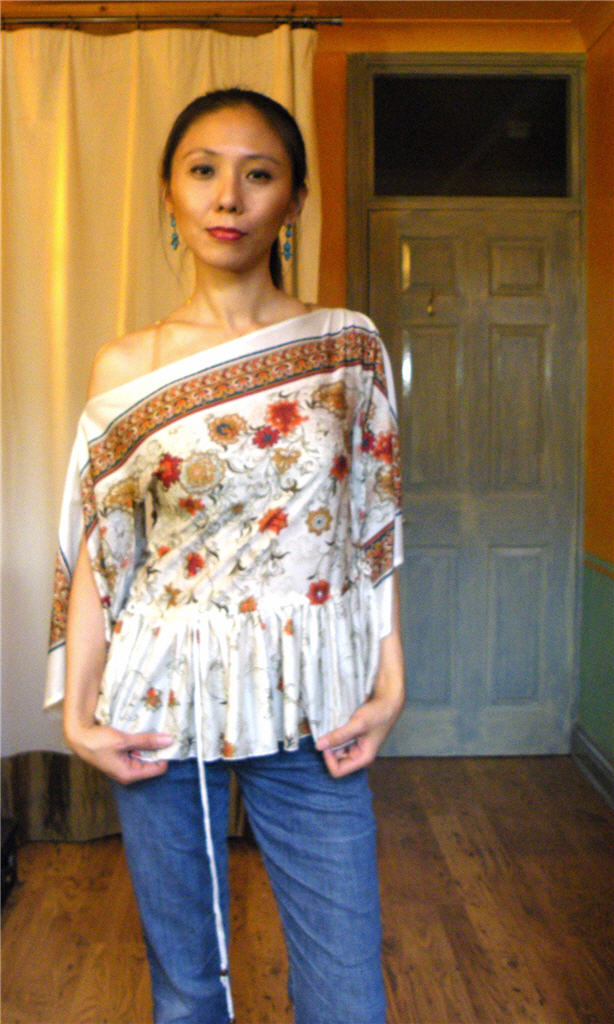
“But it’s just a simple square top!” I hear you protest. Well yes. I didn’t exactly buy this issue for the patterns. I bought it for the image of this scarf fabric. Because it reminds me of another Restyled Ready-To-Wear in my closet…

Like my newly decorated sewing room, the colors and pattern make me happy.

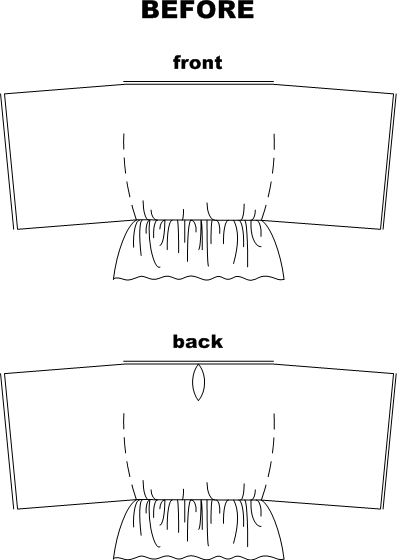
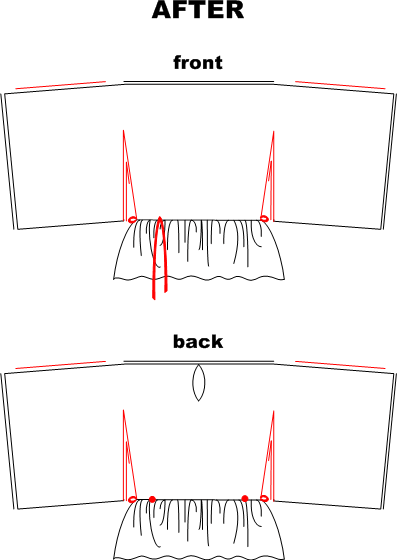
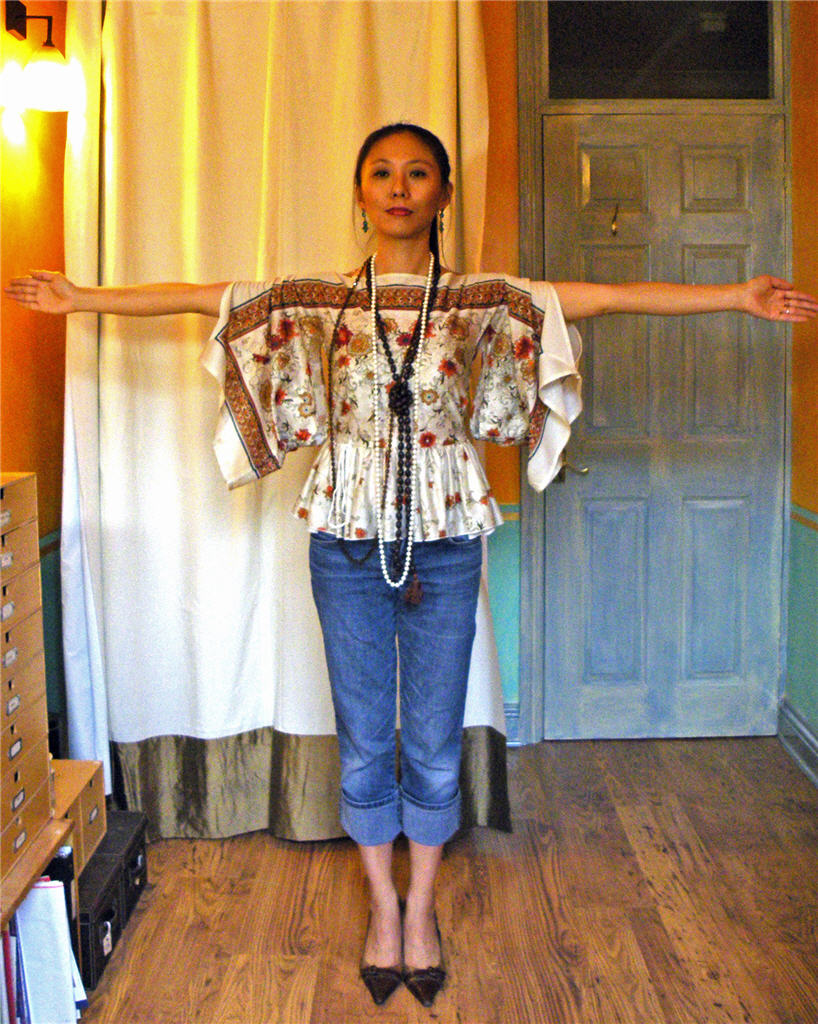
It’s from Top Shop, a second-hand top I think. There was only one on the rack and it’s made from this 70ish plasticky polyester. I wish the fabric were smooth drapy silk, for the original design might have worked better. As it was, I had to restyled it to avoid looking puffy. Here’s the Before & After diagrams (click on the images to enlarge and see the details):

The alterations:

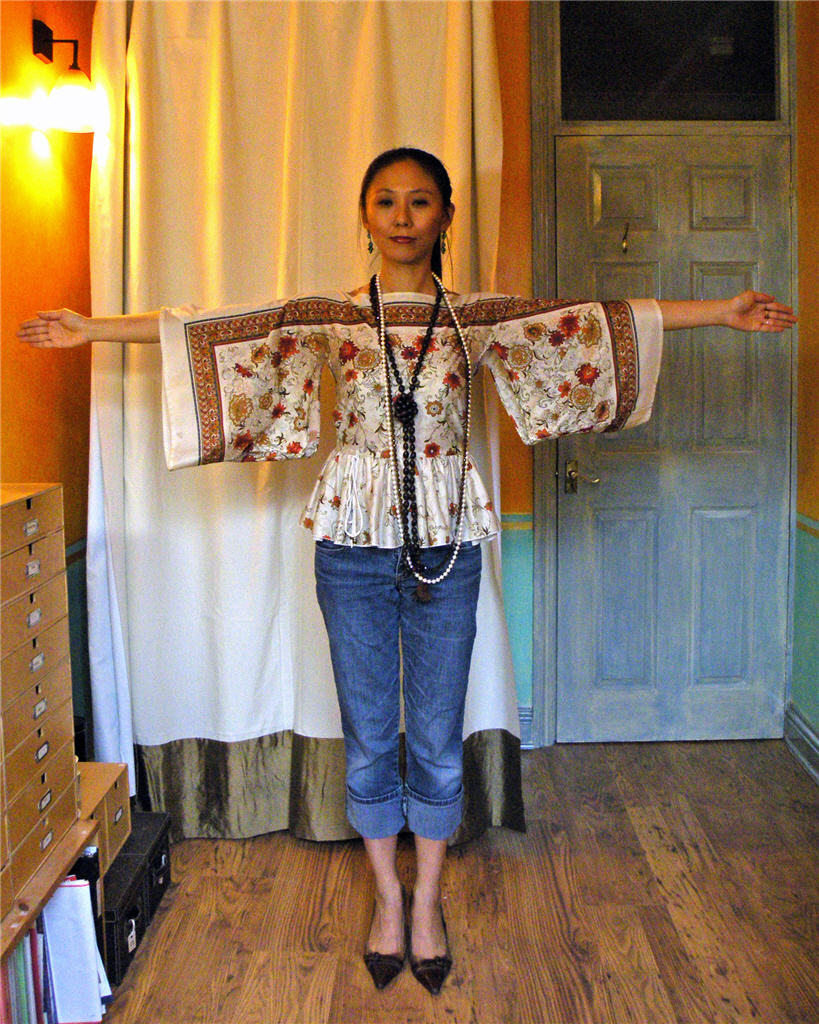
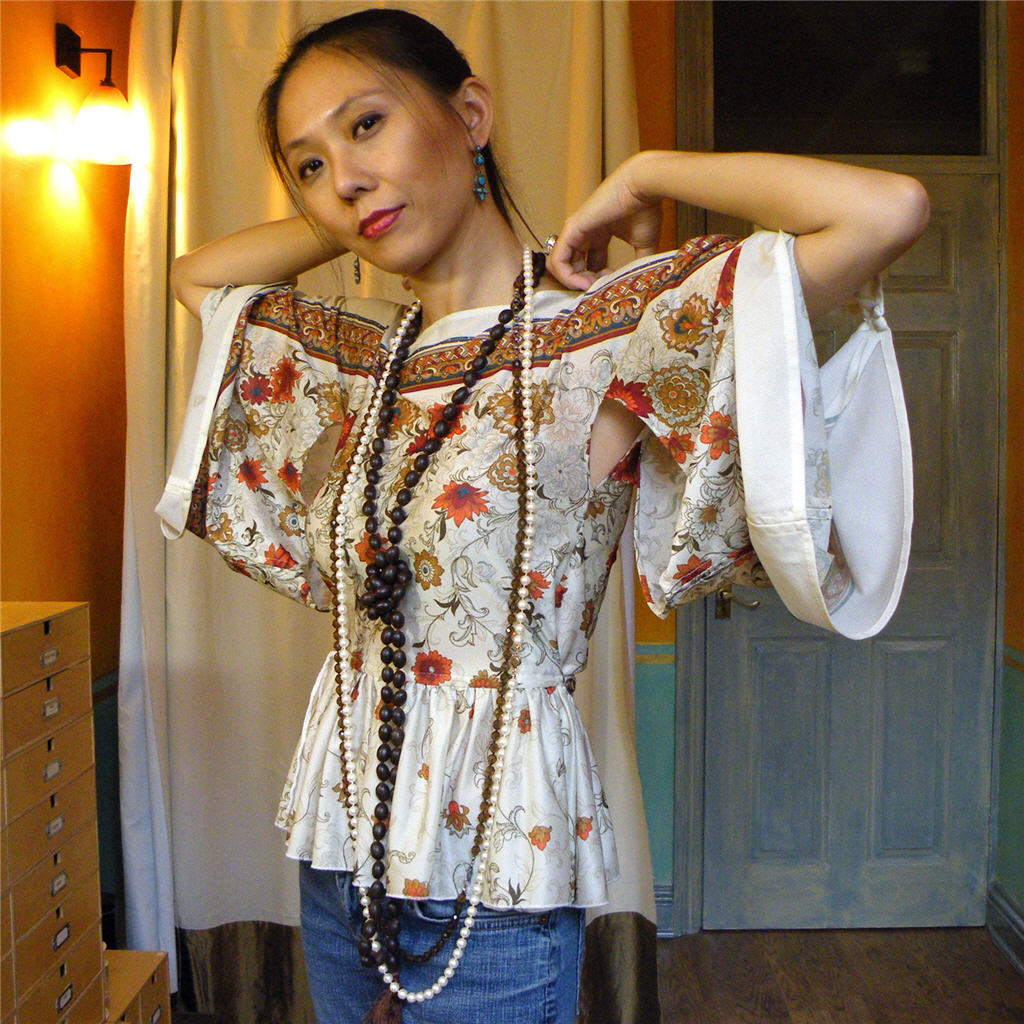
  1. To create a slimmer silhouette I cut apart the sleeves from the bodice along the original stitching lines. Sewed the front & back side seams I just created about 2/3 way up. Hemmed the remaining part of the slits to create Japanese style kimono sleeves. (See close-up photo below.)
  2. To further slim it down I replaced the elastic gathering at the waist with loops at the waist side seams that pull the extra fullness towards a couple of buttons on the back. (See enlarged After diagram above.)
  3. For a bit of Greco-Roman flair – and that all important extra wearing option – I opened up the shoulder / sleeve top seams part-way to create slits. (See top two photos below.)
  4. Lastly a decorative waist tie thrown in for good measure. A couple of venetian beads weigh these fabric tubes down.

Et Voilà…


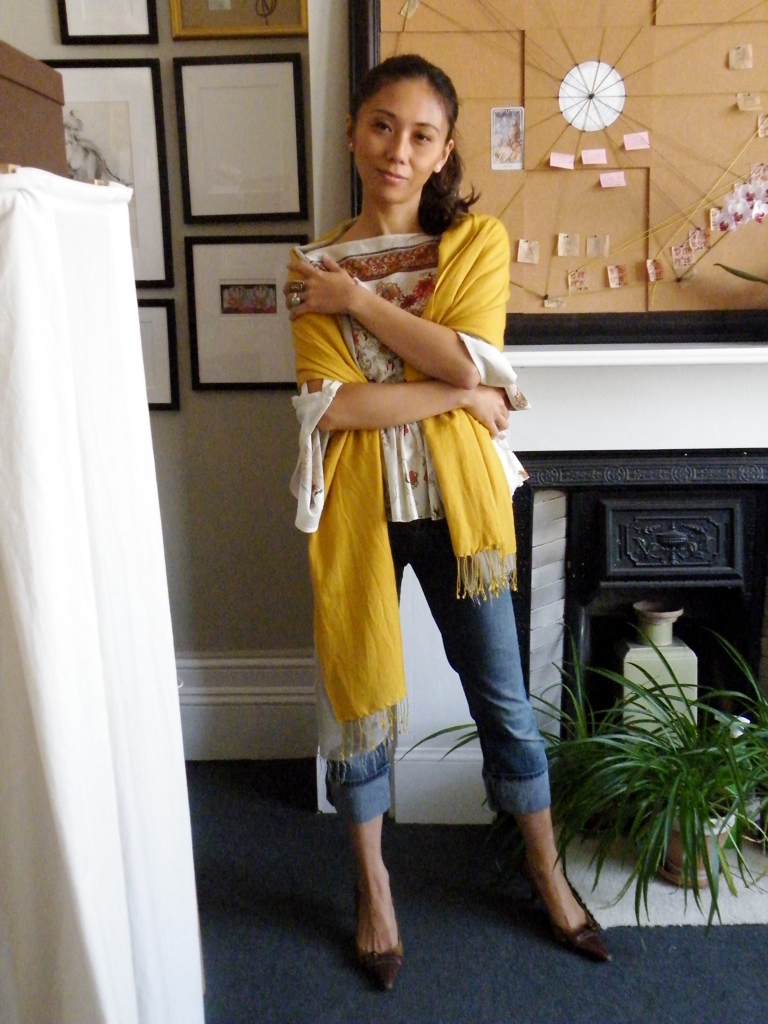
I like it too with a couple of shawls for a remotely English Civil War inspired look. In my rather irreverent muddled head anyway.

And back to Burda Style 7/2012…

I’m hoping to track down scarfs like the one used in that series of patterns. Sadly Roeckl, which supplied the ones used in the magazine, doesn’t seem to have that exact pattern anymore.

Anyone has suggestions for where to look?

How to do Candy Floss Sweet

OK, so I’m a bit slow to the game. But Louis Vuitton Spring / Summer 2012 collection’s fashion show video still tickles my fancy. (Watch the video before it’s gone from their website!)

There are some things that seem a bit off from a Sewist’s point of view. Frabjous Couture wasn’t impressed by the poor pattern matching at the center front of Look 4 (the peach dress in the picture above). I find some of the silhouettes potentially lethal. If even the tall skinny models look a bit frumpy in Looks 6 & 11 what chance is there for mere mortals like us?

But the show itself is pure bliss. Cotton Candy Bliss!

And there are details I really like. There’s a graphical element to the designs that keeps them from being sickly sweet.

Like the broiderie anglaise in big graphical pattern. It’s funky, not tacky or matronly like some lace can be.

Same with the pairing of the lace and pastel croc leather.

Or embroidering over otherwise dowdy suiting.

And stiffer organza instead of limpy chiffon.

Plus plastic cut-out flowers that twinkle like little stars! Brilliant if impractical.

American Vogue had one of these twinkle flower dresses in a Mad Men style spread.

I swooned over it, which is why I got on the case and tracked these down so late in the SS 2012 season. But it’s fine by me. A lovely dress is a lovely dress is a lovely dress. My taste has no time table and answer to no Fashion Police! 🙂

Which is just as well. Because I rather like these ludicrous combination of hot pants and 3/4 sleeve tops!

All of these bring me back to sewing. Because I have this pink lace that has been in the stash of what must be 25 years. It was a present from my dad – he liked his women sweet. I had no idea what to do with it – I’m a New Yorker at heart, I don’t do sweet.

Now at least I have precedents to go by, even if this is not quite the right type of lace. I’ve got some cream organza ordered. But don’t hold your breath for results any time soon. These things have to gestate. So maybe another 25 years hence and you’ll see me wearing this lace alongside the lovely ladies at Advanced Style!