Golden Cowl Neck Tunic

OK, one last make for the holiday. This time it’s a restyle job. And it was an eleventh hour job. I was still up at 7am the day we flew out trying to finish it. So sewing quality is quite iffy. And fit can be improved a bit in the back, as usual. But I’m fairly happy with the design overall.

Without further ado, I present….

Before: Tarty

vs-gold-dress_1vs-gold-dress_2vs-gold-dress_3vs-gold-dress_4

This was a convertible dress from Victoria’s Secret. And as I’ve written recently, I’ve gone off convertibles because they’re quite fussy to wear with high risk of wardrobe malfunctioning.

This one I find especially tarty because of the ruching on the skirt CB. I don’t have curve down there and normally I’d appreciate a bit of shapely illusion. But this is way too much attention.

But I loved the fabric. It’s gold, but not a brash metallic. And it’s so soft and drapy. I especially loved how a cowl neck styling look in this fabric. I’ve tried to find more fabric like this and bought some duds on the way.

So I took this dress apart and tried to make something more classy out of it.

After: Classy & Glam (I hope)

Au natural…

gold-cowl-tunic_s1-1

gold-cowl-tunic_5mug2-1Fgold-cowl-tunic_5mug2-4SRgold-cowl-tunic_5mug2-3B

gold-cowl-tunic_s4-1…Or worn with hem turned up and held in place by elastic waistband threaded through the hem.

gold-cowl-tunic_s5-1

…Or a shallower cowl neck by ruching both shoulder with broaches.

It obviously can’t be worn as a dress by itself, what with the side slits. But I do still have the skirt portion of the original dress left. I might make that into a more modest pencil skirt to wear under this. Then it might look like a dress too.

As it is, I was thinking more of the Pakistani kameez, or Vietnamese ao dai as inspiration. I love how those combination of tunic and pants look in soft drapy fabric.

The Making

Originally I was going to use McCall 6078 sleeveless cowl neck T-shirt pattern again. But as my fabric pieces are reclaimed, they weren’t wide enough for the front pattern piece. So, necessity being the mother of invention, I played around with draping the fabric on Big Bertha. I was sure there was enough fabric. I just need to figure out how the fabric need to be positioned.

This is what I ended up with:
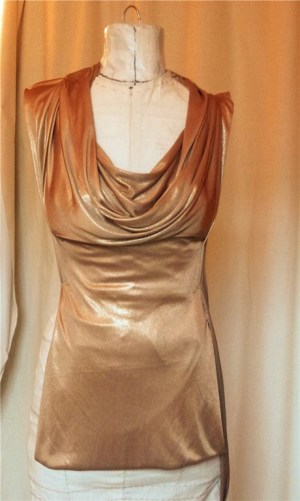
gold-cowl-tunic_0drape-1gold-cowl-tunic_0drape-2gold-cowl-tunic_0drape-3The front is one piece of fabric split into top cowl portion draped on the crosswise grain, and the bottom on the usual lengthwise grain. The back and side panels are from the second piece of fabric draped on the usual lengthwise grain.

gold-cowl-tunic_2measuregold-cowl-tunic_3patTo tidy up the pieces, I measured up the draped front bottom, side, and back roughly. Then I modified my tentative knit slopers to match the measurements.

The cowl piece is marked with pins at strategic places like underbust seam side and CF, shoulder seam, etc. while it’s still draped. I marked only one side and mirror image that on the other side to get the cowl a bit more symmetrical.

Here’s a diagram (not to scale) of roughly what the cowl neck piece is shaped like:

gold-cowl-tunic_4det_4The cowl neck extend to the CB to form a collar. To some extent you can control how low the cowl neck is by changing the angle of the collar CB seam.

To control the drape a bit, I also turn the outer edge of the back collar inside and slip stitch it to the back neck edge.

My cowl was a fair bit low cut. To preserve my modesty and also add more drape – can you ever have enough? – I added a separate rectangular piece inside the main cowl. The top two corners are tacked to the cowl neck edge about two inches below the shoulder seam (neck edge)…

gold-cowl-tunic_4det_2gold-cowl-tunic_4det_3gold-cowl-tunic_4det_5gold-cowl-tunic_4det_6

gold-cowl-tunic_4det_7

The bottom two edges are attached by thread chains to the underbust seam where it meets the side panels. I’m not sure if the same trick would work on other cowl neck (or even surplice / wrap) tops. But it certainly is worth experimenting with for those that threatens to expose your girls!

So there you have it, from tarty to classy (or Grecian-inspired anyway) in 24 hours. Or maybe 48.

And I would like to thank Big Bertha. I couldn’t have done this without her. Even though she’s getting a bit lumpy. (Me also, but in different places.)
V1159 Donna Karan twist front dress

This one was a tortoise. I made the first muslin like a year ago. Maldives was what it took to push through with a proper make. Or sort of proper. You see, part of the delay was due to my attempt to alter this no-alteration pattern. There was a fair bit of “I feel lucky” going on.

The Pattern

It’s a lovely feminine pattern. All of the makes on Pattern Review have been gorgeous, even if many complained about the low cut armhole and front gap-ahoy.

Style Shots & Mug Shots

v1159_4s2_2v1159_4s2_4v1159_3_0Fv1159_3_2SLv1159_4s2_6v1159_3_3B

Fabric & Notions Used

Size Used

My first muslin was a 10 based on high bust measurement. For this one I used am 8 with alterations.

First Muslin

For my first I followed the instruction closely. Or so I thought.

Like others, I noticed that front drape crisscrossed in the opposite direction to the pattern photo and tech drawing.

It wasn’t until I took apart the muslin and tried to trace my alteration guidelines that I noticed I didn’t pay enough attention to the cutting layout instruction: I had the wrong side facing up instead of the right side when I cut my fabric. It’s an easy mistake to make since most of the time you’re cutting folded fabric with wrong sides on the outside, facing up.

I thought it turned out alright though. The drape plus the stretchy fabric make it a rather forgiving pattern. It does have the minor flaws noted by others, though non-matching notches wasn’t a problem in size 10 and 8.

Heeding their warnings I had raised the armholes by about 1-1/2”, but they were still a bit low and gappy. The front was fine if I stand up straight, but immodest if I lean forward – like to get up from a chair. So I decided that I’d attempt alteration for my next make.

BTW, the profile looks horrible, especially the skirt, only because the fabric I chose wasn’t really appropriate. It felt more like sweatshirt material. So too stiff to drape gracefully. I learnt my lesson and chose a more drapy fabric for this make.

Changes Made

v1159_1Palt_3_fv1159_1Palt_3_b

  • Narrowed lower back.
  • Sway-back adjustment.
  • Full-bust adjustment and pivoted FBA dart to shoulder pleats and waist / skirt drapes. Interestingly, I think this might have made the shoulder more like the slight cap sleeve in the pattern photo.
  • Shorten front fold to get rid of gaps.
  • Lower left shoulder adjustment.
  • Raised armhole. I think I might have overdone this a bit. Together with the FBA, the armhole has become a bit too small / binding. The Vilene Bias Tape I use to stabilize the armhole probably doesn’t help either. When I get home I might unpick this, get rid of the bias tape, re-stitch with stretch stitch, and pray that the natural give of the fabric will remedy the over-zealous armhole reduction!
  • Changed skirt seam to CB seam (to make it easier to diagnose skirt fitting problems).
  • Omit skirt lining. Extended bottom edge of the “Upper Back” pattern to meet at CF. Added interfaced facing to make this extension sturdy enough to support the weight of the front draped skirt.
    v1159_2D_3v1159_2D_4

Verdict on the Instruction

It is convoluted. This is one pattern where I had to follow the instruction faithfully. At least for the first muslin. The illustrations helped tremendously because the verbal instruction is a jumble due to the poor pattern area naming. How are you suppose to make sense of “shoulder pleats in FRONT AND BACK (1)”??? In fact, when I mapped it out, all pattern pieces cover the front and the back, just different parts of them. This is because they all warp around your body.

To help others who want to make this dress, here’s my rough mapping of pattern areas and numbered matching seams in a somewhat Burda style. Who knows, maybe some of you may also be brave enough to attempt alteration! 🙂

And here are some details of my muslin, especially the inside, to help you figure out what’s going on with the pattern areas.

v1159_0m_0-F-Iv1159_0m_0-SL-Iv1159_0m_0-B-Iv1159_0m_0-SR-Iv1159_0m_1D-I1-av1159_0m_1D-I2-av1159_0m_1D-I3-a

For this make, I tried to stabilize edges that I thought might stretch out of shape:

  • Vilene Bias Tape on back neckline, armholes, and front drape crossing hems. I might omit it from the front armholes in future make or enlarge my altered armholes slightly.
    v1159_2D_2v1159_2D_1
  • Clear elastic on shoulder seams, waist seams, under-bust seams in the front.

v1159_2D_5I also tacked the folds of the top front drape in place. That’s the only way the folds will stay gracefully small and Grecian. Otherwise it’d morph into an unflatteringly wide Beauty Pageant Sash look.

Would I sew it again

Probably. Once I work out the kinks. I think it’s a wardrobe classic. I might even alter the armhole area to take sleeves. It’d be a lovely LBD with 3/4 sleeves!

Ohhh Lulu Betty Retro Hot Pants

OK, I know I’m over the age for wearing hot pants. But ever since I collected these clippings I wanted one. No matter what.

hot-pants-i-2hot-pants-i-1hot-pants-i-3hot-pants-i-4hot-pants-i-5

Besides, if I go for a slightly retro bathing suit style, and wear it only in hot sunny and beachy places like the Maldives, surely it’d be taken as modest bathing suit rather than skimpy short shorts.

This of course means rushing to make one before my holidays. Otherwise I might never get to wear it. Especially living in dreary London.

The Pattern

Again, I had a couple of patterns I thought might work. Both are actually billed as lingerie patterns.

I made ‘muslin’ of both and settled on Ohhh Lulu…Betty Panties this time. I’ll probably make the Burda Style one in the future as well. To wear around the house for my own pleasure if no where else. (Yeah, like many men, the Other Half doesn’t really get these granny pants. He calls my Betty Hot Pants “diaper” for chrissake! Rude boy.)

Style Shots & Mug Shots

hot-pants-s1-1

(Sorry, couldn’t resist showing off the lovely lagoon just outside our water villa in the Maldives. There’s not much fish on this side of the resort. But on the plus side the sand is soft to walk on without the prickly fresh corals. At low tide, you can walk across the lagoon to the sandbank. I don’t swim, so that was perfect!)

hot-pants-s2-1hot-pants-s2-3

Fabric & Notions Used

Off-white Knit Double Cloth from B&J Fabrics in NYC bought a few years ago. It’s a med-heavy weight stable knit that’s satiny on one side and a nice spongy double knit on the other. The two fabrics are held together with what looks like double-sided adhesive film. Unfortunately the satiny side is marred in places. So I went for the double knit side.

MaxiLock serger thread from Wawak (formerly ATS). 3/8” clear elastic for the leg holes. Decorative elastic (like the type found on thigh high stockings) from Macculloch & Wallis for the waist facing. Invisible zipper.

Size Used

XS per hip measurement chart.

Changes Made

  • Sway-back adjustment – shortened CB by 3/8”. You may have noticed I haven’t been consistent with my adjustments. My excuse is that I still haven’t quite worked out the correct back fitting yet. Anyway, this 3/8” was nowhere enough. Hence the horizontal folds at the waist in the photos.
  • Shortened the crotch length as the muslin was a bit baggy there.
  • Scooped out a bit more from the front leg curve to remove bagginess in the crotch.
  • Made the back leg curve more shallow to cover a bit more of my bum.
  • Added straight side seams to accommodate an invisible zipper. My fabric doesn’t stretch enough to pull over my hip while still being snug enough at the waist. It would be a bit weird if this was a panties or a proper retro swimwear. But as it’s hot pants in heavier fabric, I don’t think it’s weird to have the zipper.

Verdict on the Instruction

The instruction is clear. But again I didn’t really follow it faithfully as I’m making this as shorts rather than panties.

I inserted the zipper first. Then sew up the side seams, followed by the side-front and side-back seams. Because my fabric is bulky but still slightly translucent – like most whitish fabrics – I had to spread the seam allowances apart, top-stitch along both sides, and trim close to the top-stitching. For the leg hems I stitched the clear elastics to the wrong side so that when I turn the hem in and top-stitch, they’d be hidden. For the waist I stitched the decorative elastic to the right side, turn in, top-stitch, then tack the lower edge of the wide elastic to all vertical seams. Again, I turned to my trusted walking feet and stretch stitch for almost all of the sewing.

hot-pants-d-1hot-pants-d-2

Would I sew it again

Hmmm…maybe one more Hot Pants in black. Then as granny pants as the designers intended. I’m feeling old enough to retire those skimpy panties that give you the wedgie. Ouch.

M6078…A classic Cowl Neck Sleeveless T

Not one to waste scraps, I used the 21” x 58” leftover from my Endless Dress to make a cowl neck top.

During the last Vogue / McCall / Butterick sales I got a few basic but classic patterns. So there were two cowl neck patterns to choose from. I’m sure there are more in the few issues of Burda Style magazine I own. But I don’t like how Burda tends to drape the cowl to one side or use stiff fabrics that resulting in a single ungraceful large fold. For me cowl neck is all about Grecian style: Lots of fluid mini folds.

The Pattern

So the candidates were:

In the end I went with M6078 view B. M6563 is designed for woven fabrics, so had more ease than M6078. And more ease means more unnecessary alterations. Sometimes it’s best to go with the instruction and not make grief for yourself!

Style Shots & Mug Shots

m6078B-s-01m6078B-s-05
m6078B-0-1Fm6078B-0-2SLm6078B-0-3B

Fabric & Notions Used

Mustard color Viscose Cotton Lycra 4-way Stretch Fabric from Tia Knight / Tissu Fabrics. It’s soft and drapy – perfect for a cowl neck.

Gutermann polyester thread, and some woolly nylon I got in America long time ago. 3/8” clear elastic. Vilene Bias Tape

Size Used

XS (4 – 6).

Having read on Pattern Review that the sizing runs big, I was careful to go by the finished bust, waist, and hip measurements indicated on the patterns rather than by standard sizing chart. Sizing chart would have me using a M (12 – 14). But recently I’ve been experimenting with using my old sizing (8 / S) with a FBA or otherwise widening at the side seams rather than all around. However, as this pattern is for knit and I like a more fitted look, I went down one more size to XS.

Changes Made

I compared the pattern to my tentative moderate stretch sloper first before deciding what fitting changes to make.

  • Narrowed lower back 1/4” – 1/2”.
  • Sway-back adjustment – shortened CB by 3/4”. There’s still a bit of fold at back waist line, but I don’t mind it in this style of slightly drapy top.
  • Raised back neckline 3/8”.
  • Widen shoulder by 1/4”.
  • Prominent shoulder blade adjustments – added 1/4” ease to back shoulder.
  • Forward shoulder adjustment on front only – raised front shoulder at neck 1/4”.
  • Deepen front-facing to 6” at CF (insurance to prevent the facing from flipping out).
  • Cut on the lengthwise grain because I didn’t have enough fabric. This was fine on a 4-way (or 2-way) stretch fabric. If mine was a fabric with only 1-way (crosswise) stretch, then I wouldn’t deviate unless I go with a larger size with enough ease built into the pattern itself.

Verdict on the Instruction

Easy to follow and quick to make. I did deviate in places though.

I did a Burda style stabilized back back neckline and armholes using Vilene Bias Tape, then clear elastics to stabilize shoulder seams. All seams are done on sewing machine with lowered foot pressure, walking foot, and narrow zig-zag stretch stitch. Side and shoulder seams and the bottom hem are finished with 3-thread overlock on the serger. Neckline, armholes, and bottom hem are stitched with stretch stitch.

For a softer drape and because my fabric doesn’t fray, I left the facing edge unfinished.

Would I sew it again

Most definitely! It’s a great wardrobe builder. I could see this with long sleeves as well. It’s slightly loose in the waist, so if I were to use a less drapy fabric I might narrow through the waist a bit more.

Bandeau Tube Top: Carrie or Tarty?

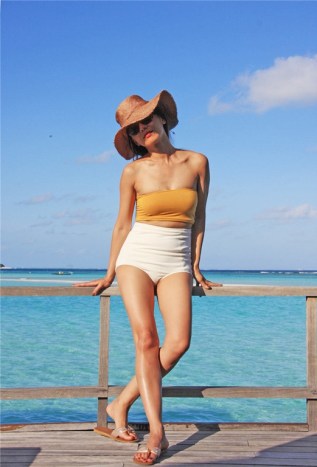
So, as I only needed half of the fabric width for my Endless Dress waist band, I turned the other half into a matching Bandeau Top.

bandeau_s_3bandeau_0_1Fbandeau_0_2SLbandeau_0_3B

bandeau-satcI was thinking SATC Carrie (S2 E17). My other half’s verdict? “Tarty”. Men. Go figure.

In any case, it can still act as a Modesty Preserver for my Endless Dress, now that I’ve learnt that yards of skirt attached to a flimsy bodice = wardrobe malfunction.

Making of this bandeau top should have been dead easy. But it was actually like solving an Escher puzzle. Or a game of Twister.

FYI, this is how NOT to do it:

bandeau_oops_1bandeau_oops_2

While it looked neat and tidy, when I turned the thing right side out, it was all twisted the wrong way. (Sorry, forgot to take pictures for your and my education.) I had to unpick the bottom edge. Then from the right sides fold in the seam allowances, grab hold of the SA inside and pull it out for sewing. Sewing the full circle the correct way was a twisted and Escheresque experience. But turned right side out everything fell right into place.

I’m sure there must be a clear how-to in some sewing book or somewhere online. But I didn’t have the luxury of time to look for it. I got a whole travel wardrobe to sew!

As you can see, I’ve already thought to make the top less flimsy by adding the Power Mesh underlining. So that’s one point against tartiness. Plus the top and bottom edges are reinforced with clear elastics. That’s another point against tartiness. Having said that, wear it in weather inappropriate Britain, and I can definitely see tartiness creeping in. Guess it’s another garment that’s not going to get much wear }:-)