A Moulage Fitting without the Master

…Sadly. I wish I were still living in NYC. If I were I’d sign up for one of Kenneth King’s Moulage class. As it is I have to make do with the Moulage CD book by itself. Don’t get me wrong, the first (actually make that two) muslins are pretty good. But it would have been even better to get that expert tweak and learn to read the wrinkles – what need to go and what can stay. Because for us novice it is so easy to overfit. Or want to overfit. I know they Photoshop skin wrinkles out of fashion photos. Do they do the same with wrinkles in the clothing?

Anyway, I need your help. Especially if you’ve taken the Moulage class with the Master. I don’t have a Fitting Buddy here in London. So I’m trying to fit myself and could do with your second opinions. (On the Birthday Wishlist – a replacement dress form. Big Bertha has become a little bit misshapen. This time I might try Connie Crawford’s paper tape version instead of duct tape double.) I’ve posted on both Artisan Square & Pattern Review boards already. But doesn’t hurt to get the word out again here does it! So the Moulage….

First the back story:

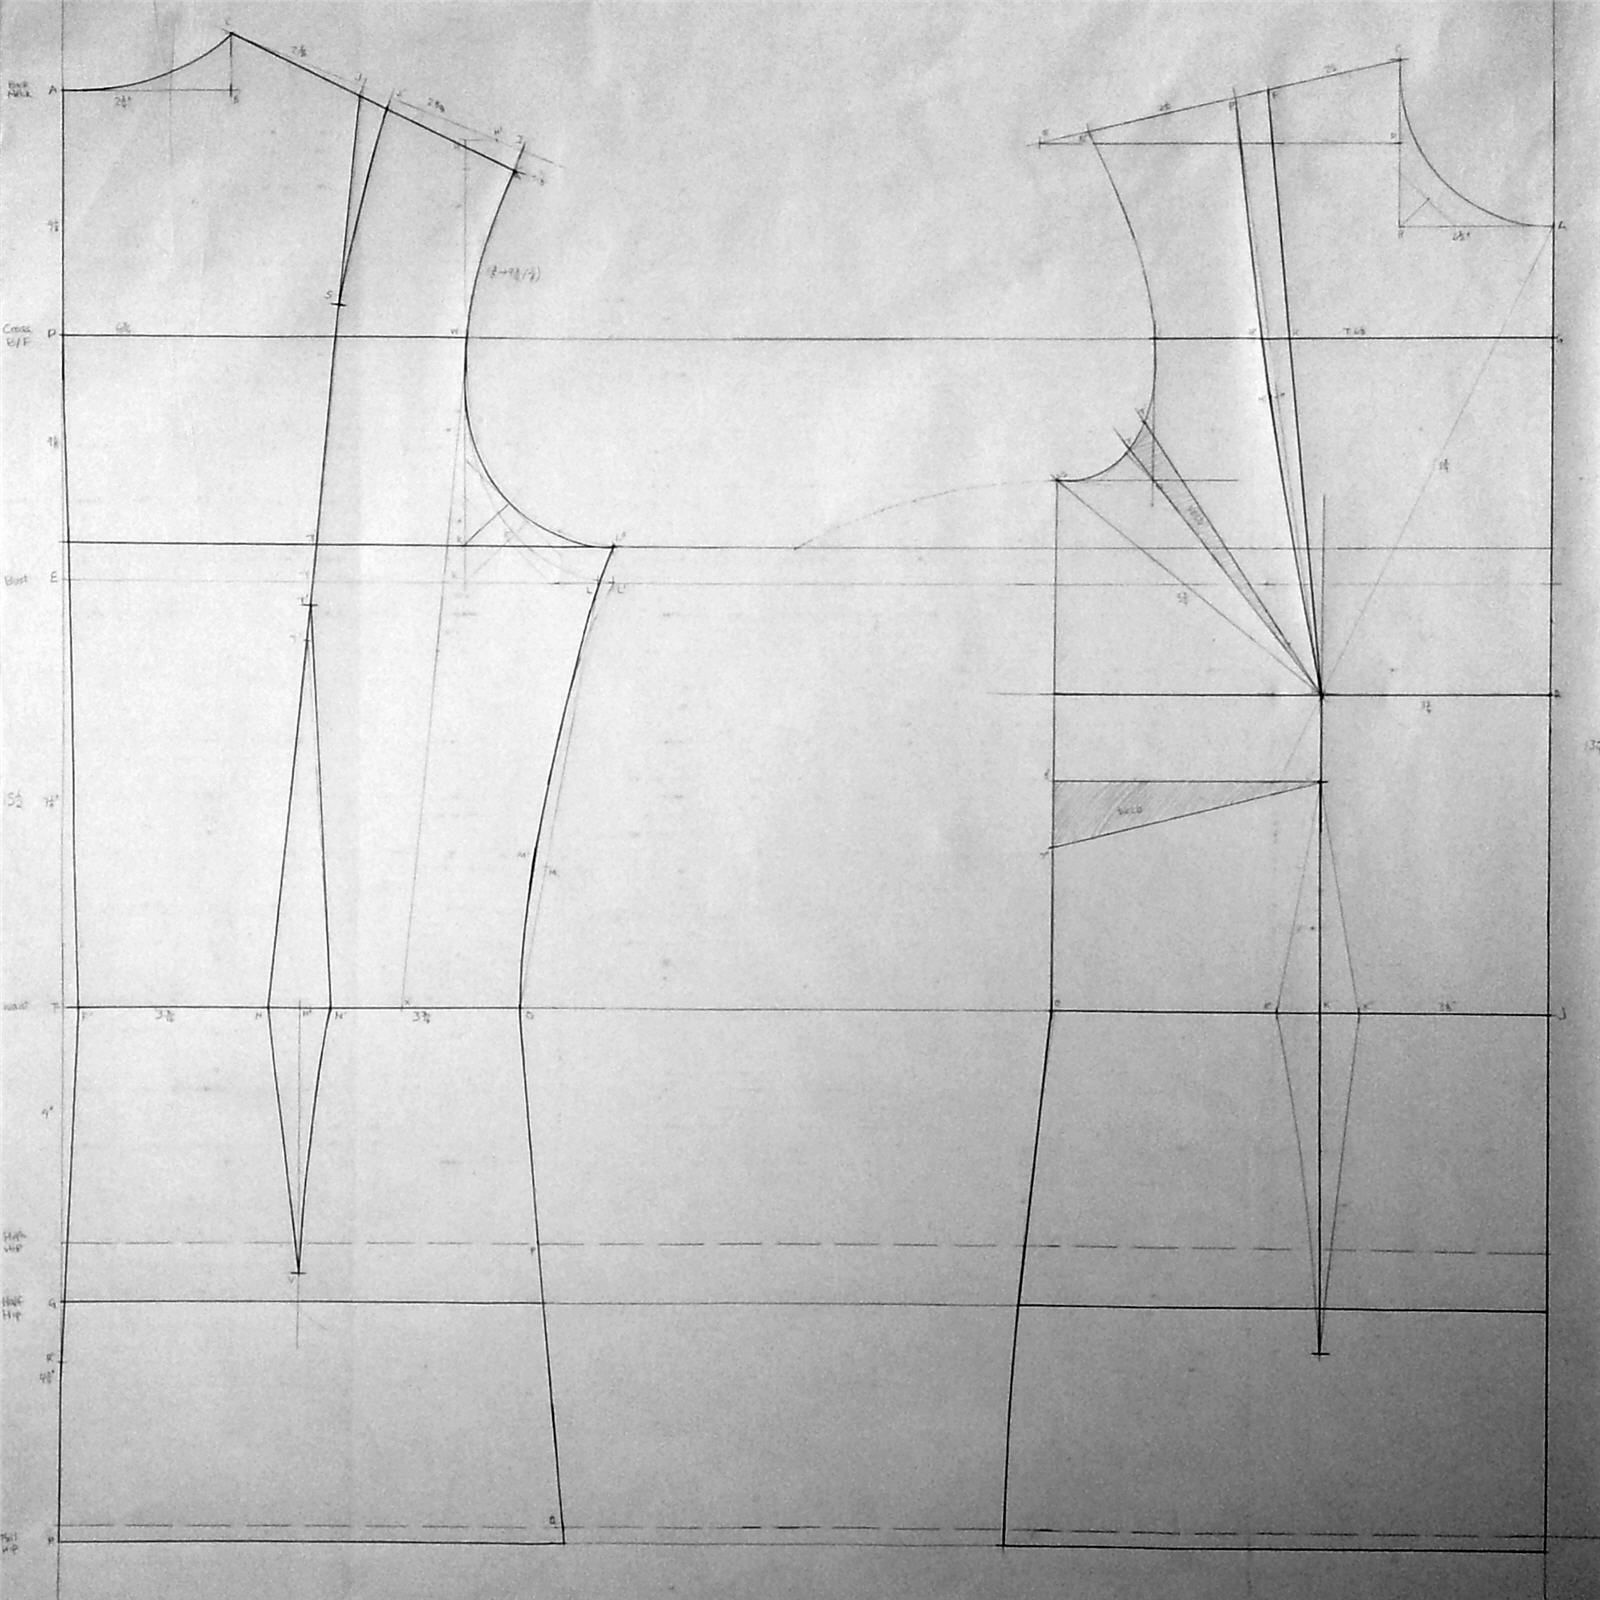
I actually made two muslins. The first one I panicked when my front pattern step 10 came out looking really funny:

I ended up moving width to the front bust from the back bust (instead of using the formula given). While my OH isn’t exactly a perfectionist with measurements, a difference of 5″ between front bust & back bust seems too great to be just inaccuracy.

This first muslin seemed fairly good, but there were still some wrinkles:

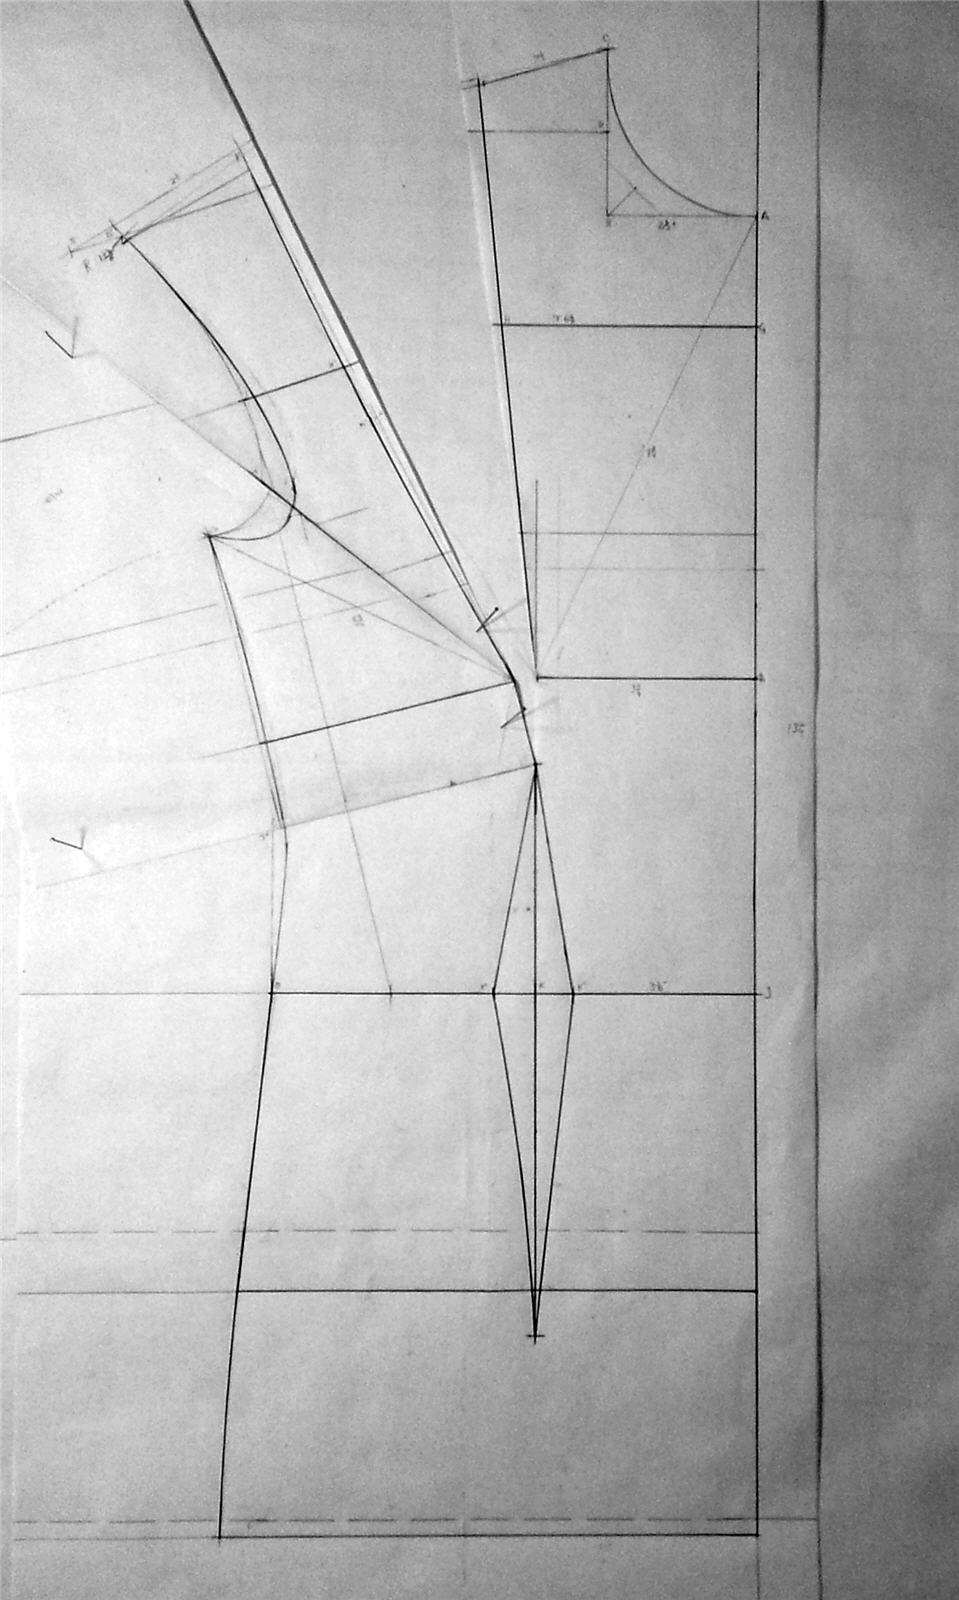
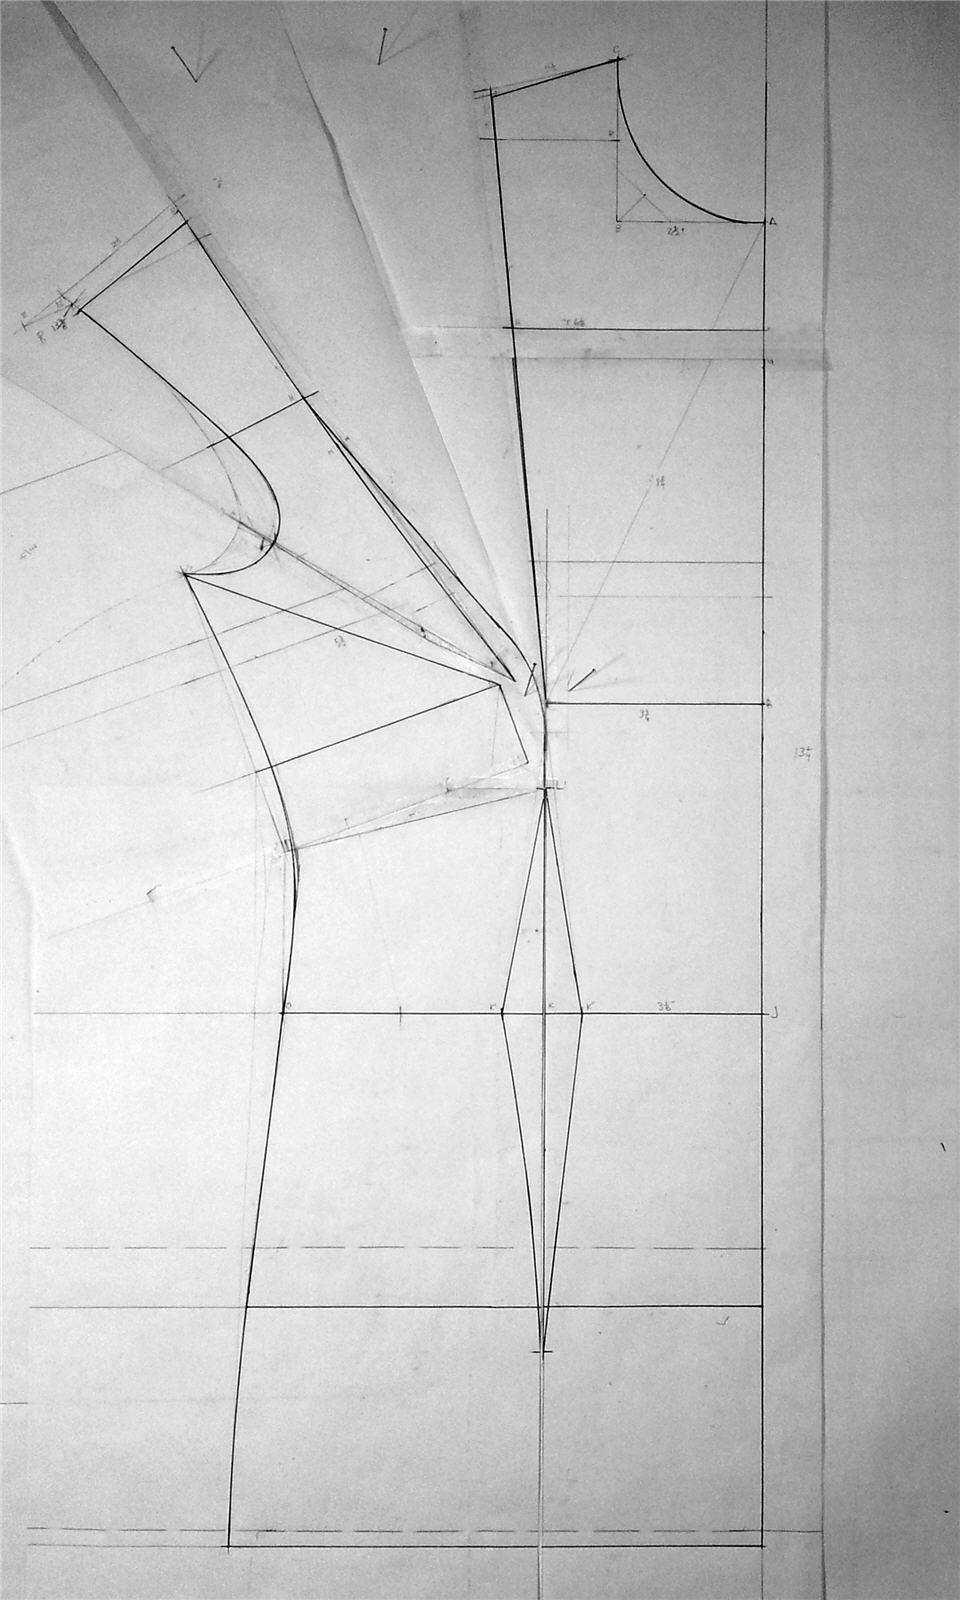
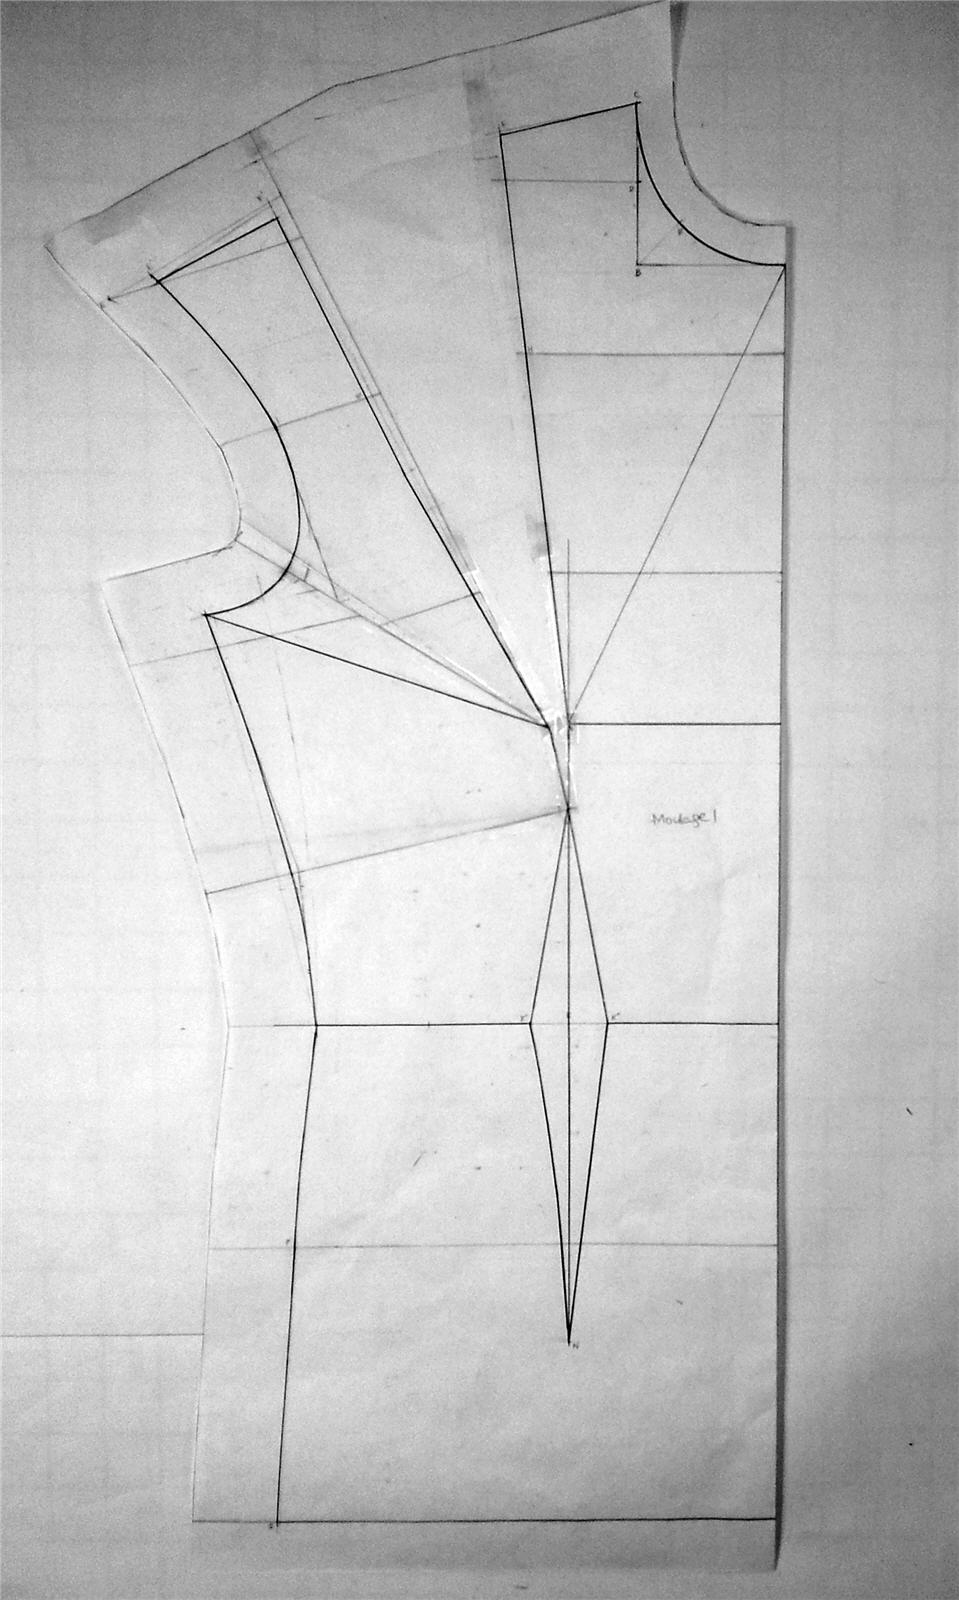
In the name of science (yeah right), I decided to start again & try to stick to the instruction more closely. But as the front pattern looked too narrow after step 13, I again deviated. I mixed in the instruction given for D-cup+, but used the standard amounts given for waist dart end point (L’) and the armhole dart (T’).

Standard instruction:
Bastardized D-cup+ instruction:

What’s not shown in the pattern photos above is the lowering the left shoulder & armscye following the instruction in Special Cases section.

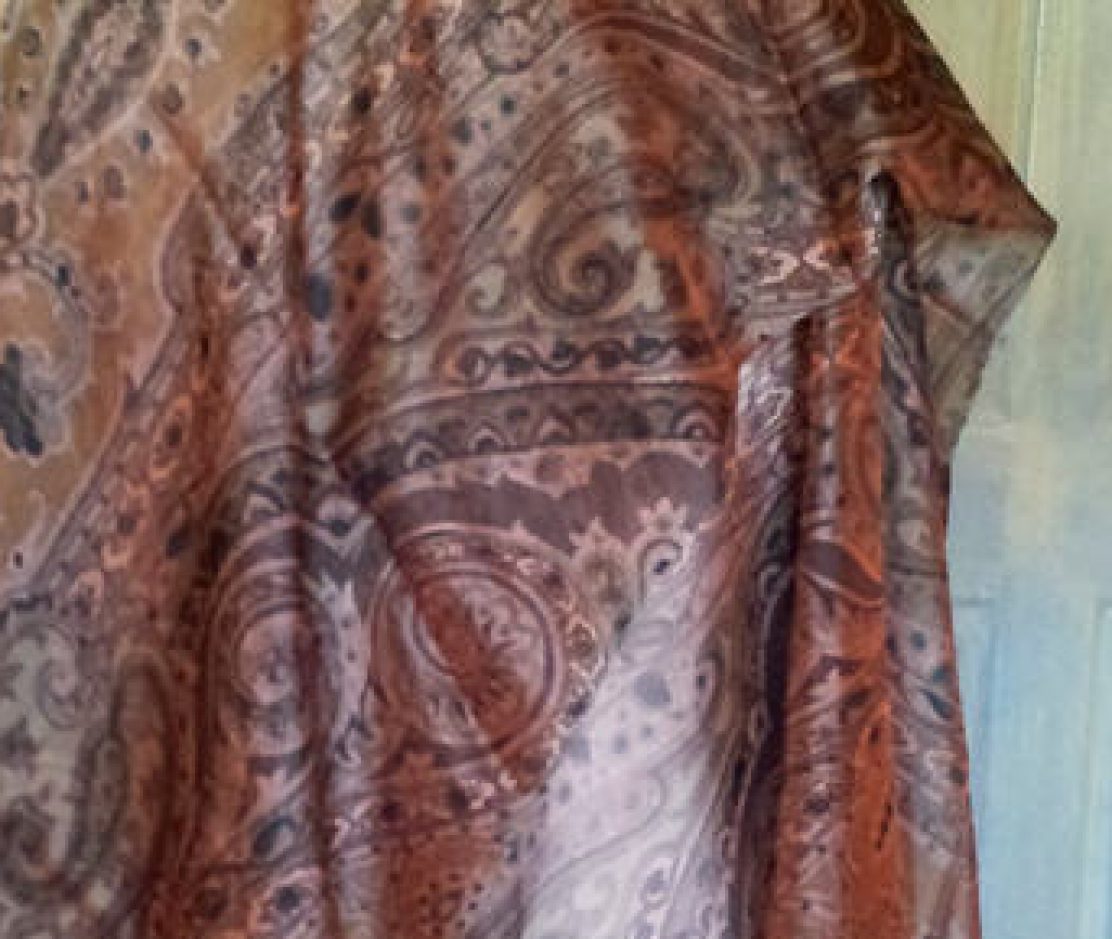
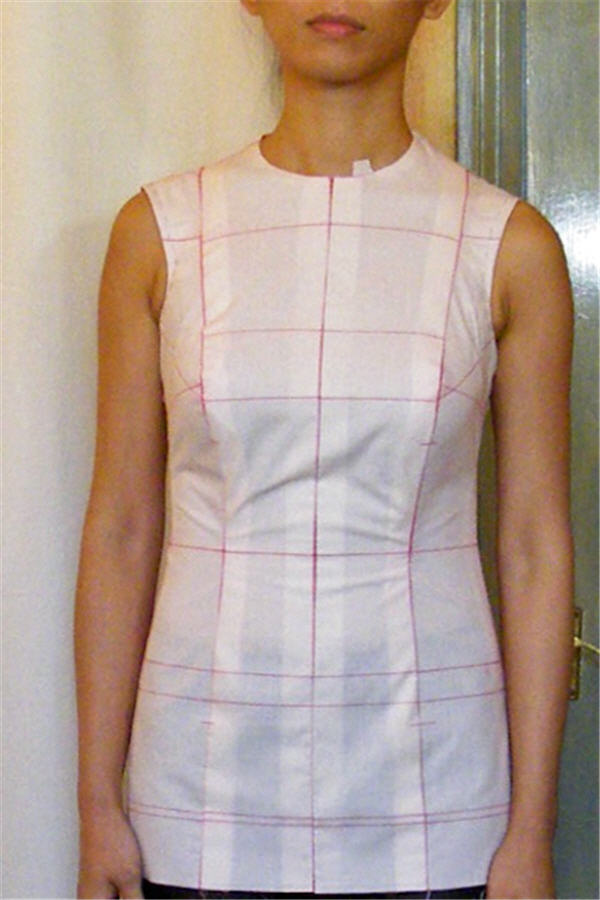
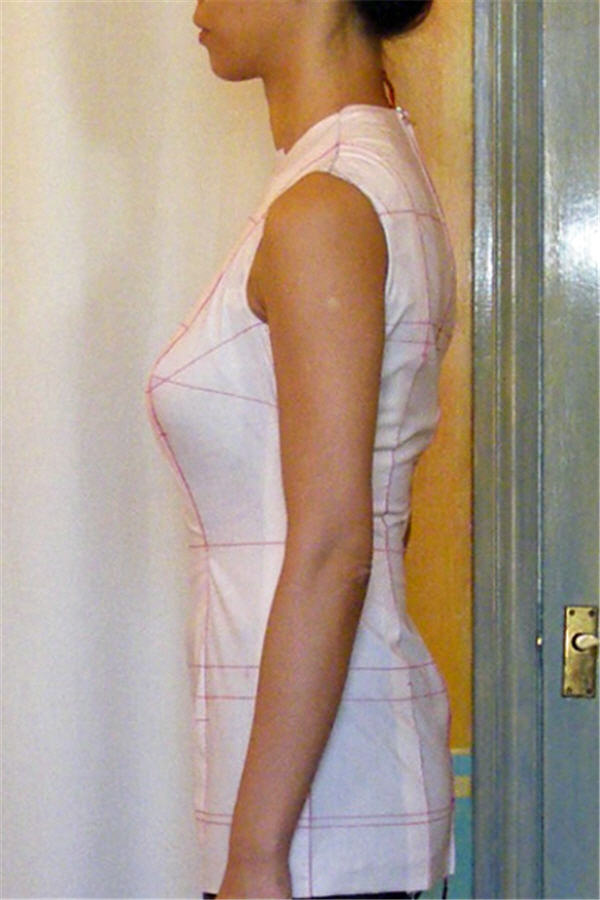
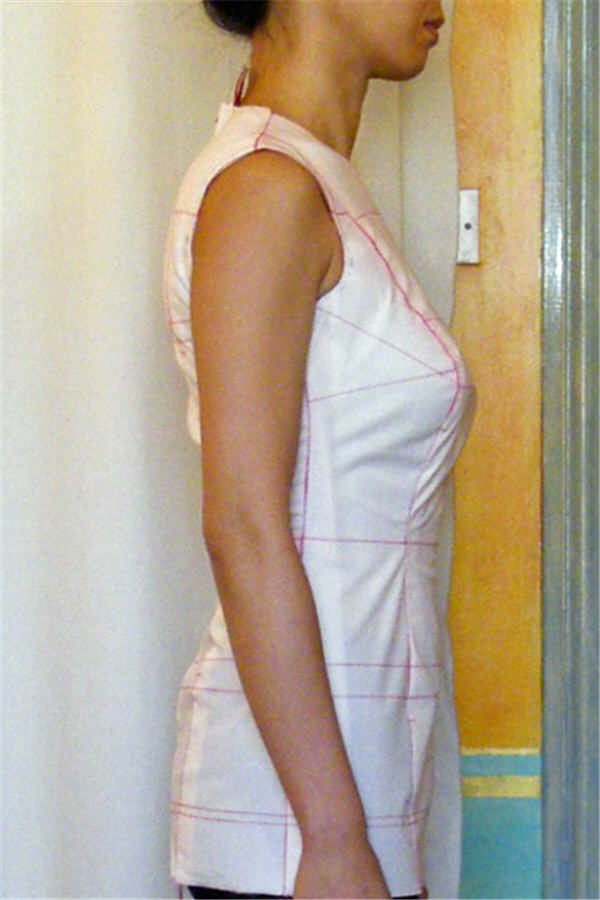
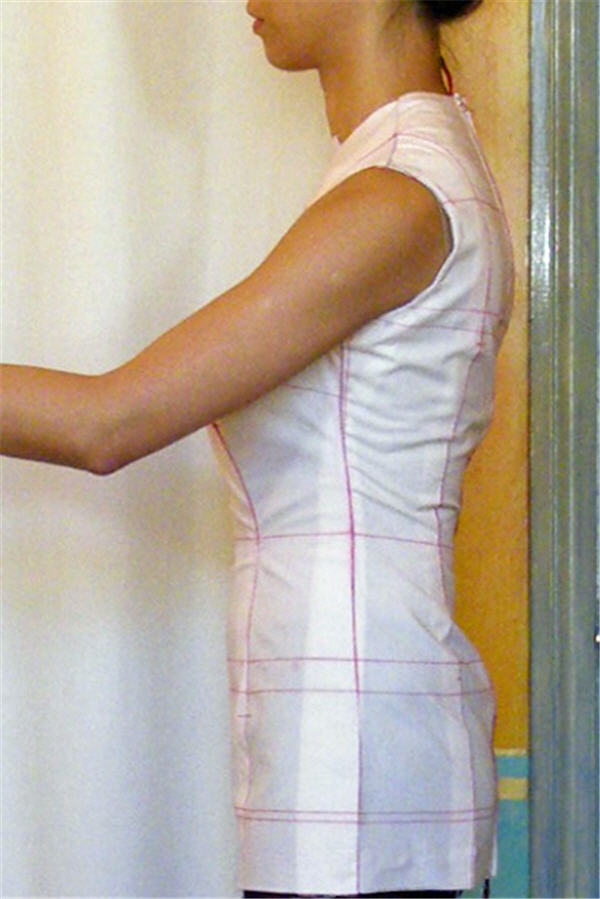
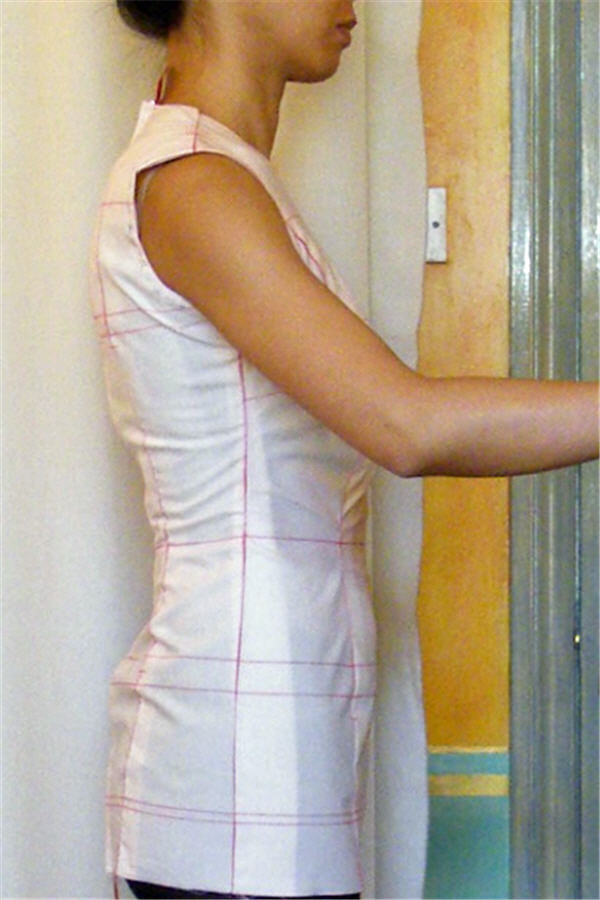
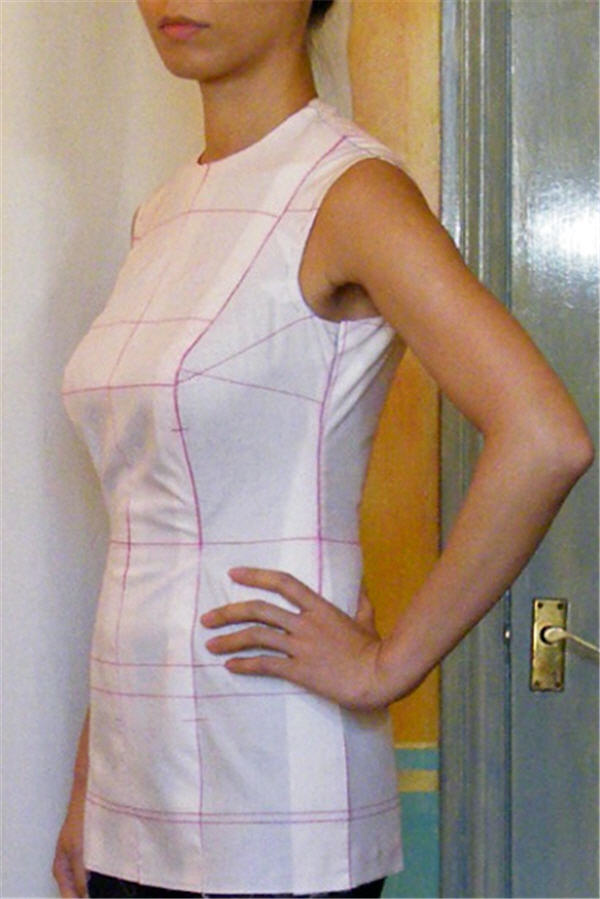
So here is muslin 2:


I’m not good at reading muslin wrinkles, and have a tendency to over-fit, so could really do with your second opinions. Keep in mind this is meant to be skin-tight with zero ease.

What looks off to you?

What needs fixing and what needs to be left well alone?

Do you think I need to…

  1. Do a little bit of sway back adjustment?
  2. Scoop out back armscye a bit more?
  3. Lower right shoulder & armscye a little bit?
  4. Shorten the CF a little – is the looseness under the bust normal?
  5. Make front lower armscye curve more shallow – is it normal to have such a gap there or should it be closer to the arm crease?

Thanks in advance for your feedback & help! 😀

Knit Block experiment 2: BS 2010-02-122

Next up in the Knit Block experiment queue is the rusched bust variation on the raglan T, again previously made as an unintentionally off-the-shoulder marinière top.

The Pattern

Judging by the tech drawings you’d think the fit of this one would be the same as BS 2010-02-112, the plain raglan T. But I discovered while altering both simultaneously this time that 122 is actually larger than 112. That might explain why many makes of 122 have the same fatal flaw – the persistent off-the-shoulder look, which makes an otherwise very wearable top unsuitable for office wear unless you got a jacket or cardie over it.

Style Shots

(Obviously not for the office…)

bs201002122-v2-4style-2bs201002122-v2-4style-6bs201002122-v2-4style-15bs201002122-v2-4style-13

Woohoo wind machine!

Fabric & Notions Used

Again, another one from the stash that was a bit meh because the color doesn’t match the online store photo & the fabric feels a bit scratchy.

Size Used

Size 34 again instead of the recommended 36.

Changes Made

Fitting changes

The process is similar to what I did for 112. But the bust rusching complicates things. It’s been a while now, so I’m a bit hazy about how I did it. I think this is what I did…

  1. Aligned Bodice Patterns with Bodice Blocks at underarm. Again I lowered the pattern slightly for a little bit more ease underarm. The top & bottom of the Front Top Pattern’s CF are roughly equal distance from Block’s CF. Front Bottom Pattern is butted against Front Top Pattern at the side seam with the overlap at CF.
  2. Because of the rusching which complicates the neckline, I checked the width & length first so I can establish how low the rusched CF neckline will be on my chest. Front Patterns were a bit too narrow and the Back Pattern too wide. I added / subtracted width-wise where needed to match my Block more closely. Interestingly the length is already the same as my adjusted 112 without any shortening!
  3. The under-bust seam is way too high. So I lowered it to make it closer to my under-bust line indicated on the Block. The adjusted Front Top Pattern bulges out from the new CF in the same way the original pattern bulges out from the old CF.
  4. I decided to keep the rusching 2″ in length. So I aligned the top of Front Top Pattern to 2″ above the Front Bottom Pattern at CF, keeping the underarm as close to the Block’s underarm as possible.
  5. Aligned Sleeve Pattern’s shoulder mark with Bodice Block’s shoulder seam, then Sleeve Pattern’s neckline with Bodice Pattern’s neckline – or as close as possible, in this case the front doesn’t match exactly. Again, there’s a bit of overlap between the sleeve & bodice.
  6. Removed the overlap at the neckline from the bodice.
  7. The front raglan seam at the neckline seems dangerously close to the armscye. So I reshaped the curve to add a bit more fabric here.
  8. Aligned Sleeve Pattern with Sleeve Block at underarm. Again, pattern lowered slightly for a bit more underarm ease.
  9. Checked the Sleeve widths & lengths. The width again I only narrow towards the wrist. The length, like the Bodice length is almost where it needs to be without much shortening!

The lengths, the extra width at the neckline, and the high under-bust seam make me suspect the top was drafted to hang lower & bigger than 112. No wonder my first make of 122 was way more risqué than my first make of 112, despite making very similar changes.

Design changes

  • Shorten the sleeve to 3/4 sleeve.

Here’s how the final pattern looks compared to the original size 34…

bs201002122-v2-2fit-5

And how it compares to my previous make of the same pattern…

bs201002122-v2-2fit-6

And the mug shot comparison…

Previous Make

This Make

You can see from the various comparison photos why my previous make was falling off my shoulder – the neckline of the first make’s raglan sleeve was almost at my shoulder edge! That’s why its useful to have a knit block, even if you’re not using it for designing your own patterns.

Verdict on the Instruction

Again, the process was a bit of a blur by now…Probably batching. And there was no armscye interfacing to omit as the instruction for this one interface the neckline only!!!???

For the bust rusching I decided to pleat rather than gather. Gathering such meager extra fabric just result in a puffy fattening look IMO. I prefer the more graceful drape of irregular pleats for creating the illusion of a shapely bust.

I also did the rusching after I attached the facing – makes it easier to attached the facing without getting the drape caught in the top-stitiching.

Would I sew it again / Would I recommend it to others

It’s a flattering wardrobe basic I think. And now that I’ve adjusted it so it’s more wearable for work, I most definitely will be making a few more in different fabrics, maybe different length.

And I’d recommend it if you can take the time to correct the fit.

Knit Block experiment 1: BS 2010-02-112

So way before my holiday(s?), I was testing out my knit block. First batch of experiments were on using the block to alter commercial patterns.

To 2-birds-1-stone it, I picked a couple of raglan-T patterns rather than yet another normal sleeved patterns. Actually make that 3-birds-1-stone. A long long time ago, I had made a couple of Burdastyle marinière tops, which despite fitting failings I still wear to death. So this will be the chance to try to rectify those fitting failings & multiply my supply of ever versatile (& flattering) marinière tops. First up, a plain Jane raglan T.

The Pattern

Style Shots & Mug Shots

bs201002112-v2-4style1-1bs201002112-v2-4style1-2bs201002112-v2-4style2-3bs201002112-v2-4style2-old-western

(Mug shots further down for very good reasons!)

Fabric & Notions Used

The fabric was from my stash. And I have loads of it. It was on sale for 5-meters lengths. The color doesn’t really match the online store photo. And the feel is a bit scratchy. So I wasn’t mad about it and happy to use it up for a wearable muslin.

Size Used

Size 34 instead of the recommended 36 since it’s closest to my knit block.

Pattern Changes Made

Fitting change

OK, this time I’m not going to itemize all the alteration measurements. I’ll just show you the process, since that’s the whole point of this experiment – altering with minimum measurements!

The key steps I went through in this test are…

  1. Align Bodice Patterns with Bodice Blocks at underarm. In this case I wanted a little bit more ease underarm, so I lowered the pattern slightly.
  2. Align Sleeve Pattern’s shoulder mark with Bodice Block’s shoulder seam, then Sleeve Pattern’s neckline with Bodice Pattern’s neckline. In this case you can see there’s a bit of overlap between the sleeve & bodice.
  3. Remove the overlap at the neckline – I choose to remove it from the bodice. This makes the neckline smaller, so less likely to fall off my shoulder or expose my bra straps. If I had gap instead of overlap, then I would have patch the gap instead to make the neckline just right.
  4. Check the Bodice widths & lengths. The front just needed length adjustment, and narrowing the waist tiny bit. The back also needed width adjustment along the entire length.
  5. Align Sleeve Pattern with Sleeve Block at underarm. Again, pattern lowered slightly for a bit more underarm ease.
  6. Check the Sleeve widths & lengths. The Sleeve is a bit too long for me. Widthwise it’s wider than my Block, but I felt I could do with a bit more ease at the underarm. So I only narrow the sleeve further down.

Design changes

  • Lower & widen the necklines for a less conservative look.
  • Shorten the Bodice & Sleeve for a hipper retro look.

Here’s how the final pattern looks compared to the original size 34…

bs201002112-v2-2fit-4

And how it compares to my previous make of the same pattern…

bs201002112-v2-2fit-5

Previously I had just made the design changes without doing any fitting changes first. The result was quite wearable, but the neckline was a bit wide, resulting in one too many exposed bra straps. Here are the mug shot comparisons…

Previous Make

This Make

OK, apart from the less risqué neckline, this make looks worse than the previous with all that draglines pointing to the bust in the profile, and the dreaded sway-back type draglines at lower back.

The back draglines are actually better than the previous make – the photos don’t show this that well. But obviously I haven’t crack this nut yet.

The bust draglines…I wonder if it’s to do with the fabric since the pattern widths are pretty much the same. In fact, in the new pattern I move a bit of width from the back to the front – the previous make’s back was a bit loose. The previous make was in what I presumed to be cotton lycra. But now I’m inclined to think it has some rayon in it. All the rayon fabrics I’ve used so far has that really lovely soft feel that just seem to mold to your shape in a knit, or drape flatteringly in a woven. I might have to make this again in a rayon lycra to test this theory.

Verdict on the Instruction

To be honest, it’s so long since I made the top, so I don’t really remember much about the process. I probably streamlined it by batching up seams to be sewn. (I was in production mode with this top & another 2 knit block tests.)

The main deviation I made was in omitting the armscye interfacing.

On normal sleeve knit tops I’ve been stablizing the shoulder seam but not armscye. Reason being I read that shoulder seams will stretch with weight of long sleeves if not stablized. But for close-fitting armscye like these I thought the armhole would be more comfortable if it retain its stretchability. The lycra in the fabric should theoretically help the armscye return to shape should it temporarily stretch out of shape.

For raglan sleeves I can’t figure out what would be the equivalent of the shoulder seam. So I just left out the stablizer altogether.

Now the embellishment…

bs201002112-v2-3design-be-presentThis being a plain T in an almost-not-there color – albeit with a subtle sparkle – I decided to add a bit of interest with fabric painting. Yes, again.

I thought it could be my commitment-phobe version of tattoos. However, standard tattoo black looks too harsh against the peach. So I picked Jacquard Lumiere 561 Metallic Gold which matches the metallic thread in the fabric perfectly.

The designs mimic the tattos that my favorite Japanese singer has.

217925I thought hers look cool not trashy. Her tattoos were also meaningful. So I adapted the designs to make them meaningful to me too.

Mine stands for “Be Present” with a playful twist. “Be” is in the Queen Bee design. “Present” is in the barcode. Read whatever you want into it!

I tried making a stencil for these like Savory Stitches did with her stenciled bees. But the lines were too fine, the fabric too textured, so I couldn’t get clean lines stenciled. In the end it was tracing paper transfer & free-hand again.

Would I sew it again / Would I recommend it to others

A raglan T knit block? What do you think?

Update on Lambswool Interlining

Artisan Square didn’t fail me. The lovely Ann (winner of the first Great British Sewing Bee) offered these advice on working with lambswool interlining:

  • “You don’t  need to preshrink it – it’s not suitable for use in anything that’s going to be laundered.”
  • “It will take heat and steam that you would use on wool, but shouldn’t need much.”
  • “It’s a knit – treat it as such.”
  • “Don’t stretch it at all when pressing – use a light touch just to smooth it if necessary.”

See the full discussion thread at Artisan Square.

The discussion also confirmed that this one from Bergen Tailors & Cleaners Supply Corp in the US is the real deal. It has thin open criss-cross threads that runs diagonally and thick fluffy threads that run length-wise. It’s stretchy in one direction (cross-wise), but stable in the other direction (length-wise). Someone else identified another US source for it, but this one is a bit more expensive. 

Aside

Shockingly small acquisition

You’ll have to excuse me for a while. I just came back from Taiwan and I’m terribly jet lagged. On top of that a laptop upgrade means countless hours setting up again & learning where everything is. I would never understand why companies insist on changing what’s not broken & chasing after the ever new. (In this case Windows 8. In a word: Don’t. Unless you only ever use a tablet rather than traditional PC/laptop.)

Anyway, this time around, I did manage to check out Taipei’s fabric district. I only discovered where it was by chance on my last visit there. I didn’t have time to check it out last time, so this time I made sure it’s first on the agenda.

2013-10-taipei-fabric-mart-12013-10-taipei-fabric-mart-2

Shockingly I only came back with one piece of fabric.

2013-10-silk-print This is from one of the stalls on the second floor of Yongle Fabric Market (永樂市場) that specializes in silks from China. There’s a few of these. Others specialize in quilting fabrics, or at least I assume that’s what they are judging by the sizes of the pieces. There are also a few home furnishing fabric stalls, fake fur or leather stalls. And probably others.

It’s a bit of a maze. And I find I’m not good with choosing from lots of small selections. I get overwhelmed. Give me one of the big organized stores of NYC and I’ll spend a fortune. Drop me in the midst of these bustling markets and I walk away (almost) empty handed! Therein lies the secret to curbing my fabric addiction!

Third floors seem to be loads of small dressmaking stalls. I guess it’s not so much of a home sewer scene (though there seem to be a burgeoning craft scene – cutie bag-making etc) as much as leftover from a time when RTW weren’t so readily available and dressmakers still quite affordable. I remember my mother & aunts mentioning buying fabrics to get dresses made. (A few unused pieces eventually found their way to my stash!)

Apart from Yongle Fabric Market there are also a bunch of small fabric shops in the neighboring streets. A few of these specialize in imports. And boy were the prices sky high! I suppose Taiwan is further from Europe than London or even NYC. So shipping alone would jack up the prices. And perhaps you’re meant to haggle over prices, judging by how my Mom shops (or used to shop) and the fact that most fabrics weren’t labeled with the prices. That, for me, is a terrible turn off. I’m more of a self-service type of gal. What you see on the label is what you pay for. In & out. So no purchases from these shops then.

No idea what I’ll make with this lovely silk print. It reminds me a bit of traditional Chinese paintings. Love peonies! Will have to pay a visit to the blog of the ultimate mistress of prints, the lovely Oonaballoona for inspirations!

And meanwhile on the other side of the earth…

My OH was visiting LA and was tasked with bringing back that rare beast called Lambswool Interlining. This one is from Bergen Tailors & Cleaners Supply Corp.

2013-10-lambswool

Not having worked with this before I’m not sure if this is the same thing that sewing books and more experienced sewers refer to. This one seems to be a knit – there’s quite a bit of stretch crosswise. The fiber content is lambswool & rayon. I can’t find any information on how to work with this – whether you need to pre-shrink it, can it take heat & steam, do you treat it like a knit or woven, etc.

A visit to Artisan Square is in order me thinks. Hopefully one of those experienced sewers who’ve worked with this before can shed some light. And of course if you’ve got the answers to these pressing questions, do share!