2-piece ‘Jumpsuit’ (Halter Top & Style Arc Antoinette Trousers)

The hissy two-part shimmering black snake finally hatched. I tried really hard to get her to this year’s Jungle January Party, but Brain Freeze said No. It didn’t help that I picked two styles of garment that I haven’t tried before. And even she’s made with my Mom’s Kabuki sized top & skirt, there still wasn’t enough fabric for things to go according to plan. So neither part came out as I had hoped. But as they’re memories of Mom, I’ve styled them as best as I could & hope to wear them loads when the weather’s warmer.

Style Shots & Mug Shots

BEFORE

0-fabric-MomsTopSkirt-5b

AFTER

WORN WITH: 3 Burda 2012-05-109 lace applique top; 4 Miss Selfridge jeans; 5 McCall 6078 cowl neck top; 6 Refashioned RTW leopard skirt; 7 Refashioned Mom’s RTW tibra-ziger skirt & sash


The Design & Pattern

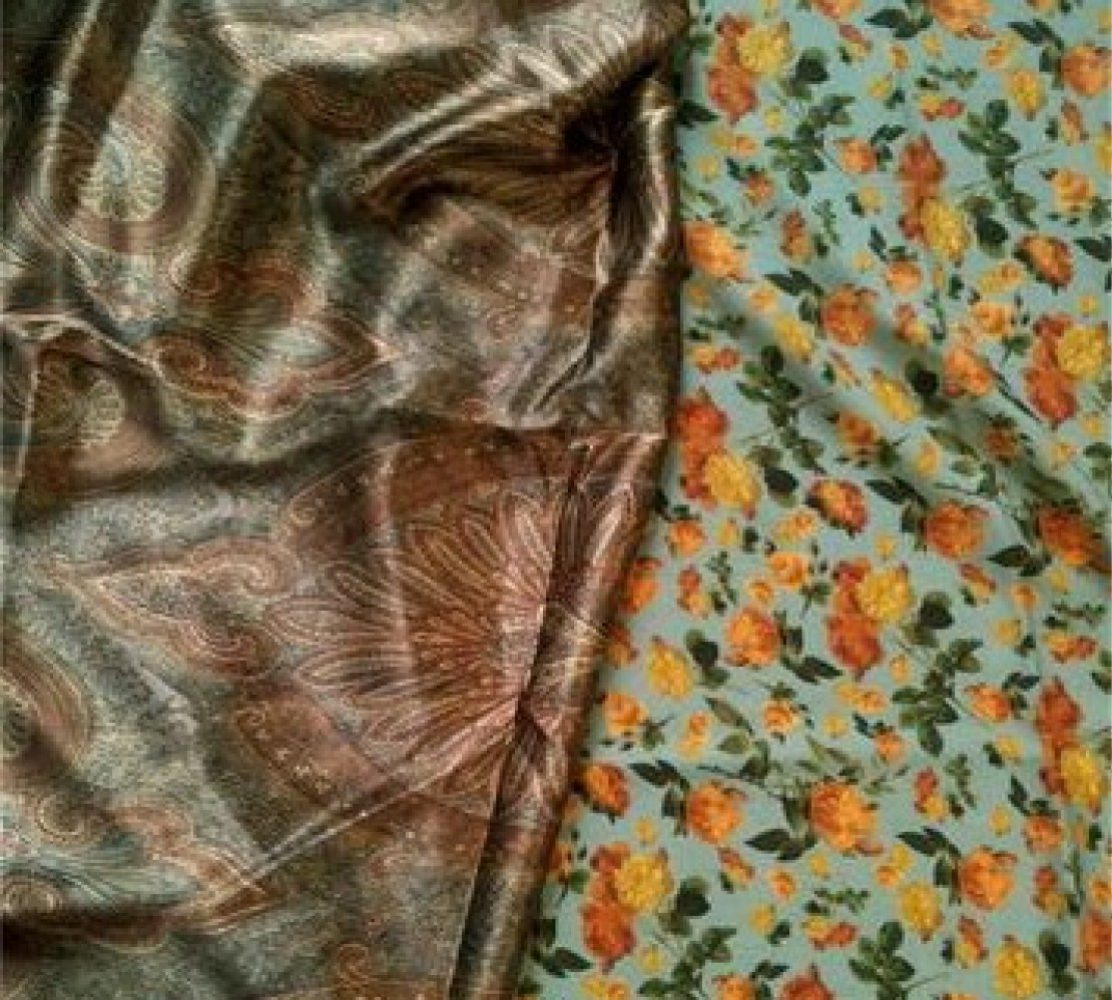
The design started with the drape of the fabric. I thought this slinky knit would be perfect for the side bow tie halter top design that has been stuck in my head like forever. I think I first saw something like this on TV, then on the high street. But now I can’t seem to find a perfect specimen to show you. The closest are these:

0-inspire-eg-10-inspire-eg-2

I was originally planning on using a floral silk Mom gave me, but I was worried that its floatiness would make the front neck gathering (& its inhabitant) too puffy. I felt safer testing the design with this limpy knit. So that’s Mom’s Kabuki top taken care of.

As for the Kabuki skirt, turning it into another shape of skirt would be too easy. And too prim & proper for me. I needed edge. Another vague idea floated up from my primordial soup of mental clippings: matching trousers for a ‘jumpsuit’ look. Ding ding! I get to try a look that I otherwise wouldn’t go near. While I admire jumpsuits on other women, I can’t square with having to strip to go to the loo. This way I get the look without the loo hassle. Plus I multiply my wearing options. Win-win!

Top:

This was draped on Q. I actually sorted the trousers pattern first. And after struggling to fit the ready-made pattern into what I thought would be enough fabrics, I was in no mood for more of the same. Only the front neckline was gathered. The back I kept sleek & went for a slight A-line at the side seams. The neckband I ended up keeping simple & made the bow tie a separate sash for extra wearing options. But now it doesn’t work so well as a bow tie for the top. Win some lose some. The tie this time was made from only one sleeve. The other sleeve was sacrificed to the trouser pockets.

Trousers:

Style Arc Antoinette Pants


…Chosen because it had a bit of slouch & a bit of sleek, so hopefully would fit on the unpicked skirt panels. This is the first time I tried a Style Arc. Love what bloggers like the Clothing Engineer achieved with their patterns, but was put off by the high cost & single size paper pattern format. What if I pick the wrong size? Luckily the Style Arc Etsy shop sells cheaper PDF version of the pattern in multiple sizes. While the multiple sizes are not nested – you’ll have to print out each size separately – at least you won’t have to pay & wait for another size if your first choice isn’t quite right.

I did have to tweak the fit of the trousers, but as I made mine with a knit instead of a woven, it seems pointless to list the changes in details. I may need to tweak the changes again if I make this in a woven or even a different knit. Suffice it to say I needed crouch reshaping, waistline reshaping, and shifting inseam & side-seam slightly towards the centre to get rid of major wrinkling under my bum. I also had to adapt my pencil skirt block to make a replacement waist facing that fits my body shape better. Unfortunately I forgot about the ease in the skirt block, so the trousers hang lower than I wanted.

BTW I moved the zip to the side seam because I just can’t get my head around CB zip on trousers even though I have no problem with CB zip on skirts. But it’s partly about convenience for sure. It’s easier to see what I’m doing with side zips & hooks. And as I grow stiffer with age easier to reach too. For zips that get zipped & unzipped more frequently (think loo again!), these little practical details matter!

Fabric & Notions Used

Construction Notes

  • There were a lot of making it up as I go along. Like figuring out what need to be interfaced or stablised. I think I might have overdone it with the stablisation of the armholes and crotch. The top end up being shorter than when draped originally. The trousers would have been a bit tight in the crotch if the trousers hangs an inch above my belly button as intended, but luckily (?) it hangs lower thanks to built in waist ease.
  • Unfortunately even with the trousers hanging lower than intended the length still wasn’t long enough (due to lack of fabric). I had to add length at the hems with scraps, which unfortunately were on a different grainline. Hopefully it’s not too noticeable, or if it is doesn’t look too odd.
  • All hems were faced with the skirt lining Georgette because (A) I didn’t have enough of the slinky knit, and (B) the glittery bits of the slinky knit is rather scratchy. Most were bias tapes to conserve fabric.
  • Style Arc Antoinette Trousers instruction: This was clear enough for an intermediate sewer like me. It’s a bit on the short side (like Burda), but has diagrams for the tricky bits – like the front pleats (not sure if these were added after JamieDFC’s review on Denver Sew). What still is a bit of a problem is front facing peaking out due to the weight & bulk of the pleats. So like PoldaPop I also tacked my front facing discretely in the pocket / pleat area. That’s something so easy to forget when designing or picking a design – the force of gravity. I’m sure this is not the first time garments go unintentionally lopsided because someone forgot that extra bits of fabric or embellishment also add weight to one side which needs to be balanced somewhere else if the garment is to hang as intended.
  • Sash: I didn’t have enough of the slinky knit to do double layer sash as I normally do. So one side is the skirt lining Georgette. I was worried the slinky knit will grow more than the woven Georgette cut on grain, so it was stablised with ProTRICOT fusible interfacing from Fashion Sewing Supply – chosen because of its claim that it won’t interfere with the drape. The result is softer than the other interfaced bits, but for this super limpy slinky knit the drape does stiffen a little. Still works for this sash though.

The Verdict

Because the top is shorter and the trousers hangs lower than expected, I’m a bit on the fence with this refashioning project. I mean they’re still wearable, but the slight disappointments killed any desire to jump up & down in this psuedo jumpsuit. And does it counts as refashioning when none of the original design feature or sewing were reused?

Regardless, it’s still a piece of Mom with me. But I think I need to move on & get back on track with my SWAP, or at least sew with my own fabrics. It’s quite depressing too to be constantly reminded of Mom, or her absence rather. I’m still not getting the hang of grieving yet…

Tigra-Zeber-Tiber-Zegra Skirt


I really should be sewing right now. A two-part shimmering black snake is hissing at me from the cutting table.

Productivity here still hasn’t recovered from Plutonian shake-ups of last year. But I want to make sure the one beast I did manage to hack together doesn’t miss the Jungle January 2016 Party.

JJ2016-fabricAs I’m still grieving for Mom, this year’s Jungle January pets (and maybe others) will all be refashioning items from her closet. First up is this psychedelic purple top which is now a skirt & a sash scarf/belt. I can’t tell whether this is a Zebra or Tiger stripe. So Tigra-Zeber it is then. Or should that be Tiber-Zegra instead? Anyway, don’t Google “zebra tiger” – the first image that comes up is seriously disturbing!

Style Shots & Mug Shots

WORN WITH: Zara blouse.

WORN WITH: self-draped altered RTW top.

WORN WITH: Vogue Donna Karan 1282 top + RTW cardie from Mom.

Fabric & Notions Used

  • Mystery flocked knit top from Mom’s Closet. I can’t find any photo of her in this, but I vaguely recall it’s a top + skirt combo. She must had this for ages, as the top had all the vertical darts let out presumably to accommodate the middle-age spread. Sadly the skirt’s gone. Sadder still because it means less fabric for me to play with.
  • Lining: Skin color lightweight Power Mesh from Tissu Fabrics. These Power Mesh seem to have become my GoTo lining for knits.
  • Invisible zipper, hook & eye from the Stash.

The Design & Pattern

What design? What pattern! While I wasn’t as wantonly destructive as the contestants of The Great British Sewing Bee in my refashioning, nonetheless as there was preciously little fabric left for proper pattern-drafting, I too had to improvise as I went along. Key seams were all unpicked. I needed every millimeter I could get.

Changes Made

  • SKIRT
    • Swapped front & back. My waist shaping always nudges the back waist on skirts downward rather than stay level at the waist. So the lower front neckline of the top was better suited for my back bottom. Especially as it already comes with bum (formerly bust) shaping. Granted the darts are from the side seams. In a plain fabric I would hesitate to use such shaping for the bum – what can I say, sometimes I give in to herd mentality too. So thank god this busy print hurry your eyes away from the darts to whichever ways.
    • Widened & re-shaped neckline for waist.
    • Re-shaped side seams & hem for A-line skirt shaping as this wastes the least amount of fabric.
    • Added side invisible zipper & hook/eye at the top.
    • Added lining (using main fabric as pattern) & reused neck facing for waist facing.
  • SASH SCARF/BELT

    • Spliced each sleeves length-wise into 4 strips & joined the short ends to create 2 long pieces for double-layered sash. The sleeve caps became the shaped ends of the sash.

The Verdict

Yeah, I could have just left this purple psychedelic top as a top. But then I wouldn’t be able to sent her to the Jungle January Party.

You see, while documenting the top as is, I decided my Mom’s top deserved better than a mug shot. So I found some leopardy playmates for her…

0-fabric-MomsTop-1

I know, it’s crazy busy & not everyone’s cup of tea. I usually don’t wear so much busy prints in one go. I was trying to honour of our gracious hostess by going all out. But actually I secretly LOVE this combination. Something vaguely Italian about it.

The scarf is Mom’s too. I decided against refashioning it. Firstly there’s not enough of it. Secondly some memories should be kept as is, especially as it play nicely with others & fit perfectly into my Look Book anyway.

The skirt is another altered RTW from 2012 & it’s the best shade of leopard that’s not high on something or other. The golden yellow is the perfect match for the psychedelic purple Tigra-Zeber-Tiber-Zegra. ‘Complementary colors’ they call it right? Most yellow leopards are such dull beasts. Not this skirt.

But now that TZTZ is also a skirt they won’t play nicely together anymore. So the hunt is on. Oh, did I just find an excuse to expand my stash? Oops.

2015/16 Janus Post

Hello everyone. It’s that time of the year again.
Festive cheers to you all!

It’s been a hard year for me with Mom getting stomach cancer half-way through the year. I had to check out of my sewing room & rush to her side. In the end I could do little for her. She passed away just a couple of weeks before my birthday. I had planned to care for her through the holiday season & wasn’t expecting her to go so quickly. So this has been a lonely Xmas stuck in a now-to-me foreign place sorting out the aftermath of her passing. Not sure if I’ll get my sewing mojo back anytime soon. Then again refashioning a few of her outfits may be a good way to honour her & keep her in my life.

Looking Backward

SWAP items sewn:
0

Number of items completed:
22 including fixes & wearable muslins.

So depending on one’s perspective I either did rather poorly or really well.

2015 Total: 22 makes
Garment types
1ish Dress (2 skresses!)
16 Tops (2 fixes)
3ish Skirts (inc 2 skresses!)
1 Cardie
1 Bag (fix)
Pattern brands
20 Self-drafted
2 Burda
View all 2015 makes at a glance…

This was the year of the selfies…as in self-drafted patterns. By testing in batches of 3-4 wearable muslins, I managed to breeze past last few year’s tallies in the first half of the year. I’m sure the second half would have been just as productive if not more. But Life happened.

The winners of 2015 …

First up, winner in the most wearable but not too boring stake is my Dolce & Gabbana Wannabe Cardi. I lamented my unsuccessful attempt at mock-ribbing at the time. But the result is still flattering & versatile. Came in really handy when it was hot outside but freezing in the air-conditioned hospital.

The next two I’m proud of because they stretched my drafting & design skills, and weren’t total mess at the end.

I wasn’t sure my Fortuny Top would work out what with the complicated innards – the result of a band-aid approach to draping. But it’s actually quite comfortable to wear. And aesthetically it’s right up my alley with a mix of soft & edgy, feminine & masculine. Definitely much more wearable than it’s previous incarnation as a head-in-the-cloud Fortuny Delphos Wannabe Dress.

My Westwood+CdG Love Child Wannabe Peplum Top is more of an one-trick pony. But by Jove, not only was it interesting pattern-drafting, it was also a mind-twister when it came to construction order. Really proud. Pat on back. Smug face.

The next two made my list for being wearable muslins with an attitude.

Camden Town Kids Wannabe Top started out as a bog standard knit block muslin. Simple addition of puff over-sleeves, a tweaked neckline, plus a play with both sides of an otherwise ugly knit turned it into something much more interesting that’s still quite versatile & right up my alley.

East & Easter Tunic was again an ugly fabric sacrificed for block testing which I manage to salvage with addition of ribbons & soutache. That’s why I can’t even part with ugly fabrics. Sometimes they can still be turned into respectable ladies with the right design. Sorry MR. They’re all staying!

And the 2015 misses…

  • I tried. But sleeveless ruched bust tops & I are just not friends. My going-down-south boobs just aren’t flattered. Witness exhibits A Candy Cane Halter Top & exhibit B Strap to Strapless Mustard Top: Too much expanses above the boobs, too little between the boobs & the waist.
  • And Kimono Kaftan is too delicate a flower for my not too delicate manner. Besides, I don’t get enough beachy holidays to justify it taking space in my cupboard. But it is a nice colour & print. I still plan to remake it into something more wearable in the city.

2015 in closing

  • I’m thankful that the groundwork laid last year panned out into more numerous & interesting makes this year, even if majority of them are still wearable muslins. I have yet to memorialise the blocks into something more hardwearing – they’re still all tracing paper drafts at the moment & easily damaged. It’s quite slow-going. I get confused by so many drafts laying about. But I will plough on, and hopefully add some key missing blocks in 2016, like trousers.
  • SWAPing didn’t really worked for me this year. I kept thinking I don’t have the right block for that design yet. Yes, some could have been made with commercial patterns as well. But I thought I’d get better fit & kept thinking I’m almost there. Hopefully SWAPing will resume in 2016.
  • Jungle-January-2015_1600x100016 May 2015
    This year I’ve been unusually social by my introverted standards, what with joining in with all the Jungle January & Me Made May merriment. But both were very rewarding. First JJ pushed me to churn out 4 makes, including two of my Best Of’s. Then MMM expanded my selfie skills by being too much of a hassle if I were to get out the proper camera-tripod getup everday. Now my smartphone is my weapon of choice. I’ve even got myself an octopusy tripod (Joby GripTight GorillaPod Magnetic) so I can experiment with more angles. Now if only I can master depth of field control on a smartphone, or proper camera for that matter…

Looking Forward

I hope I will get my sewing mojo back soon after I’m home in my lair. Right now it’s hard to imagine what the coming year will be like sewing-wise. I’m still trying to catch my breath & process what had just happened this year.

I know I want to honour my Mom by refashioning some of her clothing. I was going to donate bulk of it to charity, but made the mistake of trying them on first. With my fabric hunter goggle on they appear not too shabby even if the sizing is a bit dowdy on me. She has many prints that I wouldn’t have picked up normally. But as they’re there for the taking, I’m thinking this is my chance to be more like all you Mistresses of Prints (you know who you are!)…

So, first up I think maybe some animal prints for Jungle January 2016. Now you have to help me here as I don’t know my animal prints for ****

JJ2016-fabric

I think I recognize a black snake & purple zebra & maybe a brown leopard in my Mom’s safari park, but is that grey spotty velvet in the top left an animal?

I’ve also picked out some blindingly bling gold ensemble for refashioning. We shall see what else I’ll manage to squeeze into my luggage as MR’s present will be taking up a bit of room…

MR-present

Hand IT over!

(No, he is only getting one.
But I’ve been given strict order to keep the Evil One NRFB.)

And finally,
Happy New Year!
And make many promises that you know you’re never going to keep!
Like taming that stash!
xxx
😛

Finish It…: East & Easter Tunic

Well hello there! Long time no see. Hope you are all well.

I disappeared for a while because my Mom was diagnosed with aggressive late stage stomach cancer 🙁 Her whole stomach is now removed & she will need chemo going forward. I’ve been & will be on filial duty for a while. Unfortunately she’s on the other side of the world. So not much sewing is going to get done rest of this year. But here is one last project I managed to finish while my siblings take over for a couple of weeks.

This project was part of my Fix/Finish It June-July sewing plan. I had already finished all the machine work by the time I learnt about my Mom’s illness. I did consider taking the hand sewing with me. But it was just as well I didn’t, since trying to understand & speak Chinese all day long left me unfit to do anything else.

The Inspiration & Design

1-bs-2013-02-121_photoTo recap, this started out as the muslin for my self-drafted Tunic Block, which is essentially an experiment in going dartless with my Top Block.

Now the Tunic is another classic that deserves a place in almost everyone’s wardrobe. I like the vaguely ethnic variety. My starting inspiration for turning this muslin into a tunic was Burda 2013-02-121 Flared Tunic. What would you call this – Moroccan?

I also collected a bunch of other examples – both what I don’t like & what I do like. Sometimes it’s useful to compare the two to figure out what makes or breaks a design.

Mine ends up being a mishmash of the Burda original and the swirly soutache designs. The design details were made up as I went along, testing different ribbons & soutache/Russia Braid arrangements.

Style Shots & Mug Shots

The Pattern

  • Block: Self-drafted Tunic Block
  • Design changes:
    • Enlarged neckline: CB 0″ lower – Sides 1″ wider – CF 2″ lower.
    • Lengths used: Bodice bum length, Sleeves wrist length.
    • Widen sleeve hems by 7″ total, tapering to nothing at mid upper arm.
    • Added CF slit: Measured same 2-1/2″ up from my Block’s waistline as on Burda 2013-02-121 for bottom of slit.
    • Added side seam slits: Measured same 7″ up from hem as on Burda 2013-02-121 for top of slits.

Fabric & Notions Used

Construction Notes

  • I mostly followed the instruction for Burda 2013-02-121 with the following key exceptions:
    • 2-sew-closuresMy fabric was too heavy to make spaghetti button loops. So I used the soutache cord for the loops & hand-sewn this along with the flat buttons to the inside of the CF slits after rest of the tunic was done.
    • CF ribbon trims were stitched before the neckline seam so that the ends of the ribbons would be hidden in the neckline seam.
    • Sleeve & bodice hem trims were stitched before the hems were turn inside, again for a tidier inside finish.
    • 2-sew-soutache1The soutache embellishment were sewn by hand. I tried machine-stitching this as shown in this YouTube video, but found mine a bit too skinny, stretchy & otherwise unwieldy. I will try again some day on another project maybe with a wider soutache…

The Verdict

Somehow my tunic ends up also looking vaguely Chinese. I guess there is no escaping my DNA eh? 🙂

I’m fairly happy with the result though. Now I just need some bottoms to go with the tunic. Maybe it’s time to venture into trousers/pants making? OK, maybe next year. Mom comes first.

Finish It July: Candy Cane Halter Top

Yes, I’m done with fixing. Or at least I’ve had enough. But I’m still not in the mood for starting totally afresh. So my next project is a finishing project. As in finishing the last scraps of stripy knit I used for the Knit Top Block tests earlier in the year (Dartless Knit Top Block and Semi-fitted+Raglan Knit Top Blocks).

The Inspiration & Design

There wasn’t enough left for a normal T, even a sleeveless one. But there was just about enough for a strapless one, like the Bandeau Ruched Bust Top I just finished recently. My inspiration actually was an outfit from Burda 2013-13. (I already made a similar lace skirt. So now the stripy top. And yes, I’m plotting to eventually make the minty cardi as well!)

The stripy top isn’t available as a Burda pattern, and it looks like it’s a bustier top rather than a knit ruched bust top. But I thought the silhouette would be close enough. And I’m in no mood for drafting anything new & complicated. Being paranoid about tuby top over exposure, I decided to add halter straps as well.  This was partly inspired by 1953’s Butterick 6518 which is featured in Blueprints of Fashion: Home Sewing Patterns of the 1950s. (I plan to one day make something like that too!)

Style Shots & Mug Shots

WORN WITH: 1 & 4 Refashioned RTW pleated skirt; 2 TopShop Martha jeans; 3 Refashioned RTW A-line skirt; 5 Self-drafted lace skirt;

The Pattern

  • Block: Self-drafted Ruched Bust Tube Top
  • Design changes:
    • Added contrasting band at neckline: rectangle measuring neckline length x 3/4″ folded + SA, cut on crossgrain.
    • Added halter straps: rectangles 2″ folded x length required to tie around neck CB, cut on crossgrain. This is positioned from front princess line outward towards the side seam.
    • Added removable bust padding: pattern is based on shelf-bra bust area with the triangular bit at CF underbust removed, and no SA added.
  • Fitting changes:
    • Added back the triangle at CF underbust that I had cut off for the Mustard version. I originally sewn this up without any fitting changes, forgetting that knit fabrics can behave differently. The Mustard fabric had much more stretch both direction & was more susceptible to gravity. So the triangle was surplus to requirement & ballooned unattractively underbust. In this fabric however, it was needed to get rid of unsightly draglines. I was going to live with the defect, but then thought it would be better to test the fix on this wearable scrap muslin make.

Fabric & Notions Used

Construction Notes

  • The construction is mostly the same as the Mustard version, with the following differences:
    • Removable bust padding: Each pad is two layers. Princess seam in each padding layer is sewn separately using butted zig-zag stitches. The two layers for each pad are then overlocked together at the outer edges.
    • Shelf Bra: This time I varied the bust dart position for the Fabric vs Power Mesh layer to avoid a build up of layers that shows through the outer layer. Fabric side seam is sewn at top SA & lower 1″ only, leaving a gap for the removable bust padding to be inserted/removed. The front SA at the gap is top-stitched in place. The back SA at the gap is sandwiched between the F&B SA of the Power Mesh side seam. Rigilene boning is sewn to this Power Mesh side seam SA, so again sandwiched between the two layers of the Shelf Bra.
    • Neckline: The band is stitched to bodice neckline wrong sides together. The knitted elastic short ends are stitched to the CF double layer Power Mesh, then stitched to the seam allowances of the band/bodice neckline. The straps are stitched to the band at the inner SA (long side/upper edge in the photo) & at the fold line. Shelf Bra neckline is then stitched to the band’s inner SA, flipped inside at the fold line, and top-stitched in the band/bodice seam ditch. CF is then gathered / pleated, and the tab folded over the band fold line / top edge & hand stitched inside like with the Mustard version.

The Verdict

I’m pretty happy with the design. Love the visual interest the perpendicular stripes of the neckline band & straps add. It’s a nice variation for Breton stripe. But…

I’m not convinced these variations of strapless tops really suit my short-waisted torso. The proportion isn’t flattering when they are worn tucked in. The ratio of exposed chest vs bodice vs lower half makes the torso look even more squashed. This one is slightly better than the Mustard version because the wide straps breaks up that expanse of exposed chest & make this look less like a strapless.

And my attempt at sweetheart neckline in these ruched bust tops are just not happening. I should have paid more attention to Stretch Pattern School’s lesson on tension line. The elastic at the neckline simply cannot keep the top up and dip in the CF at the same time. I will have to find other ways of keeping the neckline up if I want a sweetheart neckline.

Otherwise a decent effort don’t you think? 😉 A- then!