Merry Xmas all!

I don’t really celebrate – being a scattered immigrant family we didn’t grow up with any strongly ingrained holiday traditions. But the festive spirit can’t but rub off on you innit! So out came the Xmas angel and decoration I made a few years ago. But on a rosemary pyramid that will hopefully see me through a new year of fragrant cooking.

Digging out photos of last time I realize I’m still missing a few bits…


The popcorn strings didn’t last very long. They crumble all over the place. So I don’t think I will be making fresh ones this year. Besides they’re better for eating! The orange clove pomanders and cinnamon sticks are still in good shape, so back on the tree. And I must get more candy canes. They’re about the only thing I remember from childhood Christmas – just the one lasting memory of sucking the tips till they’re sharp like pencil!

Anyway, to all who are celebrating I wish you a Very Merry Christmas!

Hats off to Issy Blow, Fashion Galore indeed!

I feel hungover today. Not from el vino mind you, though it is the festive season in one of the drinking capital of the world. No, I think it’s intoxication of the inspirational kind. You see, I went to see the new Isabella Blow: Fashion Galore exhibit at the Somerset House, London with a friend last night.Ā And she was a living, breathing, walking work of art. Along withĀ  live beautifully lived, if cut a bit too short.

me-and-issy

Issy Blow will not everyone’s cup of tea, but she represent such a unique British spirit. A bit aristocratic and eccentric, a heady mix of tradition and punk (in the same vein that Vivienne Westwood is too). Think Lady Gaga, but much more pervasive, seeping deeper into the pore of life. She is a truer heir to the surrealists like Schiaparelli. Though she’s a fashion editor rather than a designer, her discoveries and collaborations extends to her everyday and not just for shows and events. You feel she’s not just out to shock and impress others, but that she really enjoy her outfits and bringing them to life.

And I love how irreverent she can be with those priceless masterpieces of fashion too. I hate it when art is contained, treated preciously, starved of air. (In my youth when I was buying the occasional designer pieces I had similar attitude, wearing them to the painting studio, and yes once or twice gotten oil paint on them.)

The exhibit is of the extraordinary designer clothing, hats, and shoes she owned. They were going to be auction off to pay inheritance tax. But her friend and wealthy heiress Daphane Guinness halted the auction and bought the entire collection. She and other friends of Issy Blow put together this fabulous exhibit.

The collection famously contain Alexander McQueen‘s first collection from his fashion degree graduation show. And there are quite a few exquisite pieces by McQueen, who apprenticed with the fine tailors of Savile Row before getting his degree from the famous Central St Martin. I love his deconstructed tailored looks.


There’s a room full of the finest pieces from his Dante’s Inferno themed Autumn/Winter 1996 show. I wanted to take pictures for design and sewing inspirations, but was told off when the guards caught me after this one and only shot šŸ™

mcqueen-aw-1996

I’m seriously considering paying another Ā£12.50 to see the show again and bring along a sketch pad to note down all the inspiring details.

My friend doesn’t sew, so was more into the outre hats. Here are a couple of photos she managed to sneak in before being told off too. Stingy guards!

hat1hat2

There are more photos to be found here:

The exhibit is on until 2 March 2014. I highly recommend it. And hopefully it’ll travel to other edgy fashion capitals of the world, like NYC!

In the meanwhile, I must be off hunting for the best books on Issy Blow and Alexander McQueen! I feel so inspired to sew and make art, even if my everyday life can’t be as glamorous as theirs!

Pencil Skirt sloper quest

If only it were the height of summer instead of chilly winter here…So even though my bodice slopers are done, I can’t really put them to good use. Boo. I haven’t got sleeve slopers to make them practical for winter. And sleeves sound like they’d be a royal pain to draft and fit.

So what do I do? Move on to a pencil skirt sloper of course. I mean, how difficult can they be to fit right? Well, maybe just a tiny bit if you’re fussy not only about the wrinkles, but also about any potential frump factor. I like my pencil skirts fashionlicious, not corporate teamaker ready.

Since I had fairly good success with Kenneth King’s bodice moulage, and saw the success ClioĀ  had with herĀ Kenneth King pencil skirt, I decided to start with Mr King’s Skirt draft instructions. Here are the results based on following the instruction strictly:

1-f1-sR1-b1-sL

Hmm…They may be the instruction taught by the Parisian couture pattern drafting system, but my result looks a tad frumpy to me. That’s the thing isn’t it, there are all sorts of experts and systems out there. But you just don’t know if their vision of loveliness is to your taste or not. And we also know that taste and trends change. So are the instructions from the various pattern-drafting camps up to date with current trends? Do all those couture dissecting books examine current couture and not just past examples?

Even if they are current, are they designing for the target market that you’re aspiring to?
Dennic Chunman Lo talks about a designer’s signature fit in his Patternmaking book, how clothing aimed at mass market may have a different cut to those at higher price designer end (and how nowadays jacket shoulders have a lot less ease / shoulder extension than before). Maybe some of the industry experts instruction are geared towards designs for a different audience than you.

Of course it could simply be that my figure isn’t suited to pencil skirts and no amount of tweaking is going to fix that. Maybe they only look fab on stick insect models or curvy goddesses. Also, have you notice a lot of these skirts are shown with legs crossed or slightly apart? Maybe at attention stance doesn’t show off these skirt well. (And I don’t know why some people call untapered skirts pencil skirts. To me they’re just straight skirts. I mean pencils have tapered points, right? You can’t write with them otherwise. Why call them pencil skirts if they’re not similarly tapered???)

Anyway, long story short, I tried tweaking the muslin to my taste. I want a more noticeable tapering at the hemline. And a bottom hugging back.

What can I say, I have booty envy. Mine are a bit flat. So I’m unable to fill out normal cuts like some of you can. I’m not sure how one would achieve this. Can you just taper more at the back side seams? Have anyone tried that? Does it cause weird twisting of the side seams or rippling in the stitching (due to difference in degrees of bias between the front side seam and the back side seam)?

I checked out a few high street shops and noticed some pencil skirts seem to taper on CB seam as well as the side seams. I’ve never seen this in commercial patterns and pattern-drafting book. Have you?

My last resort would be to add back princess lines and use them to add more tapering to the back. I’ve done this before with previous pencil skirts, some of which were perhaps a bit too tapered – making going to the bathroom a bit troublesome, especially in dresses with such over-tapered skirts!

That reminds me I need to be careful that I don’t over do the tapering so that it’s hard to walk / sit / climb the stairs in, or go to the loo! (Note to self: must test drive the final muslin like Clio does.) That’s another gripe I have with existing pattern-drafting / fitting instructions – they may tell you how to add ease, but not why that much or why add it there. Not knowing the principles makes it impossible to adjust the instruction to update or personalize the fit.


That’s why I’ve ordered the reprint of Theory of Garment-Pattern Making by W. H. Hulme from the 1950s. It supposedly covers things like the effect of anatomy, proportion, and movement on garment design and pattern drafting. I’m hoping it’ll answer my question about what ease is really necessary where. Here’s Fashion Incubator’s review of the book.

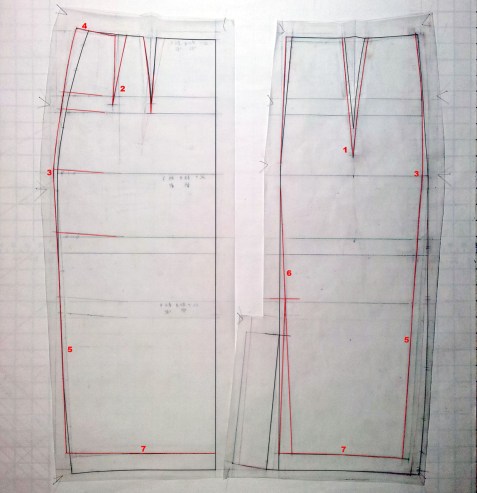
In the meanwhile I tried the following changes:

pencil-skirt-sloper-fit-pat-alt

  1. Increased the dart depths and made side curve above the hip shallower to match my bodice moulage.
  2. In the front I split the deeper dart depth into two darts per side. When I tried one deeper dart, it points right at the hollow between my tummy and my protruding thigh, so looked wrong. Splitting into two allows me to have one dart accommodate my tummy and the other my protruding hipbone.
  3. Moved almost all the hip ease to the front so that the back would hopefully hug my bottom better and the front accommodate my protruding thigh and forward limb movement (walking, sitting).
  4. 2-0alt-front-thigh Added the front ease for protruding thigh using the technique shown in Fitting and Pattern Alteration. The slight tilting up at the side seam seems like it might also push the ease forward rather than side-way and make the front view slimmer looking. I think the side-way expansion of the standard draft doesn’t skim my front-back body well, so makes the skirt look slightly too big and therefore frumpy.
  5. Straighten the side tapering (the original draft has slight curve) and made back side seam match the front side seam angle (for some reason, my original draft based on the calculation instruction came out with less tapering on the back vs the front).
  6. Tried tapering a little bit at CB below the hip as well. Above the hip I made the tapering less deep so it’d match my bodice moulage. Why? Oh, I don’t really know. Maybe “why mess with a moulage that seems to fit”?
  7. Shortened the skirt about 1″. I would never understand guidelines that recommend the same length for everyone.

Here’s the result:

2-f2-sR2-b2-sL

I hope I’m not deluding myself here. I think the changes does make the skirt look smarter, more like how pencil skirts look on all you gorgeous gals. Short of getting booty boosting Spanx I think this will be as close as I’m going to get to a practical yet flattering pencil skirt without the princess seams. I might still add princess seams occasionally for a even more tapered look on some skirts. But for dresses this will definitely be as tapered as I’m going to go unless the fabric has more stretch.

Now should I try this out in a bog standard corporate wool? Or should I go for variations in some funkier fabrics? I already have three fabrics lined up for this silhouette, if not exactly this bog standard boring darts+CB vent pattern.

231

Custom Dress Form v2.0: wrap up

To all of you who complimented Q, she said “Thanks!” with a huge grin on her non-existent face! Thought I’d let you know via a post since I’m not sure you get notified of my replies to your comments.

OK, let’s wrap up with a few thoughts and suggestions for those of you less crazy than me but still looking for a serviceable dress form.

Do I need a pinnable dress form?

Will you be creating new designs by draping or just checking the fit of flat / commercial patterns? If you just want a fitting tool, then you may not even need a pinnable dress form. After all, you won’t be pinning into your flesh. So you may even get more accurate reading if you let your muslin or garment hang off the form like it would on you. That way, you’ll spot the too large neckline or other bits that might not stay put before it’s too late.

Yes pinnable won’t hurt if you have good fitting habits. And it would certainly be needed if you aspire to designing by draping. But give yourself an easy way out if you don’t have the money to buy one or patience to make one.

How accurately should the dress form reflect my figure?

OK, I’m no fitting expert, so take my 2 cents here with big pinch of salt. It’s tempting to have a mirror image of you. But I wonder if it’s really necessary to see every bump. Especially since we shift shape constantly. Just by breathing, moving, how much we ate that day, time of the month, etc. It’s probably one reason why it’s so difficult to get accurate measurements. I don’t know if it’s even possible to have a dress form that will be completely faithful to your figure 100% of the time. Any of the wrap methods – Plaster + Expanding Foam, Duct Tape, Paper Tape – will wrap in your breathing ease. So even the most accurateĀ Plaster + Expanding Foam method will need adjusting.

But since most of us will be making garments with ease rather than skin tight garments, I’m not sure that level of accuracy is absolutely necessary. I think theĀ Duct Tape / Paper Tape methods will be accurate enough. If you have figure variations that are significant enough to affect fit of garment with some ease, then they will probably be big enough to show up in yourĀ Duct Tape / Paper Tape dress form.

Some of us also are uncomfortable having such an accurate model of ourselves in the house for all to see. TheĀ Duct Tape / Paper Tape methods when covered with fabric probably produce a less scary version of our body.

You can tellĀ Plaster + Expanding Foam method isn’t my favorite can’t you? šŸ™‚ For me, the benefit of it’s accuracy – and it certainly is the most accurate of the various methods judging by the forms out on the blogsphere – isn’t enticing enough to overcome the mess and fume of that process. But maybe you don’t mind the mess and really want the most accurate form possible. In that case I’d recommend checking out these links before you start:

Duct Tape or Paper Tape?

There sure are a lot ofĀ Duct Tape forms out there. A lot of the period re-enactment costumers seem to make Duct Tape forms, even with legs and arms.

Having tried both I think I like Paper Tape form better now. Duct Tape forms you definitely need to stuff for the form to maintain your shape. And you’ll be surprised at how much the stuffing weighs once tightly packed in. So you’ll need a sturdy stand.

Paper Tape form if you add enough layers seems like it’ll be stiff enough to hold its shape without stuffing. After all, Wolf Forms are a variation of paper forms – their forms are hollow and made of 3/4″- 1″ thick cardboard Papier MĆ¢chĆ©. Mine which is about 1/8″ thick took about 11 layers of tape. If you’re concerned about sturdiness, you can try reinforcing the paper tape form with a 1″ layer of expanding form inside like this woman did. The short of it is your form is more likely to be light enough to not need a heavy duty stand, which may or may not be easily available / affordable depending on where you live.

Additional tips for Paper Tape form…

What to wear underneath:

  • Do wear the type of undergarment you normally wear. Don’t wear old bras that don’t support you as your normal bras do. This method won’t ruin your undergarment if you cut carefully. So give your form the shape you normally have!
  • For the base layer of the form, wear a dry cleaning plastic bag or garbage bag. You can use plastic wrap, but you may need multiple layers which you then need to peel off from the inside to avoid air bubbles between paper layers. It may also stick to the skin more and be harder to cut off. Avoid T-shirt etc since they add too much bulk and cause inaccuracy. Tights, leotards, and swimsuit may have the opposite effect of compressing your squishy bits and againĀ cause inaccuracy. Shapewear may be OK if you normally wear them, but it may be harder to cut off.

Type of paper tape:

  • Many people make theirs with gummed paper tape that you have to moisten. I’d recommend doing the wrapping with self-adhesive paper tape, then reinforcing with the gummed paper tape only after it’s off you. The self-adhesive tape is less messy and quicker to use for the wrapping process – no time wasted wetting the tape or drying it enough so it’ll hold its shape. This means less immobility for you as a wrapee, and less patience required of the wrapper.
  • 4-layers of self-adhesive tape seemed stiff enough to hold the shape long enough for the form to be cut off, taped together, then reinforced.

Maximizing accuracy:

During wrapping:

  • Wrapping order is important! Both for your comfort and to minimize inaccuracy. The longer you are wrapped in the more likely extra ease is going to get wrapped in as you try to catch your breath or fidget in your tight paper sausage case. I like the order recommended by Connie Crawford: Bottom first, then back and side underarm, then chest and bust, and lastly abdomen. That means the areas most affected by breathing is left free for as long as possible. But you might want to vary this depending on how you tend to breath – some people breath into their belly, others into their chest. Observe which area expands the most when you breath in and wrap that last. Connie’s instruction is available as video on DVD, which seems quite detailed, and in her pattern-drafting book in less details. It was also featured on Sew News website, but is now gone. (I saved a copy while it was still online.)
  • It doesn’t seem like it’d be possible to wrap too tightly, but some people do get over-enthusiastic when wrapping the squishy bits. Make sure your wrapper is mindful of this risk. Unless you wear shapewear all the time, you probably don’t want your squishy bits to be overly compressed. You’ll only end up with a less useful form even if it looks more flattering.
  • The breast area is another tricky area. Make sure you use the cross-your-heart duct-tape trick to built in some cleavage in your garbage bag base. And be careful not to wrap the girls too tightly.
  • For all curvy / shapely areas, use smaller / thinner pieces of tape to avoid wrinkles, air bubbles, flattened shapes, or having to cut fiddly darts in the paper tape. It’s OK to wrap diagonally if that’s where the curve want the tape to go. Just make sure you end up with about 4 layers everywhere before cutting off.

After it’s off:

  • Once you cut off the form, tape it back immediately and reinforce with a layer of self-adhesive paper tape on the inside. Then a layer of gummed paper tape on the outside and another on the inside. Next trace the holes – neck, armholes, hem. This gives you insurance against inaccuracy introduced by any subsequent tinkering. Make sure to mark the front, back, right, and left.
  • Check the key measurements.
    • If they are larger, check if they are the same as your measurement when you inhaled and held your breath. If it is the same or smaller, then it’s probably breathing ease you wrapped in. You need to decide if it’s worth removing this. If you’re always going to make garments with some ease, you might want to keep the form as is and just note how much breathing ease is already built in. It means when you’re fitting garments on your form, you can make it more close fitting.
    • If the larger measurements isn’t due to breathing, then you may want to remove that by cutting and re-taping where necessary.
    • If it’s too small by quite a bit, you may want to use something else to add bulk first before smoothing over with more tape – eg card boards, foam pads (result may be a bit squishy). Trying to bulk up simply with more tape will take a long time. I learnt the hard way. Or if you’re adding padding for a pinnable form, you can always wait until the padding stage to fatten your form where needed.
  • If the measurements are all good (enough), then time to decide if you want pinnable or not.
    • If you don’t need pinnable, then simply reinforce the form with more layers of tapes on the inside, and expanding foam if you want. Then cover up the holes with cardboards cut to the tracings you made earlier. If you’re adding a stand, you may need to cut a hole for the stand first before you cover up the holes.
    • If you want pinnable, you can go down the fabric cover route for less hassle. You’ll have to pin to the fabric rather than stab the form.
    • You can use knit for an easier cover to make. But keep in mind that any guiding lines drawn or sewn on the cover (eg CF, CB, sides, bust, waist, hip) may shift, so won’t be accurate.
    • Woven cover is probably better, and you don’t necessarily need to learn draping to make one! You can tryĀ Fashion Incubator’s saran/plastic wrap sloper pattern-making method on your form to create the patterns for your woven cover. That way you also get an easy moulage as well! (Not quite a sloper with wearing ease, but the skin-tight version.) Do double-check the accuracy of the patterns by trying out a muslin or your cover on yourself. It should be skin-tight with minimum wrinkles. For the cover you may want to make it with princess seams or more darts than normal to ensure better accuracy.
    • If you’re going down the same route as me – performing a reduction surgery, then fattening back up with padding – I’d still recommend making your cover at this point. It’s more insurance against inaccuracy introduced by any subsequent tinkering. I wish I had done this. I was only saved by having drafted my moulage separately. But plastic wrapping the form at this stage is an easier alternative. The rest is as I’ve already written. Just use the same cover patterns for the fusible interfacing to rein in the padding.

An arm or two for Q?

Tina Lou mentioned arms for Q in her comment on my last post. And indeed I do plan to make arms for Q. Just not yet. Too much effort all at once even for me!

The Sew News version of Connie’s instruction does have a brief instruction for the arms. Not sure if her DVD covers them in more details. (Contact me if you’re desperate for a copy of the Sew News instruction.)

But the best instruction I’ve come across so far is Pandemic Apparel’s photo-illustrated instruction for dress form ‘sleeve’. However, I might do the plastic wrap method on a duct tape arm I made for Big Bertha that I never used instead of drafting a sleeve pattern from scratch.


So that’s about it then for the dress form wrap up. I’m now desperate for a wearable project. If only I have more time off work…sigh.

Custom Dress Form v2.0: part 4

As you’ve already met Q, let’s get straight down to business shall we.

Most of the following steps are a hodgepodge of Suzanne Stern‘s couture dress form customization instruction on Threads Archive DVD (issues 44, 45, 48) and Wolf Forms production process article again onĀ  Threads Archive DVD (issue 141) and the How It’s Made TV segment on Wolf Forms on YouTube.

3-3 To recap, I’ve now got Q post reduction surgery and on her one flimsy PVC leg with a hefty wooden hoof. Next up was fattening her back up.

As she was originally my size with a fairly uniform reduction (1/2″ at CF, CB, sides), theoretically I can put an even layer of padding on her. But I might have complicated things a little bit by also taking in a little bit for the breathing ease that was wrapped into the original paper tape – I want the option to be able to make skin-tight corset or evening dress.

So one precaution I took was to cut rayon seam binding tapes measured to my key circumference measurements (+ a bit for overlapping & pinning / sewing close). After I wrapped an even layer of 2-1/2 oz cotton-wool blend upholstery padding, I wrapped these seam binding tapes around the padded form and made sure the fluffy padding can be compressed to the right size. If the tapes won’t close at the markings then there’s too much padding, if it’s loose then there’s not enough padding. Here she is with her lovely rolls spilling over the tapes!

4-1 4-2

A second precaution is to use my moulage pattern for the thin non-woven interfacing that covers the fluff. This way, I can adjust the padding to better fit the cotton drill moulage cover that will be Q’s final skin.

First though I needed to do a final check on the moulage fit. So I made the cotton ticking moulage cover next:

4-mc-f4-mc-sR4-mc-b4-mc-sL

OK, there still seems to be some draglines in the photos. It actually doesn’t look as bad in real life. As I’m not a starlet who’ll be papped on the red carpet for the tabloids I gave myself permission to ignore the less than perfect photographed results.

5-1So with moulage pattern checked, I cut and pinned together the thin non-woven interfacing version. I then put this on Q with CF closure and checked the amount of padding again. Most of it was fine. It was a tight fit, but with a bit of careful tug and occasional spot fusing with a dry iron, I was able to rein in the fluff and get the interfacing moulage on.

The bust was a problematic area. I had to add extra padding to fill the bust out. I also used the underwires from an old decent-fitting bra to check the bust shaping. A pin was hammered in between the girls to get the cleavage right. Once it all checks out, I fuse the interfacing to the padding with dry iron on wool setting. The pins holding the interfacing moulage together came out after I’ve fused the seams.

5-25-3

Here’s Q after interfacing wrapping, still sporting her rolls:

5-65-55-7

Next up is a thin cotton jersey cover. I needed this extra layer because my cotton ticking cover doesn’t cover the neck.

6-16-26-3 6-4

This was actually a hand-me-down from Big Bertha, my previous Duct Tape Double. So it was already shaped to fit my figure and just needed closing off at the neck and armholes.

Again, I hammered pins in to create the underbust and cleavage shaping. The bottom, like the interfacing layer, is folded over the hem edge and in this case stapled to Q’s cardboard bottom using a staple gun leftover from my collage days. (The interfacing was just fused to the cardboard.) … And where have the rolls gone?

And this brings us up to date and those photos of Q in her cotton tickingĀ  moulage skin, which is made with a center back zipper so it can be taken off if I ever want to check the fit on myself again.

finished-Ffinished-sRfinished-Bfinished-sL

The ticking I got from John Lewis’ home decor fabric department is relatively thick – probably mid to heavy-weight. It covers any stubborn left-over rolls. You could probably use drill or canvas as well. I stained mine with cheap tea to give it an antiqued look. And although I added a CF bust fish-eye dart, I still hammered yet more pins for a more defined cleavage. The key circumferences are thread traced with top-stitching threads to guide future draping projects.

The neck and armholes I could have just left with the jersey covering. But as I had some craft brass wire mesh and decorative floral head tacks in the stash, I added metal looking caps to make Q look even more like the Wolf Forms. The mesh is wrapped around a cardboard layer, then tack in the center to the cardboard layers already covering these holes. More pins are hammered in closer to the edge of the disc to make it more secure. One downside of this prettification is that the cut edges of the wire mesh is a bit scratchy. Hopefully they won’t snag any fine fabric draped on Q.

finished-detail1 finished-detail2

And look, Q takes pins no problemo! I could pin into just the ticking cover or I can stick one right into her. The middle pin is as far as the pin will go and it looks pretty secure.

So mission accomplished. Well done Q!

Now obviously not everyone’s going to go through the trouble for a dress form. So maybe I’ll write up some tips & learnings from my experience next time.