Where’s a gusset for a set-in sleeve when you need one eh? So long story long, recent days? weeks? (I’ve lost track) have been lost to sleeve slopering. Remember my top / dress sloper that’s based on a Kenneth King moulage?


I needed a matching sleeve so I can start making practical tops for the typical London summer (too cold to go sleeveless).
The Starting Point…
 I started again with Mr King’s instruction for a basic fitted sleeve. First a few words from The Man himself (Thanks Mr King!) in case you have similar questions about the instruction as I did:
- Pg 20, Basic Sleeve Outline, Step 8: What are the pros & cons of the two methods for getting E’F’ distance [cap height]? Would the shallower cap height produced by method 1 be more comfortable to wear?
Kenneth: The shallower cap height is indeed easier to wear, as it has more lift. The trade-off with cap height and bicep width is one of appearance versus mobility. A higher cap yields a shorter bicep, which looks well when the arms are down at the sides. Suits look better with this situation. But the higher cap height limits mobility somewhat—but you don’t do jumping jacks in a suit jacket, generally. A shorter cap height gives more mobility, but you sacrifice some in appearance, as there is a rumple of fabric under the arm when the arm is down at the side. Men’s dress shirts have the short cap height/long bicep situation.
- Pg 22, Basic Sleeve Outline, Step 9: If my half-bicep is less than 6″ (I have skinny arms), FF’ and FF’ would still be zero right?
Kenneth: That’s correct.
So when I get to step 11 my curve should stop at H and be horizontal from H to H’ to F right?
Kenneth: That’s correct.
- Pg 25, Basic Sleeve Outline, Cap ease: Is there a minimum amount you would recommend? Can one get away with 0″ cap ease? Would that cause any sort of fitting or comfort problems?
Kenneth: Cap ease is dependent on fabric. If you are cutting for leather, then close to zero is good. For dresses and blouses, where thin fabric is used, 1/2”, to a maximum of 3/4” is plenty. I generally go with 1/2”. For tailored garments, I go with 1”-1 1/2” maximum, depending on fabric. If you’re working with a really spongy woolen, the cap can absorb much more, but gabardine or Super 120 will need much less (that 1/2”).
- Pg 53, Fitted Sleeve with Elbow Dart, Step 5: Once I folded on B’D’ and trace out the front B’F’JMD’ I find my bicep line is no longer perpendicular to EM. Is that suppose to happen or did I do something incorrectly? If it’s correct, what line do I use as the grainline – should it be the original EM line (ie the bicep will be slightly off the crossgrain)?
Kenneth: Your bicep will tilt slightly because of this folding. Generally I will draw a new bicep from the intersections of the armhole and the seam on the sleeve, and make the grain line perpendicular to the new bicep line—that’s the gold standard.
However, the grain line can change—when I’m fitting a sleeve, if I have a situation where the pitch of the sleeve is markedly forward or back (this is dependent on the particular wearer’s anatomy), then, when I set the proper pitch of the sleeve, I’ll drop a plumb line from the top of the cap and re-establish the grain line so it’s perpendicular to the floor. This isn’t so important if the garment is made from solid colored fabric, but any pattern, plaid, or stripe—it’ crucial that the sleeve rain lines be parallel to the grain lines on the body, which generally are perpendicular to the floor. (the exception here is bias garments.)
OK, so the result was pretty good (sorry, forgot to take mug shots). But I had to make some minor adjustments because of quirks of my arm joint/posture…and vanity.
The Fitting Quirks…
Origin of the Big Bust Impersonator?

 I used to think my problem was a Forward Shoulder Joint (Fitting & Pattern Alteration #9), but now I think maybe I have a combination of a Posterior Arm Joint (F&PA #10) + Forward Shoulder Joint. Sounds contradictory doesn’t it. What I mean is that my shoulder sits further back on my torso, but is tilted with the top of the shoulder pointing forward and my elbow further back. This may explain why my bodice side seam is more towards the front if I want it perpendicular to the floor. According to F&PA, Posterior Arm Joint may occur with #33 Prominent Bust (the common FBA by another name). I wonder if that’s why according to most instructions I’m a B-cup bodice, but in fact I need a FBA for the front to fit well.
 Anyway, so my moulage bodice looks more like the resulting bodice for Posterior Arm Joint adjustment (except my back side seam is straighter & back waist darts wider): I’ve allowed the top/dress sloper’s bodice side seam to tilt backward a little bit (1/2″) for better balance between front & back at armpit level, but there is still more of the armsyce on the back bodice (9″) than on the front bodice (6-7/8″). So I had to move my 1-piece sleeve’s underarm seam towards the back as well if I want this seam to match up with the bodice side seam and still get the right pitch / tilting of the sleeve to match the way my arm hangs. The sleeve adjustment is done as instructed for Posterior Arm Joint, moving the underarm seam (7/8″) only at the armpit, tapering back to original seam line at the wrist.
 I was getting closer, but the sleeve twist a little bit at the elbow with dragline from sleeve cap center towards front / inner elbow. I ended up moving the underarm seam towards the front (3/8″), a bit like #48 Inward Rotation of Elbow, but without increasing the elbow width. This makes the upper arm portion a bit twisted when flat, but feels straight when worn. The temptation to straighten it out is great, but maybe the body is just too wonky to obey?
 To Cap Ease or Not to Cap Ease
Lastly, on the can of worm that is sleeve cap ease…I ended up with about 3/4″ ease. I started out with almost 0″ ease. But I found that on very fitted sleeve like this one, where the shoulder seam isn’t extended out beyond the curve at the top of my arm, I get draglines pointing towards where the arm bulge out of the shoulder joint without this ease. The draglines disappears when I increase the cap height (to 5″). But this added the 3/4″ ease.
Now there’s a bit of debate online on whether sleeve cap ease is really needed. Some of the discussion implies that the reason ease was added originally was an attempt to improve arm mobility. This argument against sleeve ease is that if the armsyce is shaped correctly (mirrors the arms’ typical range of motion, which is more forward than backward), then sleeve cap ease is not needed. I have to admit I don’t know why ease are added by the various sewing professionals – the RTW pattern drafting, home sewing, couture, & tailoring books I own all mention some sleeve cap ease.
But when I shrink-wrapped my Duct Tape Double arm, then cut the wrap open to make it lay flat, I ended up with a series of little darts at the armsye that add up to about 2″ ease. So it would seem like the ease would be useful for accommodating this bulging out of the arm from the shoulder joint.

I can see that if the shoulder seam is longer / extended out, covering some / all of this bulge, then the sleeve can drop straight down (like on men’s suits) and little / no ease would be needed. Alternatively, if the fabric is loosely woven & easy to stretch, maybe armsyce can be 0″ ease and the fabric in the cap area stretched out to accommodate the arm bulge (don’t know if this would pass the laundering / dry-cleaning test).

The other argument against sleeve cap ease is that some fabrics are a pain to ease. But if the arm bulge needs accommodating, then that need doesn’t go away, right? It would make more sense to me to use a different shoulder / sleeve design for these fabrics, eg extended shoulder seam; more casual shirt like sleeve with shallower cap and attendant excess fabric / folds at the armpit. Any of you experts out there manage to accommodate this arm bulge without any cap ease in difficult to ease / non-stretch / tightly-woven fabrics? Pictures proof please!
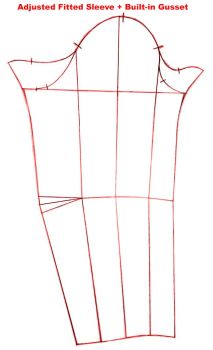
Next up, vanity tweaks. Here’s a sneak peak of the resulting pattern. But you’ll have to wait for the details!
Like this:
Like Loading...


 According to some, if the armhole is high & close to the arm joint, and the bodice armhole shape is anatomically correct (more scooped in the lower front, less in the lower back – so effectively oval pointing towards your bust), then that should give a decent range of motion. Mine is quite close to this. The only deviation is that the lower back portion of my armhole is also scooped a bit. I find normal armhole shape already a bit binding there (probably because of my Posterior Arm Joint). So to make it even more shallow in this fitted top sloper would be uncomfortable with my arms resting at the side never mind swinging my arm backward.


