Yet another lace skirt!

First one for me, but obviously not for the internet. Skip if you’re already yawning! 😉 This one is the first of my self-drafted “straight” skirt planned for the Year of the Skirts.

Style Shots & Mug Shots


The Inspiration & Design

I normally don’t go for lace. They’re usually too dainty, or too mother of the bride conservative, or too boudoir for me.

But I loved the styling for Burdastyle 2013-03-109 Lace Skirt.

It’s so Spring like and “airy”. I know, it’s coming up to Fall. But I’m usually a season or a few years behind.

I was originally going to use this Burda pattern. But since I’m sorting out basic skirt blocks for myself, I thought I might as well test the one closest to this Burda skirt. Then I won’t have to test and alter two lots of patterns.

The Pattern

Block Used: Straight Skirt Block

This is the one derived from a combination of Kenneth King moulage and straight skirt instruction that I blogged about here.

Design Changes Made

  1. Moved the darts slightly to work with the lace’s regular repeat pattern. The darts are still within my acceptable range.
  2. Moved the side seam slightly and widen at the hem slightly, again to work with the lace’s pattern.
  3. For the lace layer, joined up one side seam at the hem just above the scallop to minimize piecing required.
  4. Went for the above-knee length. I originally planned a longer length. But after trying out on Q, I decided the shorter length looks more modern when paired with my new I’m-A-Dress-Form top. As I had already cut the lace with scalloped hem, I had to shorten from the waist.

In retrospect maybe I should have widen the hemline a bit more. Mine is not as wide as the Burda pattern at the hem. I was worried that with a straight hem rather than a curved hem (to make use of the straight scallop edge), a wider hem would dip at the side seams. But the result of my narrower hem is that my skirt doesn’t look as airy as the Burda photo.

Fabric & Notions Used

Construction Notes

Well the making this skirt was hell of a needless palava. I was hell-bent on making the skirt “airy (fairy)”. But I think my pattern and fabric combination slayed my effort. The result was a bit mother of bride-y to be honest and I could have arrive at this result with a lot less hassle.

  • Palava #1: To Underline or to Line. Almost all of the guipure lace skirt articles I found suggested underlining and even quilting the lace to the underlining with rows of loose hand tacking. That did not appeal to me. The examples all look too structured rather than “airy”. So after much agonizing I decided to treat the underlayers like linings, except the “wrong sides” – ie the side with visible darts and seam allowances – are inside / next to the body. The layers are joined at the waist but allowed to roam freely and independently at the hem. The two underlayers are also joined at the invisible side zipper.
    In retrospect I needn’t have bothered. The skirt pattern wasn’t wide enough for the underlayers to roam freely. The cotton lace didn’t help by shrinking on contact with water it seems, making the fit even more snug. So my attempt at separate closure for the lace layer with a row of eyes and hook also failed miserably with gap-ahoy. In the end I had to hand tack the lace to the zipper edge and seal off raw cut on the lace with Fray Check.
  • Palava #1.1: Lace Seaming.

    Because of my decision to treat the lace layer separately I suffered massive amount of hand sewing. I thought I’d try applique seaming that’s sometimes suggested for guipure lace. But the tiny overlapped edges looked bumpy. I was also afraid the machines will choke on the uneven bumps. So I ended up trimming away most of the seam allowances and then try to butt connect the cut edges by hand mimicking the lace design with tread bars and rather random overcasting stitches. As you can imagine it took ages for 4 darts and 2 side seams.

  • Palava #2: Underlayer fabric choices. The reason I chose Georgette on top of Charmeuse was to soften the transition from see-through lace to opaque lining, again for a more “airy (fairy)” effect. But it didn’t really work: the transition still looked quite abrupt when I hem the two underlayers different lengths. So both ended up about the same length at the top of the scallop edging. I’ve since been studying photos of some Dolce & Gabbana lace skirts & dresses I liked to see what I did wrong. But on closer inspection a lot of them do seem to show the legs, which even when paired with granny shorts seems sadly a bit impractical for real life. I love the look, but I don’t love the hassle & snarky remarks I might get wearing that sort of outfits :.( Maybe I should have gone for flesh colored China Silk instead of Charmeuse. That might have been a better compromise to preserve modesty without an abrupt transition from lace to opaque.
  • NOT A Palava: Taming the slippery underlayer beasts. For the Georgette & Charmeuse, I resorted to tons & tons of spray starch. Yeah, naughty me. But despite what the experts advice about silk (dry clean only), I plan to hand wash these. I have little space in my closet for Divas, and tailored garments have already reserved that title. So no fiddly tissue papers for me. The spray starch made these Diva fabrics much easier to handle. They still wanted to shift and slip, but at least not at a mere sneeze. It also helped to control fraying a little bit. And made it a bit easier to mark these fabrics with chalk. (I used Clover Chaco Liner. It’s the easiest of what I have that doesn’t leave a permanent mark. But I’m still on the hunt for even better marking tool / method. If you have a trick for marking slippery lightweight fabrics please do share!)
  • And the Rest:
    • The underlayer were french seamed by machine, and narrow hemmed by hand.
    • For closure I resort to my favorite – an lightweight invisible zipper.
      Mercury Handmade Fashion’s recent blog tutorial on  invisible zipper in a french seam came in really handy. I had two separate layers of french seams to deal with. So it was slow going with a fair bit of hand basting. And for waist facing I resorted to petersham + skirt eye & hook like with my other recent skirts.
    • And I finally took the plunge and tried out my hem marker. The white chalk powder worked surprisingly well on these ivory Georgette & Charmeuse. But to be on the safe side I thread-traced as soon as marked…using red threads. Yeah, me bad. But my aging eyes thanked me for it. But wait, what’s this, the Georgette layer still ends up with a crooked hem peaking out from under the lace shell! WTF!?!? I swear it was level when I marked. I’m hoping it’s my naughty ironing of the Georgette layer (yeah, me bad again) that maybe stretched that bit out. Hopefully a wash will relax the fabric and return it to the proper even length again. Worst case I’ll re-hem that bit.

The Verdict

The skirt is definitely wearable. But it sure was way too much effort for what it is. It’s nothing special design-wise — more of a team player than a superstar. Nor is it spectacularly flattering. I definitely could have simplify the process rather than let the lace bullied me into so much hand-sewing.

After I made this I checked out the fancy dress department at a local department store to gauge what seaming might work in the future. I think for a fitted look, the underlining approach is the way to go – ie handle the lace and an underlayer as one so the SA are all hidden by the underlayer. For a looser fitting look, I’d go with some sort of overlocked seam so that the SA sticks out from the seam and isn’t so visible from the outside (compared with being pressed to one side of the seam).
Flocked Denim Pencil Skirt

This is the second of my self-drafted pencil skirt planned for this Year of the Skirts. The silhouettes & patterns are basically the same. But I’m experimenting with different finishing details, fabric combinations, & maybe lengths to avoid making the same skirt over & over again. I want to see what sort of detail changes will give each pencil skirt a personality of her own.  So maybe I’ll do a comparison round up post after I’ve made all three. For now Pencil Skirt No. 2 wants her 15 seconds of fame!

Style Shots & Mug Shots


The Inspiration & Design

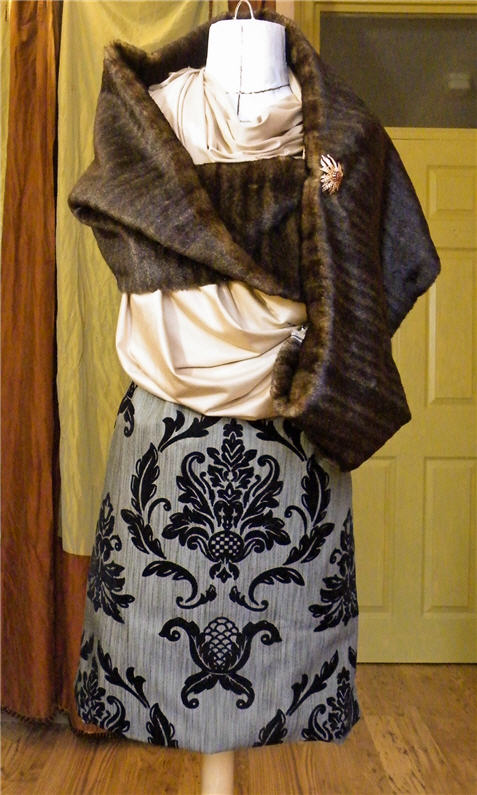
The inspiration started with this lovely flocked denim from Mood LA I bought 2 years ago. I was debating how best to showcase the large motif. Originally I was going to make the whole skirt out of it (like Oonaballoona did with her dress). But my Inner Scottishness took over. I decided to spread the love over multiple me-mades. So for this skirt, it takes center front stage. For a matching jacket I’m dreaming about it’ll take center back stage. And the bits & pieces left over will show up god knows when or where.

Now the coordinating fabric…well, it’s not as coordinated as I would like. The lovely flocked denim is the darndest shade of odd gray with a warm greenish tinge. Her sparring partner in the meanwhile is a bog standard gray denim with a cold bluish tinge, also from Mood LA. Any stylist would tell you to keep your warm & cold undertones apart. In fact, never mix them in the same outfit if you can’t resist wearing colors of different undertone to your own skin.

I searched high & low for a better match. But London yielded no result (Fashion Capital of the World my ***). So I made the executive decision that Sod the Stylists It Looks Fine Because I’m So Punk! I did make a concession and kept two fabric apart with a velvet rope piping boundary line.

0plans-skirts Silhouette-wise I decided to continue the flocked denim’s High-Low theme (formal damask pattern in indulgent velvety flock vs rough & tumble denim). Since the Substance is more rough & low, the Form went formal & high. A shapely princess pencil skirt it is then.

I kept the back details subtle & complimentary to the Diva in the front. But to stop the yawns I…

  • traded bog standard CB slit / vent for two princess vents;
  • topped these off with matching velvet buttons – my inspiration was sort of historical military jackets;
  • and tasked the CB invisible zipper with maintaining the formal symmetry.

The Pattern

Block Used: 1-Dart Pencil Skirt

This is the one derived from a combination of Kenneth King moulage and pencil skirt instruction that I blogged about here.

Design Changes Made

  1. Lowered waistline slightly (3/4″) to avoid optically widen the narrowest part of my waist with the horizontal waistline. Also remove tinsy bit of ease from the new lowered waistline so the skirt doesn’t hang even lower than expected.
  2. Convert darts to princess seam. Back princess seam is tapered below hip. Front princess seam below hip is style line only (ie seam added without tapering).
  3. Repositioned front princess line to work with the size of the motif on the flocked denim.
  4. Kept CB seam for shaping above the hip for a closer fit, and for the CB invisible zipper.
  5. Added extra seam allowance to back princess seam below mid-thigh for princess seam vents.

Fabric & Notions Used

Construction Notes

One things that slows down my self-drafted me-mades is figuring out the construction & finishing details. The design details & fabrics I’ve chosen all call for anything other than the bog standard seam & seam finishing. Maybe with more design experience the selection of seams & finishing would be second nature & more speedy. For now you’ll have to put up with my glacial speed.

  • Lesson learnt: Overlock the edges before you sew the seams, especially if the seam allowances of such bulky fabric will be pressed open.
    In keeping with the formal silhouette, I wanted seam & hem finishing that’s more formal. So no jean-style bulky flat-fell. I was going to press open the seam allowances & overlock each SA separately. But I found it very difficult to overlock once the seam has been sewn because the uneven bulk the feed dog / presser foot has to handle: 1-layer SA on one side of the seam vs 3 bulky layers on the other (1 SA + 2 shell layers). So the fabric wouldn’t feed properly. Maybe if the SA was wider so the bulk is to one side of the presser foot…But then the SA might be unwieldy where the seam is curved. I end up having to overlock both SA layers together, then top-stitch in place. Thankfully top-stitching was virtually invisible, so didn’t detract from the formal theme.
  • No lining this time. I was tempted. My default is to line everything. But as the fabric has a bit of stretch, I would have to get stretch lining. Then I start wondering why I assume lining is necessary all the time. Many of my favorite RTW skirts don’t have lining and I still wear them loads. So I jumped. It seems in keeping with denim anyway.
  • Waist finishing: I’m experimenting with petersham ribbon as my go-to light-weight skirt waistline finishing. I could have used facing as well, but it would have to be a lighter weight fabric to avoid ridges. But, erm, petersham is easier? 🙂 The bottom of the ribbon is only tacked at the seams & CF to make it easier to press without the ribbon’s bottom edge striking through. The ribbon also act as a waist stay of sort with the addition of hook & eye. I find it easier / less taxing on the invisible zipper if the waist is already hooked together at the waist opening.
  • Hemming: The hem edge is simply overlocked, not turned under as that would be too bulky for a more discrete hem. I decided against top-stitching here to continue the formal theme. But this time instead of standard catch stitch I tried blind catch stitch. Since the skirt isn’t lined, I thought avoiding stretches of exposed threads (eg from standard catch stitch) would be a good idea – more durable with less exposure to friction. I should try machine blind stitch one day. Maybe even on the overlocker! I don’t feel brave enough yet though.

The Verdict

I’m pretty pleased with the result. It makes me look like I actually have a bum! Probably thanks to the combination of stiff fabric & back princess shaping.

Having worn this a few times now I think if I were using the same patterns for non-stretch woven fabrics then I might reduce the back princess below hip tapering to give me a bit more hem ease. These denims have a little bit of stretch, so the shapelier tapering is fine this time, but might be a bit risky with my unladylike wide stride.

Skirt Blocks redux

Next couple of projects on my plate are two I planned for this Year Of The Skirts: the 2nd & 5th from the left below…

0plans-skirts

So I better catch you up on more tweaks (yes again!) to my skirt blocks.

A while back I drafted & muslined my Pencil Skirt & “Straight Skirt” (looks more A-line to me) Blocks. They are based on Kenneth King’s Skirts CD book. I had already derived an 1-Dart Princess Pencil Skirt Block from them and made it into my reversible teal+brown floral print pencil skirt (middle skirt in the skirts sewing plan above).

Then I got talking to Barbara, a long-time sewer who trained in fashion design & patternmaking at Pratt. She advised that I create a group of mix & match block pieces so I can quickly create new designs with minimum fuss using different combinations of bodice, sleeves, skirts, etc.

Great idea. But here’s the gotchas with my current Blocks:

  1. The Top & the Skirt Blocks were developed separately. The skirts are each drafted from scratch rather than based on the Moulage/French Block. So the waist darts don’t match. Now there’s no rule that they have to match, and in fact maybe you’d achieve better fitting separates if you can consider bodice & skirt separately. But aesthetically, I really wanted the option to continue that dart seam line from bust to hip for dresses with a waist seam. (I guess for dresses without waist seam – ie with fisheye dart from bust to hip – I should be using the hip length French Top Block.)
  2. Also, when I was fitting the pencil skirt before, I made Fitting & Pattern Alteration style protruding thigh alteration. This threw some irregularities into the side seam (front is hitched up, and the front & back side seams are different angle). The irregularities made deriving further design blocks very confusing since the instructions in my flat pattern design books don’t deal with quirky patterns of non-standard bodies!

So I experimented with…

  • Moving the skirts’ darts to match the Top Block’s waist darts.
  • Adjust the side seam shaping to reflect my hip-length Top Block side seam. This also made front & back side seam more similarly shaped / angled, with the front more uniformly larger than the back.
  • Accommodating my prominent front thigh with wider front darts instead of the F&PA method.

Here are my revised pencil & straight skirt blocks:

I muslined the tweaks again, and thankfully the changes have not thrown anything off. In fact, I think the tweaked pencil skirt block might actually look a tad more flattering. Even though the side seam has the same amount of tapering at the hem as before (1″), the deeper darts seem to have shifted volume from side-side to front-back. So from the front the skirt looks a tad slimmer.

Sorry, I forgot to take photos of the new muslins for comparison. But I liked how the muslin look so much that I’m considering turning them into vintage-inspired wearable top & skirts. So you may still see them yet!

I also discovered that I can sort of get away with different positions for the darts as long as they’re within a certain range. Most of my lower half mounds (tummy, bum) don’t have as clearly defined a peak as the bodice mounds (bust points & shoulder blades). So there doesn’t seem to be an one & only one “correct” position for the skirt dart points.

However, with my front darts, I do find I get slightly better result if I split it into two darts, one for the tummy & one for my protruding hip bone (which like the bust. does have a more clearly defined peak).

So this experiment has been productive. I now know that I have options when I use my skirt blocks to design my own skirt patterns. And that comes in especially handy for my next project – the pencil skirt with the floral motif CF panel.

Martin Margiela S/S97 Dress Form Top Wannabe

After weeks of cajoling, the Photographer-In-Me finally reluctantly put down her cocktails for a sec to help out. So here’s the first of a few recent project posts I’ve queued up earlier…

With fitting over, the Fitting Muslin for my Fitted Top Block can now finish her Cinderella story. Let’s let her have her moment of glory first shall we?

Style Shots & Mug Shots

4-style13-5

The Inspiration & Design

Considering that she started life as a sloper fitting muslin (so wasn’t made up with due care), then was repeatedly manhandled as the bodice for my three fitted sleeve / gusset experiments, I’m lucky that her make-over inspiration was the deconstructed aesthetic of Maison Martin Margiela Spring-Summer 1997 collection:
0inspiration_martin-margiela-1997ss-60inspiration_martin-margiela-1997ss-4
PHOTOS: found at Dusty Burrito blog…

I’ve always loved the look of old fashion dress forms, and have a thing for shabby chic potato sack aesthetic (hello burlap Louis chairs!). So this is right up my alley.

The sleeve in the left photo is meant to look like dress form arms, which you can make for your own dress form. A few tutorials I like: Pandemic Apparel blog’s free tutorial, “Make an Arm for your Dress Form” in Threads issue 90 p57-59 (available via online subscription or on DVD), Connie Crawford’s commercial pattern for dress form arm. I haven’t made one for Q (my paper tape dress form) yet. But when I do I will probably base the pattern on plastic wrapping the Duct Tape arm that MR helped me make ages ago.

As I have fitting muslin for the bodice and the sleeve already, I went for the one with the sleeve. And as it’s pre-existing pieces, the neckline & sleeve cap / shoulder area deviates from the designer original. Mine is also slightly more finished than the original, which judging from the photo seem to have raw edges for bodice armholes.

Being the indecisive type I also made my sleeves detachable so the top can be worn as a sleeveless or a sleeved top.

Now, that funky armpit ventilation design detail isn’t entirely new to me. My designer idol of yore COMME des GARÇONS incorporated armpit ventilation into a few collections in the early 90’s. In fact, at one point I owned a CdG jacket with this detail.

Very handy for a sweaty gal like me! 😉 I also vaguely recall reading about detachable sleeves in European garments of the Renaissance. So while it looks strange and avant-garde to modern eyes, it’s nothing new nor always on the edge.

Now the best bit about me-made designer wannabes…I can customize it to my own taste, do a mash up of details I like from different designers & inspiration sources, add in those silly little insider jokes & Easter Eggs that keeps me chuckling to myself through the days I wear my me-mades! 🙂

  • So the back, I added a decorative hanging tab on the outside in homage to tongue-in-cheek Jean-Paul Gaultier. I had a JPG skirt once with this detail and I’ve been adding it to my me-mades here & there.
  • And instead of pretending to be “semi-couture” I paid homage to sewing with my “Woof Form” spoof on Wolf Forms, credit Q, my current dress form on which this pattern is based with “Model 2014Q”, and wore my age “43” proudly.
  • Finally, for an emphatic “I’m definitely a Dress Form” look, I machine stitched all the fitting guidelines with contrasting threads so they’re visible on the outside.

The Pattern

1-pattern

Block Used:

Fitted Top / Dress Block + Fitted Sleeve Block (minus cut-on gusset)
Both are based on instruction in Kenneth King’s CD books (Moulage, Basic Sleeve) with body variation alteration tweaks.

Original Top Sloper MuslinAs I was turning the Fitted Top Block muslin (pictured here) into this top, I decided to tweak the waist ease placement to give me a tinsy bit more waist definition. Originally the waist ease was added at the side seam per instruction. But because I’m fairly straight up & down at the sides, following my natural shape at the side would give me no visible waist. So I moved the waist ease to the front princess waist darts while keeping the bust & hip ease at the side seams. This gives me a tiny bit more nipped in look at the side.

So to summarize, here’s the ease I added to my skin-tight 0″-ease Moulage to get my Fitted Top Block…

0″ ease moulage + horizontal ease
(total) + vertical ease
Neck-CF down 1/2″
Neck-CB down 1/8″
Neck-side out 1/4″
Shoulder out 1/4″ up 1/8″
Cross-front out 0″ (0″)
Cross-back out 3/8″ (3/4″)
Armpit out 1/2″ (2″) down 3/8″
Bust out 1/2″ (2″)
Under-bust out 1/4″ + F waist dart width reduced 1/4″ (1-1/2″)
Waist out 0″ + F waist dart width reduced 3/8″ (3/4″)
High Hip out 1/4″ (1″)
Hip out 1/2″ (2″)

Design Changes Made

  • 2-sleeve-1Added the shoulder pad shaped pieces for attaching the removable sleeves. And I guess I was trying to (unsuccessfully) approximate the original shoulder line by adding wadding & pad stitching to these shoulder pieces.
  • Left short wrist slits in the sleeve seams so I can get my relatively large hand through the slim sleeve’s wrist opening.
  • Made it hip length…because that’s what I’ve already cut out for the muslin fitting.
  • Cut CF with seam allowances (but no overlap) for a butted CF opening with hook & eye closure.
  • Left the horizontal CF bust level dart unsewn.
  • Shrink 1/4″ ease in the back armholes at shoulder blade level to reduce sleeveless armhole gaping while accommodating the blade curvature. This is something I picked up from two of my tailoring books: Classic Tailoring Techniques: Men’s Wear & Vintage Couture Tailoring.

What I should have also done is to add a bit more bust & waist ease to account for the extra layers of fabric involved! The fitting muslin wrinkle easily. So to get the “I’m a Dress Form” look I interface all pieces with fusible woven interfacing. This make the inside ugly, so lining was called for as well.

These extra layers & their respective seam allowance layers at the 8 vertical seams ate up a big chunk of those vainly spartan breathing / wearing ease I added. If you reckon each interface seam fold lose 1/32 – 1/16″, then that’s a whopping 1/2 – 1″ less ease then I bargained for. Without the extra layers the Fitted Top Block is slouch happy. With the layers and it’s only fit for the straitlaced I-Can-Hold-My-Breath days. Oops. Live & learn.

The lining is edge to edge because…well, the shell seam allowances were a bit tatty from the manhandling to serve as hem allowances. So I picked a contrasting lining for that erm, “intentional” two sided look. This way, the top can be worn as a fitted jacket over camisoles hooked only at the waist & the reverse A side peeking out from time to time.

Fabric & Notions Used

Construction Notes

  • Construction order wasn’t efficient because of the gusset experiment detour. So I had to hand fell-stitch the lining in place at the armhole & CF hook & eye tape.
  • 2-sleeve-2How to attach the removable sleeves was a conundrum. I considered solid skirt / trouser hooks, velcro, before deciding on the buttons & elastic option. I think this might be best for an area that will move a bit as I raise my arm sideways & forward. The button at the peak of the shoulder piece / shoulder seam near the neckline is on sewn the underside of the sleeve shoulder piece, with a slit left in the shoulder seam as button hole. Two additional buttons are sewn just inside the bodice armhole at the cross-front & cross-back level, with corresponding elastic buttonhole  loops sewn into the sleeves. I originally had these two buttons on the sleeve & the elastics on the bodice, but found the elastic peeking out after a day’s wear & stretch. Reversing this allows the attachment mechanism to remain hidden sleeveless or sleeved.
  • And the other Oops along the way…
    • That funky alternate side shading…As this was originally a fitting muslin, I didn’t pay attention to which side of the fabric I used. It seems like the fabric, which was an used bed skirt, have faded on one side from exposure to sunlight over the years, so not reversible anymore. Thankfully my random cutting followed a pattern of alternating side (LF & RB, RF & LB). So I can just about pretend the funky shading was erm, “intentional” & part of the “deconstructed look”!
    • Fusing bubbles…It could be my poor fusing technique. Or it could be the fact that the interfacing has been laying around for over 20 years and the adhesive has disintegrated. Again, thank to the “deconstructed” design I can try to pass this off as “erm, it’s intentional”! :-p

The Verdict

Considering this fitting muslin would have gone to fabric recycling purgatory, I’m  pleased as Punch with the result.

It’s a top to be worn with attitude (aka confidence). No shrinking violet here. Not with all the Oops that one has to spin as “all part of the Deconstructed Look”!