
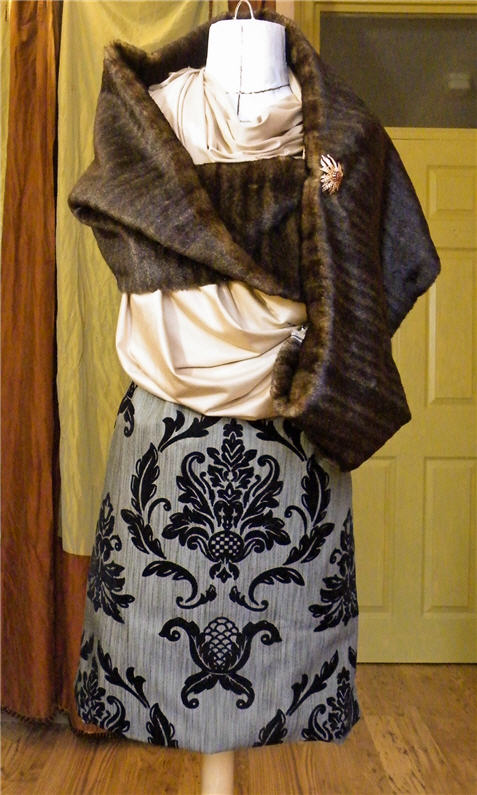
This is the second of my self-drafted pencil skirt planned for this Year of the Skirts. The silhouettes & patterns are basically the same. But I’m experimenting with different finishing details, fabric combinations, & maybe lengths to avoid making the same skirt over & over again. I want to see what sort of detail changes will give each pencil skirt a personality of her own. So maybe I’ll do a comparison round up post after I’ve made all three. For now Pencil Skirt No. 2 wants her 15 seconds of fame!
Style Shots & Mug Shots


The Inspiration & Design
 The inspiration started with this lovely flocked denim from Mood LA I bought 2 years ago. I was debating how best to showcase the large motif. Originally I was going to make the whole skirt out of it (like Oonaballoona did with her dress). But my Inner Scottishness took over. I decided to spread the love over multiple me-mades. So for this skirt, it takes center front stage. For a matching jacket I’m dreaming about it’ll take center back stage. And the bits & pieces left over will show up god knows when or where.
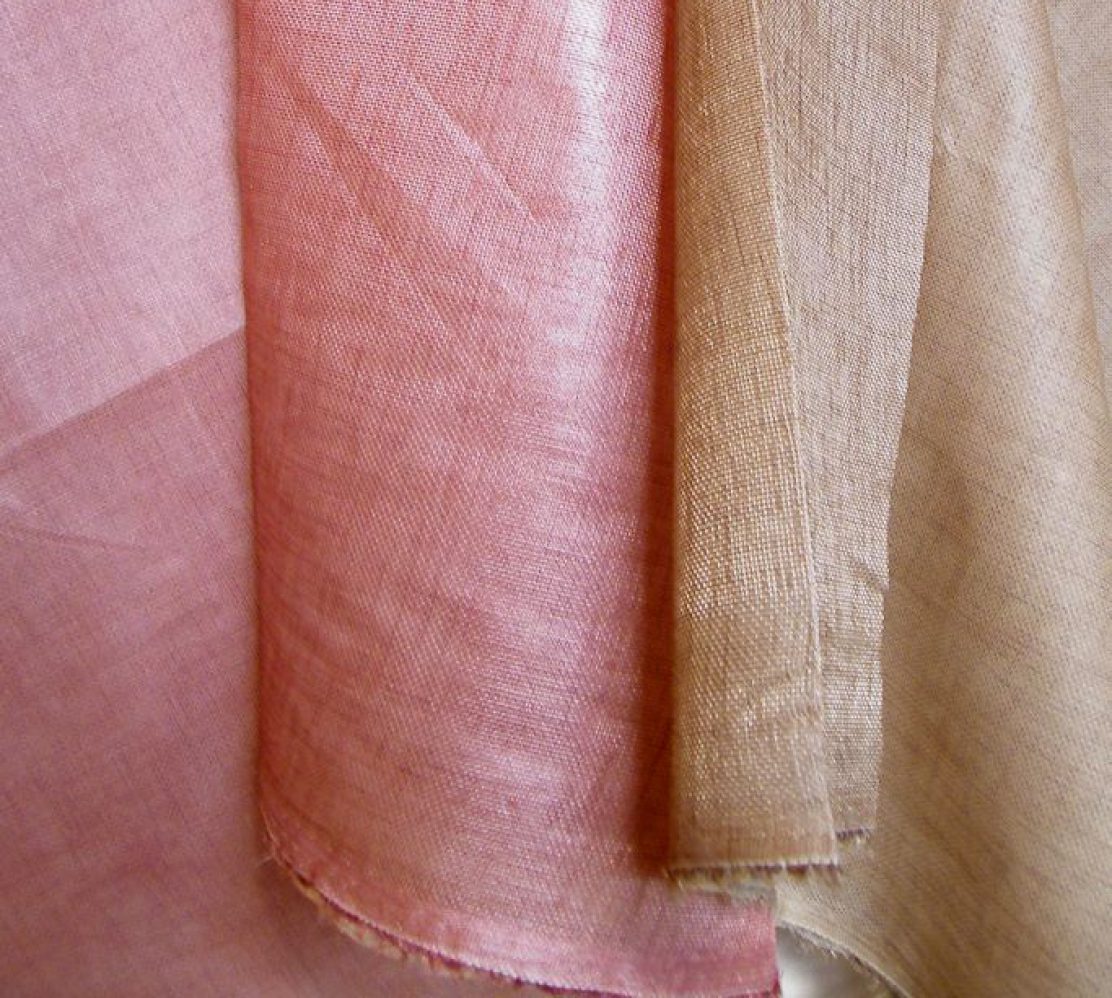
Now the coordinating fabric…well, it’s not as coordinated as I would like. The lovely flocked denim is the darndest shade of odd gray with a warm greenish tinge. Her sparring partner in the meanwhile is a bog standard gray denim with a cold bluish tinge, also from Mood LA. Any stylist would tell you to keep your warm & cold undertones apart. In fact, never mix them in the same outfit if you can’t resist wearing colors of different undertone to your own skin.
I searched high & low for a better match. But London yielded no result (Fashion Capital of the World my ***). So I made the executive decision that Sod the Stylists It Looks Fine Because I’m So Punk! I did make a concession and kept two fabric apart with a velvet rope piping boundary line.
 Silhouette-wise I decided to continue the flocked denim’s High-Low theme (formal damask pattern in indulgent velvety flock vs rough & tumble denim). Since the Substance is more rough & low, the Form went formal & high. A shapely princess pencil skirt it is then.
I kept the back details subtle & complimentary to the Diva in the front. But to stop the yawns I…
- traded bog standard CB slit / vent for two princess vents;
- topped these off with matching velvet buttons – my inspiration was sort of historical military jackets;
- and tasked the CB invisible zipper with maintaining the formal symmetry.
The Pattern
Block Used: 1-Dart Pencil Skirt
This is the one derived from a combination of Kenneth King moulage and pencil skirt instruction that I blogged about here.


Design Changes Made
- Lowered waistline slightly (3/4″) to avoid optically widen the narrowest part of my waist with the horizontal waistline. Also remove tinsy bit of ease from the new lowered waistline so the skirt doesn’t hang even lower than expected.
- Convert darts to princess seam. Back princess seam is tapered below hip. Front princess seam below hip is style line only (ie seam added without tapering).
- Repositioned front princess line to work with the size of the motif on the flocked denim.
- Kept CB seam for shaping above the hip for a closer fit, and for the CB invisible zipper.
- Added extra seam allowance to back princess seam below mid-thigh for princess seam vents.
Fabric & Notions Used
- Damask style Floral Velvet Flocked Stretch Denim from Moods Fabric LA. (Oonaballoona made a fabulous dress from a similar fabric – also from Moods – a while back. Sadly Moods Online doesn’t seem to feature these fabrics. Try the Mood NYC store as well if you want some.)
- Stretch Denim from Moods Fabric LA
- Velvet piping (“Velvet Insertion Braid“) from MacCulloch & Wallis London
- 1/2″ velvet buttons from Harlequin UK (I found them on eBay, then discovered on their website that they also do custom fabric covered belt – including fabric covered belt buckle – at a reasonable price! Perfect for when I finally tackle a retro style me-made! Let’s hope there’s enough other customers to keep them going until then!)
- Cotton / rayon millinery petersham from MacCulloch & Wallis London for the waist facing
- Lightweight tricot interfacing
- Recycled invisible zipper
- skirt hook & eye
Construction Notes
One things that slows down my self-drafted me-mades is figuring out the construction & finishing details. The design details & fabrics I’ve chosen all call for anything other than the bog standard seam & seam finishing. Maybe with more design experience the selection of seams & finishing would be second nature & more speedy. For now you’ll have to put up with my glacial speed.
- Lesson learnt: Overlock the edges before you sew the seams, especially if the seam allowances of such bulky fabric will be pressed open.
In keeping with the formal silhouette, I wanted seam & hem finishing that’s more formal. So no jean-style bulky flat-fell. I was going to press open the seam allowances & overlock each SA separately. But I found it very difficult to overlock once the seam has been sewn because the uneven bulk the feed dog / presser foot has to handle: 1-layer SA on one side of the seam vs 3 bulky layers on the other (1 SA + 2 shell layers). So the fabric wouldn’t feed properly. Maybe if the SA was wider so the bulk is to one side of the presser foot…But then the SA might be unwieldy where the seam is curved. I end up having to overlock both SA layers together, then top-stitch in place. Thankfully top-stitching was virtually invisible, so didn’t detract from the formal theme. - No lining this time. I was tempted. My default is to line everything. But as the fabric has a bit of stretch, I would have to get stretch lining. Then I start wondering why I assume lining is necessary all the time. Many of my favorite RTW skirts don’t have lining and I still wear them loads. So I jumped. It seems in keeping with denim anyway.
- Waist finishing: I’m experimenting with petersham ribbon as my go-to light-weight skirt waistline finishing. I could have used facing as well, but it would have to be a lighter weight fabric to avoid ridges. But, erm, petersham is easier? 🙂 The bottom of the ribbon is only tacked at the seams & CF to make it easier to press without the ribbon’s bottom edge striking through. The ribbon also act as a waist stay of sort with the addition of hook & eye. I find it easier / less taxing on the invisible zipper if the waist is already hooked together at the waist opening.
- Hemming: The hem edge is simply overlocked, not turned under as that would be too bulky for a more discrete hem. I decided against top-stitching here to continue the formal theme. But this time instead of standard catch stitch I tried blind catch stitch. Since the skirt isn’t lined, I thought avoiding stretches of exposed threads (eg from standard catch stitch) would be a good idea – more durable with less exposure to friction. I should try machine blind stitch one day. Maybe even on the overlocker! I don’t feel brave enough yet though.
The Verdict
I’m pretty pleased with the result. It makes me look like I actually have a bum! Probably thanks to the combination of stiff fabric & back princess shaping.
Having worn this a few times now I think if I were using the same patterns for non-stretch woven fabrics then I might reduce the back princess below hip tapering to give me a bit more hem ease. These denims have a little bit of stretch, so the shapelier tapering is fine this time, but might be a bit risky with my unladylike wide stride.

Stunning shirt and useful tute on turning darts into design lines.
Thank you! I hope it’ll inspire you to play with your TNT patterns too.
GORGEOUS!!!!! This looks so luxe on you!
Pia, this is gorgeousness all over! I love the judicious use of the print – what a fantastic print, btw – and the double vent in the back is just genius. I love your side-view mug that shows it off beautifully.