Ohhh Lulu Betty Retro Hot Pants

OK, I know I’m over the age for wearing hot pants. But ever since I collected these clippings I wanted one. No matter what.

hot-pants-i-2hot-pants-i-1hot-pants-i-3hot-pants-i-4hot-pants-i-5

Besides, if I go for a slightly retro bathing suit style, and wear it only in hot sunny and beachy places like the Maldives, surely it’d be taken as modest bathing suit rather than skimpy short shorts.

This of course means rushing to make one before my holidays. Otherwise I might never get to wear it. Especially living in dreary London.

The Pattern

Again, I had a couple of patterns I thought might work. Both are actually billed as lingerie patterns.

I made ‘muslin’ of both and settled on Ohhh Lulu…Betty Panties this time. I’ll probably make the Burda Style one in the future as well. To wear around the house for my own pleasure if no where else. (Yeah, like many men, the Other Half doesn’t really get these granny pants. He calls my Betty Hot Pants “diaper” for chrissake! Rude boy.)

Style Shots & Mug Shots
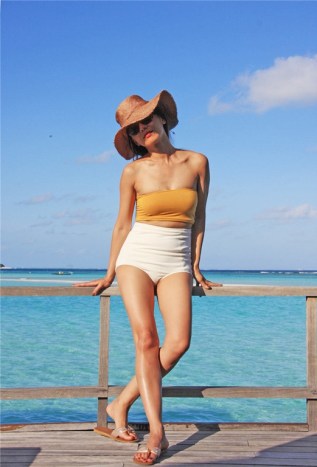
hot-pants-s1-1

(Sorry, couldn’t resist showing off the lovely lagoon just outside our water villa in the Maldives. There’s not much fish on this side of the resort. But on the plus side the sand is soft to walk on without the prickly fresh corals. At low tide, you can walk across the lagoon to the sandbank. I don’t swim, so that was perfect!)

hot-pants-s2-1hot-pants-s2-3

Fabric & Notions Used

Off-white Knit Double Cloth from B&J Fabrics in NYC bought a few years ago. It’s a med-heavy weight stable knit that’s satiny on one side and a nice spongy double knit on the other. The two fabrics are held together with what looks like double-sided adhesive film. Unfortunately the satiny side is marred in places. So I went for the double knit side.

MaxiLock serger thread from Wawak (formerly ATS). 3/8” clear elastic for the leg holes. Decorative elastic (like the type found on thigh high stockings) from Macculloch & Wallis for the waist facing. Invisible zipper.

Size Used

XS per hip measurement chart.

Changes Made

  • Sway-back adjustment – shortened CB by 3/8”. You may have noticed I haven’t been consistent with my adjustments. My excuse is that I still haven’t quite worked out the correct back fitting yet. Anyway, this 3/8” was nowhere enough. Hence the horizontal folds at the waist in the photos.
  • Shortened the crotch length as the muslin was a bit baggy there.
  • Scooped out a bit more from the front leg curve to remove bagginess in the crotch.
  • Made the back leg curve more shallow to cover a bit more of my bum.
  • Added straight side seams to accommodate an invisible zipper. My fabric doesn’t stretch enough to pull over my hip while still being snug enough at the waist. It would be a bit weird if this was a panties or a proper retro swimwear. But as it’s hot pants in heavier fabric, I don’t think it’s weird to have the zipper.

Verdict on the Instruction

The instruction is clear. But again I didn’t really follow it faithfully as I’m making this as shorts rather than panties.

I inserted the zipper first. Then sew up the side seams, followed by the side-front and side-back seams. Because my fabric is bulky but still slightly translucent – like most whitish fabrics – I had to spread the seam allowances apart, top-stitch along both sides, and trim close to the top-stitching. For the leg hems I stitched the clear elastics to the wrong side so that when I turn the hem in and top-stitch, they’d be hidden. For the waist I stitched the decorative elastic to the right side, turn in, top-stitch, then tack the lower edge of the wide elastic to all vertical seams. Again, I turned to my trusted walking feet and stretch stitch for almost all of the sewing.

hot-pants-d-1hot-pants-d-2

Would I sew it again

Hmmm…maybe one more Hot Pants in black. Then as granny pants as the designers intended. I’m feeling old enough to retire those skimpy panties that give you the wedgie. Ouch.
Made myself an Endless Dress

The rabbit hole has been a pit of sweat shop lately. I’ve never sewn so much. Not that I’ve gotten any quicker. There was just about time to tidy up before I had to move on to the next one. You see, I’m sewing for a dream holiday in the Maldives. So there was no time to rest.

endless_s1_4First off the assembly line…An Endless / Limitless Dress / Skirt / Asian Pants.

Because it’s suppose to be easy. And because as a convertible I’d have options even if I don’t manage to finish anything else.

endless_s2_4
endless_s4_6

The Design & Inspiration

So this is the one I saw in Threads then stumble upon the instruction online by chance. The very clever Marybeth Bradbury had came up with the instruction for her Endless Convertible Dress after being inspired by the Limitless Convertible Dress by Danish designer Emami.

original_1Actually, I had came across Emami’s Limitless Dress before. Friends who were into fashion had discovered it years ago. I thought it was really clever. But as it was expensive, I didn’t buy one.

This time, I did feel pangs of guilt and wonder if I should buy one. You know, to support independent designers who come up with clever design ideas. For the art of this garment is in the wearing instructions, which Emami provides video demonstration for on their website. As Marybeth’s instruction shows, there’s very little sewing involved. Plus the price seems to have come down.

In the end I made one instead of buy one. Because the colors Emami offer were a bit too drab for my current taste. Sorry…

The Making

OK, so this is suppose to be dead easy. Depending on fabric you should be able to get away with 3 seams and probably finish in an hour or two. But as I’m fairly new to 4-way stretch fabric and to using a overlocker, it took me a bit longer. Also, being a visual person, it took me a little longer to follow Marybeth’s verbal instruction and quick sketch.

So here are my learnings. Maybe it will be helpful if you decide to make your own Endless dress.

Fabric & Notions Used

Mustard color Viscose Cotton Lycra 4-way Stretch Fabric from Tia Knight / Tissu Fabrics. I ordered 3 meters, but probably got like 3 m 16 cm because I had enough left over for a separate bandeau top and a sleeveless cowl neck top. It was the lightest 4-way stretch fabric I had and it has a lovely soft touch and fabulous drape – perfect for a dress like this.

Skin color lightweight Power Mesh from Tia Knight / Tissu Fabrics for the underlining.

Gutermann polyester thread, and some woolly nylon I got in America long time ago. 3/8” clear elastic.

Size Used

It’s kind of a one-size design utilizing full width of the fabric. Depending on your fabric and your waist measurement, it’ll come out differently length-wise.

Changes Made

endless_pattern

  • My fabric curled at the selvedges, so I cut off about 1-1/4” at both selvedges. I forgot to adjust the 30” measure to the center of the waist hole. So this leaves me with a slightly shorter skirt at the sides. Thankfully, the dress style make the mistake less noticeable.
  • I used one of the selvedges to make a matching spaghetti cord instead of buying separate cord.
  • My waist hole is slightly bigger because my fabric doesn’t seem as stretchy. You need to make sure the circumference of the hole for the waist will stretch to fit your hip so you can pull the dress / skirt on. But don’t make it so large that the skirt slips down while you wear it. It’s knit, so you probably want 0 ease or even negative ease at the waist (ie your waist measurement or smaller). I also reinforced the waist hole with clear elastic in the hope that this will prevent the waist from being stretched out of shape with wear and becoming too loose. We shall see if it works over time!
  • I made my waistband taller / longer thinking that I can then wear the band as a strapless tube bodice. Now having worn the dress I can tell you that it’s a bad idea. The weight of the skirt will pull the band down leading to wardrobe malfunction a la Janet Jackson. (Luckily I was wearing the draped part of the skirt as a haltered front at the time.) Separate bandeau top is the way to go.
  • I also added a layer of lightweight power mesh as underlining to make the waist band less flimsy as a tube top. This turns out to be a bad idea again. I didn’t tack the underlining to the fashion fabric at the fold. So when I wore it, the underlining wouldn’t stay up and instead bunched up near the waist.

When I get home, I’ll probably reduce the waist band to Marybeth’s original suggestion of approx. 6” finished height and tack the underlining or remove it completely.

Verdict on the Instruction

Marybeth’s instruction is a bit sketchy, so I think you do have to have some sewing experience to know how to finish the garment. It’s not difficult, but if you’re someone who like each step to be spelt out in details, you’d struggle a bit. I’m happy to muck about with pattern drafting and improvise the sewing, so it’s not a problem for me.

You can see how I interpreted her pattern instruction in the diagram above.

Sewing-wise, I used mostly my sewing machine to give me better control over the stretchy fabric. I’d sew on my sewing machine first with reduced pressure foot pressure, a walking foot, and my machine’s basic stretch stitch – a kind of narrow zig zag stitch. For the waist seam I then sew on the clear elastic, again on the sewing machine. For waist band center back seam and waist seam I then reinforce & clean finish on the serger with a 3-thread overlock.

The hem / casing for the cord is simply folded over twice and edge-stitched with the sewing machine basic stretch stitch.

For the rest of the skirt, I did consider doing a rolled hem. But the experiments on scraps weren’t promising. The fabric was stretching into lettuce edge hem which I didn’t want. It also made the hem stiffer which doesn’t work well with this drapy dress style. So in the end I left the hem as raw edges – as implied by Marybeth’s instruction. The fabric doesn’t fray, so the unfinished edges aren’t a problem.

Would I sew it again

Probably not.

While I do love the idea of convertible garments, the ones I tried so far have all been a bit uncomfortable to wear. The threat of wardrobe malfunction is always on my mind as nothing is firmly anchored.

It can also be difficult to make the garment look good from all angles. I love how this dress look in the front. But with the styles I’ve tried so far the back always seem to look the same and not reflect the lovely style promised by the front.

Here are the styles I tried on holiday. It was really too hot to experiment more.

endless_s1_2endless_s1_3

endless_s2_1endless_s2_2

endless_s3_1endless_s3_4

endless_s4_2endless_s4_3

And here’s one taken before I went on holiday. It’s my Buddhist Monk look! 🙂

endless_s5_5endless_s5_6

I need to experiment more with the wearing options. In any case, making and wearing this one has given me ideas on styles that would look great with this fabric (hint: lots of drapes). And it goes to show beautiful garments aren’t always about complicated design and sewing. Simple can be just as beautiful.

Aside

Vogue Men’s Patterns Give-Away

OMG, I finished a top! But the sun has gone down now. So too late to show & tell. Another day then.

Between the craziness of a new job and redecorating at home, I haven’t made much progress on the sewing front. But I have gone through my pattern collection recently, and earmarked a couple for a Give Away.

Don’t get too excited yet. These are men’s patterns. Sorry, I’m hanging on to most of the women’s ones, even if many are a couple sizes too small now. Hoarder’s finger grip is strong. You can pry those other patterns off my hand over my dead body! 😉

So here they are:

Give-Away 1: Vogue 1928 Men’s Jacket, Pants & Shorts, chest sizes 32-34-36, uncut.

Loose-fitting, partially interfaced, lined, below hip jacket has shoulder pads, side panels, no side seams & long, 2-piece sleeves with mock vent & button trim.

A: collar, flaps, & pockets. A,B: welt. C: button/loop closing. B,C: side front pockets.

Shorts, above mid-knee or tapered pants have waistband, carriers, side front/back pockets & mock fly zipper.

D: stitched hems. F: cuffs.

Give-Away 2: Vogue 8918 Men’s Pants, waist sizes 26-28-30, cut to 30.

Tapered pants have front button wasitband, carriers & fly zipper closing.

A: side front welt pockets. B: shaped, side front pockets & back pockets. C: side pockets. A,C: back button welt pockets.

Both are not in the pattern envelopes anymore. But neither have been used. My other half has gotten a bit too well fed for these to be useful to me. So in the spirit of freecycle, I’m passing these on to those who can make better use of them.

How to get these:

It’ll be on a first come first serve basis. I’ve been a bit negligent in updating this blog, so I don’t expect there’ll be enough instant traffic for a proper prize draw.

So just leave a comment with your email address and I’ll get in touch to get postal address.