
So far this year I have sewn 0 item from my SWAP. Typical isn’t it? Straight after the Jungle January fever another exciting detour presented itself – an unexpected escape to balmy Jamaica. I thought I was sensible opting to air my underused summer dresses instead of cramming in last-minute Holiday SWAP. But I have little to wear as a beach cover-up. Enter the H&M scarf I had bought not so long ago precisely for this purpose. It shot straight to the front of the queue.
Style Shots


No mug shots this time because this is probably going straight back into the ReFashion pile.
Fabric & Notions Used
- Polyester print scarf from H&M. It feels like cotton voile. It frayed like crazy. Hence tons & tons of…
- spray starch, Perfect Sew Stabilizer
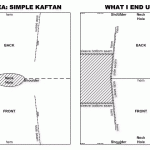
The Design & Pattern
This is one of those refashion challenges where you make it up as you go. So there isn’t a proper pattern. My initial idea was a simple kaftan. First up is checking pattern placement…

- I first tried folding in half with the fold on the shoulder line. This made the pattern look like those Indonesian monster masks which I found too distracting. So that’s a NG.
- I then tried folding on the bias. I liked the pattern placement. But I noticed the scarf isn’t perfectly square, so it makes the garment look lopsided. So again NG.
- Lastly I tried folding in half again, but with the fold as the hem and the scarf border at the shoulder line. I like that the border adds interest at the shoulder and the pattern balance it out acting as big stretch of border print. The placement also make the pattern look like a potted flower or a dancing person. So happy days.
Once the pattern placement was decided, I pin-fitted. Unfortunately it looked frumpier on me than on Q because I have arms and she doesn’t. The silhouette becomes wider, which make the length appear shorter. So I decided to lop off the bottom portion of the sleeve area and use the same approach as I did on my altered RTW kimono top. The shorter sleeves shift the emphasis to the bodice area to create a stronger vertical silhouette.

Construction Notes
- As the fabric frayed badly & shifted easily, I spray-starched & stablized like crazy before I even cut.
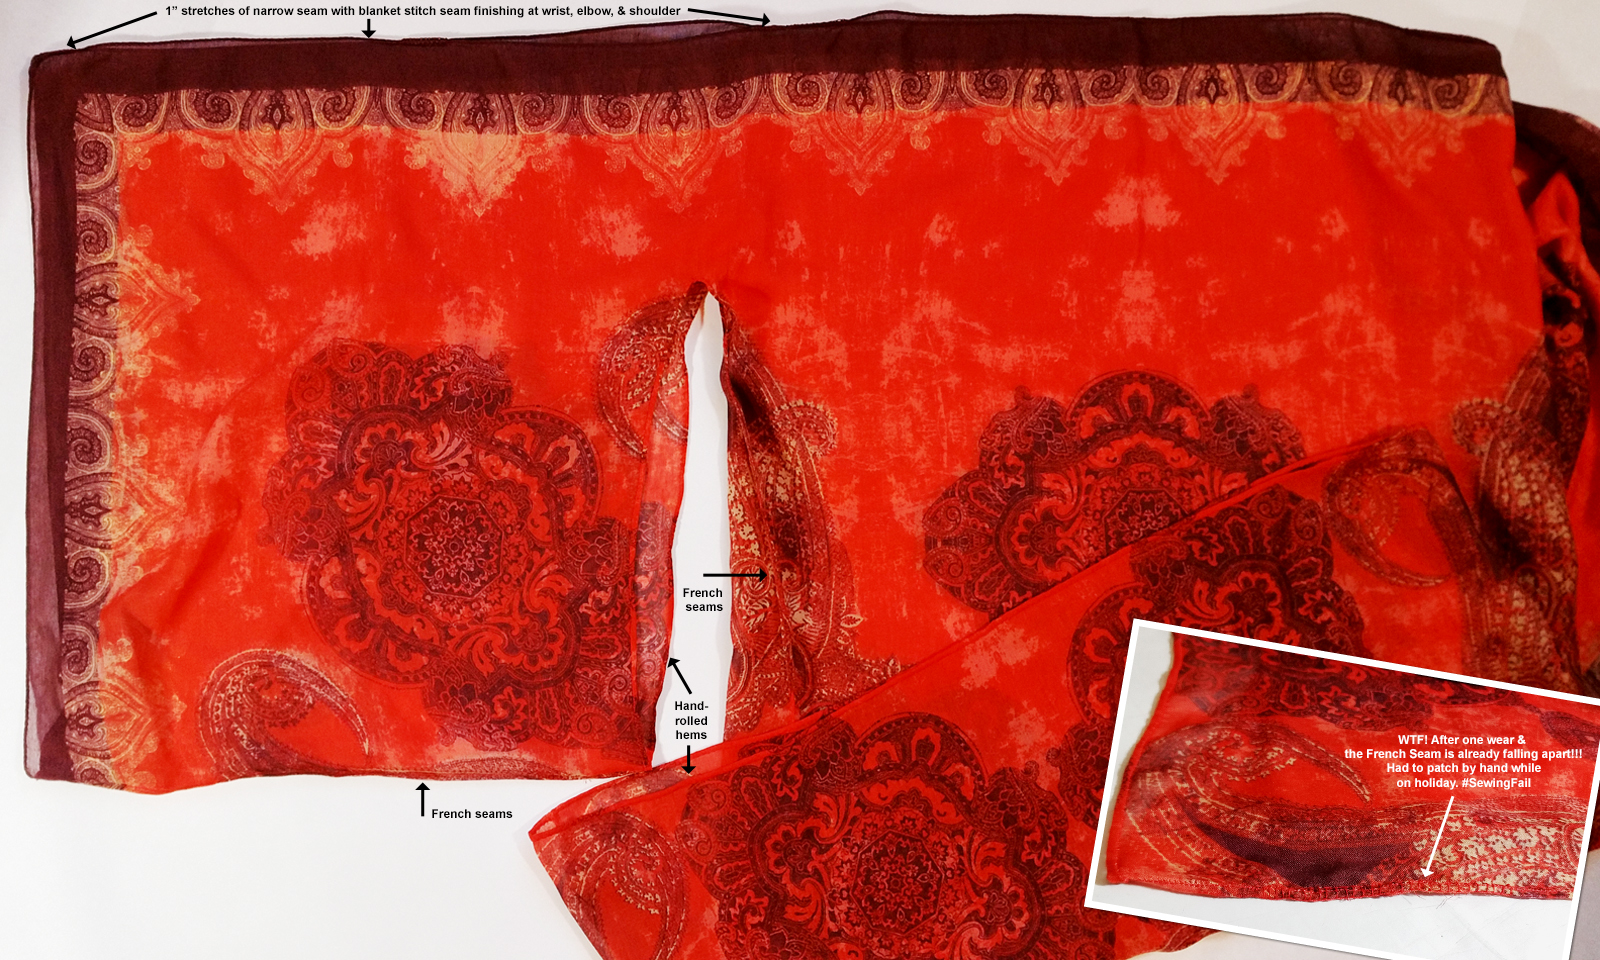
- The sewing was then fairly straight-forward: French seam for side seams & to join the bottom of the sleeves fronts to backs. Then hand-rolled hems for the bodice bottom and top of side seams & inside / underarm edge of sleeves. At the top the front & back are joined at shoulder, elbow, & wrist only. Then the starch & stablizer was washed out.
The Verdict
The top actually doesn’t look too bad. But look isn’t everything is it?
After one wear part of my side seam was already falling apart! I think I might have trimmed the seam allowance too aggressively for this fray-loving fabric. (Thank goodness for those dinky hotel sewing kit!) The whole thing just felt too delicate to wear on a relaxing holiday, especially when sun-screened skin & sea-laddened air made everything feel so sticky. I was constantly worried that I’d rip the seams. Or the underarm slit when I put the top on or take it off. I may have slit this a tad too far – the sleeves felt like hanging chads, ready to detach at any time. What a bummer.
The print is too lovely though. So for now the top is going into the Re-Fashion pile.
It’s a gorgeous cover-up. I do hope you can salvage the fabric for another project.
Sad, cause sitting here with that tiny little photo of you, it looks really great. And yet, your clothes are not supposed to fall apart as you wear them unless that was the plan all along.
Career in burlesque? Eh, maybe not.
I wondered why you thought this was a wadder when I saw the photos, but even for a beach cover up you don’t want the seams disintegrating. Hope you can manage to save it, the print is lovely.