Custom Dress Form v2.0: part 2

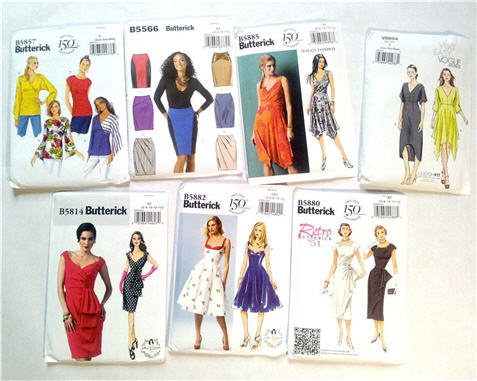
OK, her name is not going to be Darling Judy. Gosh is there nothing that pornography won’t touch on the internet? I was thinking more Blythe doll than what google yields up. Urgh.

Right now I’m considering Quasimodo. Yes, you heard me right. And it’s because of this:

2b-4

I knew I was lopsided. But I didn’t know I was that bad! LOL. No wonder my long necklaces never want to stay in the middle. They always want to loop around my left boob.

Then again I might have butchered her figure during the reduction surgery. Or at least exaggerated the lopsidedness. In any case, Quasimodo is now the new nick name my DOH has for me whenever he wants to wind me up. He’s a bit of the Joker and likes to wind everyone up.

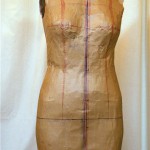
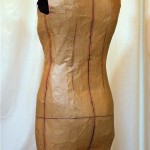
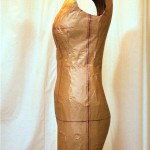
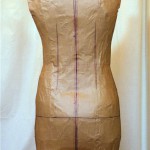
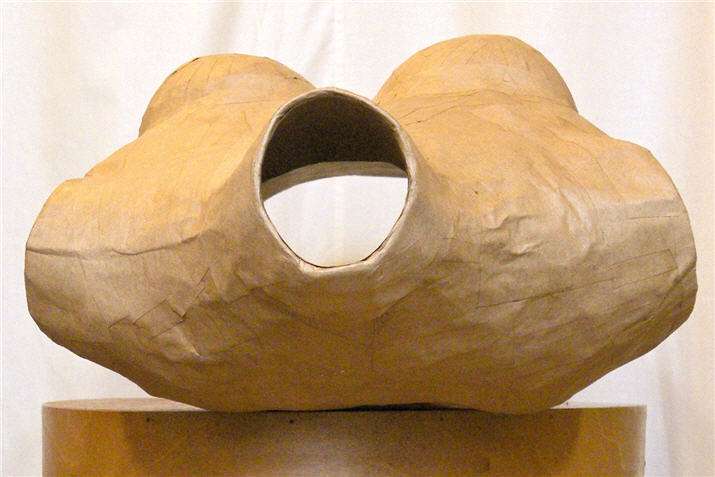
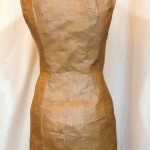
Anyway, here’s Quasimodo after her reduction surgery with subsequent reinforcement layers:

And a few notes about the process…

  • Reduction plan: The wadding / batting I’m going to use measures about 1/4″ when compressed. So I reasoned that I’d have to take out 1/2″ depth-wise (Front to Back) and width-wise (Side to Side). I opted to do this as 1/2″ at side seams and CF/CB so that the neck is also reduced. I also removed 1/4″ height at about upper armhole to account extra height at the shoulder that the padding will add. The additional fish-eye darts at the princess seams are to adjust for the extra 1″ breathing ease that was wrapped into the chest and waist.
  • This plan does mess up the bust a bit – they’re now too close together.  2a-1 
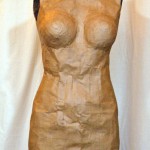
So I first tried a mastectomy (4-pointed star-shaped reduction on each boob). That didn’t work brilliantly. I ended up having to do breast reconstructive surgery. For her breast augmentation I taped on two foam bra cups I salvaged from some old dress. This allowed me to position the bust mounds where they need to be. It also deepened the cleavage to the correct depth – DOH couldn’t get the cross-your-heart duct-tape wrapping tight enough to maintain the cleavage depth. I found double-sided tape to be quite handy for this task. PVA glue & the paper tape weren’t as effective by themselves.
  • I did the surgery before the reinforcement layers. So that’s on the 4-outside + 1-inside layers of self-adhesive paper packing tape. At this stage the form is firm enough to hold the shape temporarily, but not too hard to cut with scissors.
  • I should have traced the outlines of the hem, arm, and neck holes before performing the surgery. This is to ensure the final form more accurately mirror my depth & width. It was on my check list but I still forgot. Oops. Fingers crossed I haven’t changed her shape too much.
  • Once I got the form to it’s final shape, I reinforced the form with 1-outside + 5-inside layers of the gummed paper packaging tape that you have to moisten first. This type of tape does seem firmer than the self-adhesive type. So I’m glad I got these as well for the reinforcement. But it was quite fiddly, especially as I had to cut the tape into smaller pieces to go smoothly over curves. I don’t think my DOH would have had the patience to use this during wrapping. Hack, I don’t think I’d be able to hold my breath long enough to be wrapped in this type of tape and wait for it to be dry enough to be cut off me.
  • 2b-5 
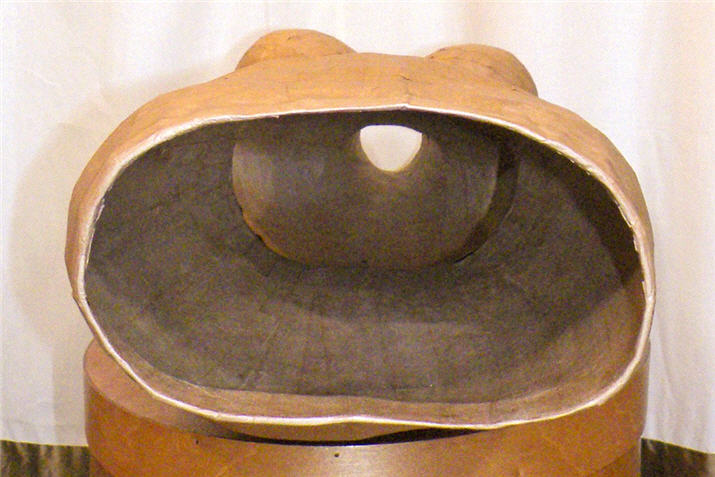
The 11-layers total of tapes gave me a relatively stable form that’s about 1/8″ thick. It’s probably not as firm as 1/8″ of solid papier mache since it’s impossible to compact the paper tapes 100% and squeeze out all the air bubbles. But I think it’s firm enough to hold it’s shape without stuffing. So I’m going to leave her hollow and just do what needs to be done inside to ensure her PVC spine that’s going to go over the stand is straight & perpendicular to the floor.

Next up, figuring out her guts!

Custom Dress Form v2.0: part 1

So, with new bra sorted, I finally got started on my new custom dress form. I haven’t settled on a name for her yet, so for now let’s just call her Darling Judy, or DJ for short.

Big Bertha, my last one, was a Duct Tape Double who became a bit lumpen over time, and was always too thick & sticky skinned to pin into. So this time around I’m trying a modified Paper Tape Double.

I’m using mostly Connie Crawford’s instruction, which is in her patternmaking book. There was a slightly more detailed version from Sew News Aug 2006, which sadly isn’t on their website anymore (I saved the pages a while back). You can try Web Archive, but the  photo illustrations are all missing. She also has the dress form instruction on a DVD and there’s a sample clip on YouTube which I found quite useful.

Here’s DJ after she was cut off and re-joined:

Gosh I’m lopsided or what!

Anyway, a few tips & lessons that the instructions don’t mention:

  • Here DJ has 4 layers of paper tape on the outside and 1 layer on the inside. The key measurements aren’t too far off. The waist and chest are about 1″ bigger than my smallest / exhale measurement. But I think that’s inevitable since you can’t exactly not breath while being wrapped. With these wrapped forms you’ll always get at least the breathing ease if not the full wearing ease. And that’s fine if you’re not using the form strictly for zero-ease garments like bustier.
  • For wrappee comfort I’d recommend following Connie’s wrapping order, but mark the key lines as you go rather than leave it till you’re all wrapped up. So hem after the skirt part is wrapped, CB after the torso back’s wrapped, Side Seams & Armholes after the torso sides are wrapped, most of CF right before you close off the abdomen. This way, you get to breath for as long as possible! An experienced wrapper may be able to complete the wrapping & marking in an hour, but we took close to 3 hours to wrap and cut off. So that’s a long time of not breathing if you’re not careful about wrapping & marking order!
  • I used as small a bin / trash liner as I could to keep unnecessary bulk down. But it wasn’t long enough. So I used cling-film to extend the length, as well as add the neck. If you do use multiple layers of cling-film, make sure you peel off the extra layers from the inside of the dress form before you reinforce the form from the inside with extra layers of paper tape. Otherwise you get air-bubbles between cling-film layers.
  • I used self-adhesive paper packing tape as recommended by Connie since it’s less messy than gummed paper packaging tape which you have to moisten first. But I do plan on further reinforcing the form with multiple layers of the gummed tape from the inside, and maybe another layer on the outside. This is just in case the gummed type is stiffer / longer lasting / sticks better.
  • Marking: it’s not really necessary to mark till you faint! All you really want is key lines to help get the form standing in the same way you do – ie not tilting to the front / back / left / right. So a level hem (parallel to the floor) is key. Level verticals (CF, CB, Side Seams) are also useful.
  • Cutting: Be really careful! I’ve been cut once before. This time I got those blunt-tip bandage scissors and have my DOH go very slowly with the cutting. The built-in breathing ease came in handy here. I was able to exhale and press against the front of the form to yield a little bit of gap at the back princess cutting line so that the scissor wasn’t jabbing into my skin. You can also try Thread’s technique of including a narrow strip of heavy paper under bin / trash liner where the cutting line will be before wrapping. When cutting, the paper would be between the scissor and your skin, thus protecting you from its sharp points.
  • Once you got your form off and reinforced it from the inside and taped on the cardboard pieces to cover the hem / AH / neck holes, you can sew a heavy muslin cover for it if you plan on pinning “into” the form. You will not be able to jab directly into the form – after a few layers the paper is really too stiff. So that much is the same as with Duct Tape Double. But at least you won’t be tempted and end up with gummed pins and bleeding fingers!
  • The cover will need to be skin-tight. (Your Kenneth King Moulage comes in handy here if you’ve made one like me!) If you have any doubt about the accuracy of your new dress form, you should definitely fit the cover on yourself first, then adjust the dress form to fit your more accurate cover. You might have to slash & re-tape if your form is too big, or pad with wadding / batting if it’s too small.

As for DJ, see all those red shaded areas on her? That’s her reduction surgery plan. You see, stopping here would be too easy (!). I plan to torture myself by adapting some of Wolf Form’s professional dress form making process. She’ll be reduced in girth, then covered with wadding / batting, then maybe the old cotton jersey cover I made for Big Bertha but never used (if I can still find it), and finally the drill Moulage cover.

You see, I plan to gift myself a couple of glossy draping books for Birthday / Christmas. So I’d really like a form I can pin into.

Stay tuned to find out how she looks after her surgery!

Brooding & Plotting

I know I know. I said  I was going  to stop fiddling with the Moulage. But I can’t help it. Especially not with the ladies at Artisan Square egging me on! 😉 So I’ve been experimenting with different ‘sway back’ type adjustments and different grain placements post bending the grainline in places with those ‘sway back’ type adjustments. And I’ll be tweaking the fit to get those vertical ‘balance lines’, well, vertical.

By the way, thanks for all your compliments. If you can get yourself someone patient to help with measurements I highly recommend Mr. King’s Moulage CD book. If you’re hopeless at drafting you can try Fashion Incubator’s saran wrap method instead. I haven’t tried this method but it sounds interesting & relatively quick. The only thing though is you don’t get additional instruction on how to turn the resulting skin-tight pattern into a sloper for further block development.

In the meanwhile, I’ve also been trying to print and have bound more of Mr. King’s Ecole Guerre-Lavigne series CD books. It’s not easy in the UK. There aren’t the ubiquitous & affordable Kinko’s & other chain print & copy shops that you find in NYC. My printer didn’t help by running out of ink.

And just for variety, I’ve also been redoing my croquis after being inspired by the ladies at Artisan Square. And planning a replacement dress form. Big Bertha (my Duct Tape Double) has broke her leg. And she’s a bit lumpen after all these years. So here’s the plan…

dressform-stand

What do you think? Overkill? Well, after Big Bertha broke her leg I’ve been paranoid about making the stand as sturdy as possible and keeping the dress form as light as possible. Big Bertha weighs a not so slight 4kg / 8lb. And her leg was a jointed coat rack, not solid piece of wood. So she started tilting over, even worse than the Leaning Tower of Pisa.

None of the cheap sturdy stand options I’ve googled were cheap by any means in the UK. (You Americans have it soooo good!)

As for the dress form, I was inspired by an article I found in my Threads Archive DVD about the Wolf Forms production process. Turns out they’re made from cardboard Papier Mâché using heavy plaster molds and the final thickness of the Papier Mâché is 3/4″- 1″. No wonder they can be hollow rather than stuffed. They’re made about 1/2″ smaller than final measurement, then padded on the outside with cotton batting, then cotton knit, then finally Irish linen. The article isn’t on Threads public website, but there is a page with some photos. There’s also a How It’s Made TV segment about these Wolf forms on YouTube which is quite fascinating. It doesn’t cover all the details mentioned in the Threads article. But it does show how the collapsible shoulder works / is made!

Kiddy Tiered Skirt Yeehaw…Gathering Hell

Excuse #4: Verdict on the Instruction, continued

OMG, how could I have forgotten about this other very important key make-my-life-harder feature…

You may gather (haha) from my previous projects that I’m not much of a gatherer. But this project has miles of gathering to do.

tiered-skirt_1-3I do own one of those weird contraption called a ruffler foot. But given the type of garments I tend to sew I’ve never used it on a project before.

I thought I’d try it out. Unfortunately, it eats fabric for breakfast, lunch & dinner. I’m not sure if I got a defective unit or not – it was a cheap eBay model – but even at the least-gathering setting, 18″ of test fabric was promptly reduced to 5″ at best. What with the calculation hell I was already in with this project, I had to abandon this route. It does make some lovely gathers though…(see bottom sample in the photo below).

tiered-skirt_1-2

The other route I’ve read about is using overlocker’s differential feed to gather & sew at the same time. Way too advanced for me – the second part that is. I tried the first part on a sample. The result wasn’t spectacular (see top sample in the photo above). Maybe 2-thread overlock isn’t the right stitch to do overlocker gathering – the instruction did specify 4-thread overlock stitch. But I was worried about having too much thread built up as I was going to gather, attach, then overlock again.

In the end it was back to good old fashion route of pulled basting stitch. Which of course took ages. Urgh.

So here’s a question for all you Master Gatherers: What’s your secrets for expert gathering? Is this one for Patience or am I missing out on some Fast Track Insider Tips?

BTW, a couple more styling ideas for this skirt if I had one in my size… Biker Chic with a leather jacket … Or Senorita style like this clipping…

tiered-skirt_3-1

Lucky for my niece this skirt doesn’t fit me. Otherwise she might not be getting this in the post!

Sewing Bits & Bobs

While in NYC I also stock up on some useful supplies. Some because they’re hard to find in London. Others because I’m curious or the price is right.

2013-sewing-bits-1

  1. Extra large sheet of wax carbon paper. I’ve tried the usual carbon paper sold to home sewers but kept going back to a couple I picked up from Steinlauf & Stoller over 2 decades ago. The home sewer version were just too small and don’t last as long or mark as clearly.OK, sometimes these waxy version don’t disappear completely. But honestly, I’m only sewing for myself and it’s not like people I know offline is going to come lift up my hem and examine the inside of my garment! And believe me I’m naughty – I mark the stitching lines with this rather than the cutting line. My reasoning being I rather have more accurate stitching which affects what people can see – the fit & shape of garment – than fuss over what most people won’t see – like the leftover markings.Anyway, this time around I couldn’t see any on display in Steinlauf & Stoller. So I picked these up in a few other shops (Sil Thread, Pacific Trimming, NY Elegant Fabrics, Fashion Design Books). Most were $5.50 per sheet.  The bookstore near FIT has it at $3.75, but I haven’t checked if it’s exactly the same quality as the others.
  2. Clover Chaco Liner & Clover Hera Marker from Sil Thread. Because I’m constantly looking for a better marking tool. The Hera Marker is a curious looking thing. I got it more for transferring fabric painting design than standard marking. I was using an plastic needle for sewing hand knits for a recent project and it did my hand in – blister and all. BTW Sil Thread have quite a few more tools from Clover and other East Asian brands that I haven’t seen elsewhere in NYC.
  3. Gridded plastic rulers. I have a few of these already and I can’t live without them. So useful for pattern alteration & adding seam allowance – if you use inches instead of cm. I can’t handle metric – mm is just too fussy for me. I don’t cut & sew accurately enough for such fiddly accuracy to make any difference. 1/16″ – 1/8″ is as accurate as I can handle. OK if you’re following pattern drafting instructions the decimal system of metric may come in handy for calculation. I just use a calculator. I can convert 1/8″ unit to decimal by heart now so it’s no big deal for me.These are thinner and more bendy the acrylic ones used by quilters. I find it easier to see the marking more accurately. The thick acrylic ones were casting confusing shadows. You can get these in many different places, including art stores like Pearl Paint.
  4. Seam Greats, Stitch Witchery, Stay Tape. Mentioned by a few bloggers, so I’m curious. Let’s see if they get used or just gather dust along with other gadgets I’ve collected over the decades!
  5. 2013-sewing-bits-2Metal Zippers from Sil Thread for the biker jackets + matching skirts that I’ve planned for these newly acquired fabrics.
    2013-us-fabrics-3
    These slide so easily but only come in two lengths. But Sil Thread will cut them to size for a small fee ($1 per cut + $1 per additional pull).

2013-sewing-bits-3

  1. Lace from Daytona Trimmings. This was one of only two purchases on the day of the Meet Up! I’m not a big fan of lace – because it’s hard to find ones that I don’t think look streetwalkerish! But this one ticked the box for me. Not sure what I’ll use it for yet. It’s obviously not considered cheap. The guy cutting it was like “It’s $5.99/yd OK? Are you sure you really want 3 yards?” Hell yeah. Cheaper than an one-way London Underground cash ticket. And it’s not like I can get more easily whenever I need to.
  2. bag-repairFaux (?) Suede Trim from one of the numerous trim stores…Most of the stuff in the store look a bit cheap (she says snobbishly). But this will be my best chance of repairing a cheap (!) but well-loved and well-used leather handbag. I’ve been searching for a replacement trim for years!
  3. 2013-us-store1-4
    Various Ribbons & Trims from Tinsel Trading Co. I love the feel of this store even though it’s not cheap, especially when it comes to the the vintage trims. There are some lovely bits for the scrapbook crafters too.
    2013-us-store1-5
    gold-trim-inspirationTwo of the gold trims I got are vintage. I love the antique gold. I’m thinking of using these to trim jacket like in one of my inspiration photo.

Finally, some obligatory pattern purchases:

2013-sewing-bits-4

These were ordered during the last online sale and sent to my brother’s. I usually find only 1 or 2 that really interest me. But being a cheap skate, I always try to get max value for my shipping dollars. Which means padding out my order with other half-hearted purchases. I really should just stop buying yet another bog standard pencil skirt or drapy dress pattern and start making things. I must have only used 5% of my pattern collection at best.

So that’s it for my own sewing pleasure. Tomorrow: the sacrifices I made for others! The Selfish Seamstress would have been shaking her head!