TNT Trench Odyssey: Part 2b Tissue Fitting #1

OK, let’s get serious now. Let’s talk about fitting. And let’s get one thing straight: I hate making Muslin muslins. You know, the type that goes to the landfill afterward. I know it’s sometimes unavoidable. But what’s left of my green conscious won’t allow it for every single garment.

So I’m giving Palmer / Pletsch’s Fit For Real People tissue fitting + fit as you sew technique a proper go. If I can make it work – learn to read the tissues, learn to mentally prepare for fabrics behaving differently – then at least I’ll end up with wearable muslins.

A word of warning before I get started. This is like the 2nd time I’ve tried this technique. So I’m no expert. I’m just sharing my experience so we can learn together. And if you’re already expert at this, please share your wisdom!

Tissue Fitting #1: unaltered bodice

As instructed I pinned the tissue pieces together without any alteration and check the back width first.

I’m using size 8, which is officially two sizes too small for my current measurement. But I was once size 8, and I’m working with the hypothesis that I’d get better results using this with FBA & other girth adjustments where needed.
1-fittine_1b-3

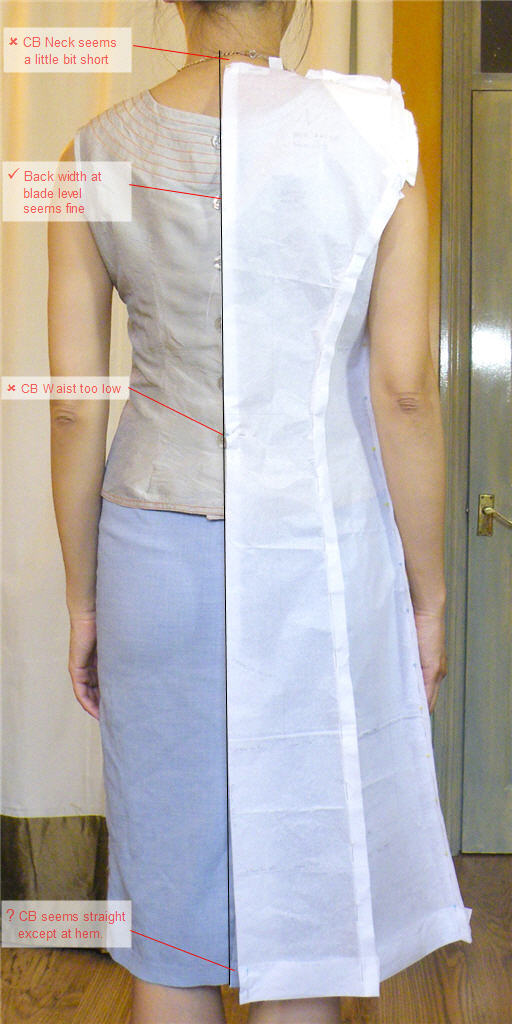
  • Size 8 back seems wide enough.
  • CB seems surprisingly straight. I normally get bunching at lower back / waist, so I was expecting CB to be too long so swinging to the side at the bottom. There is a slight swinging, but not as much as I’d expect.
  • CB waist is too low though.
  • CB neck is also lower than base of my neck. But I’m not sure if I should alter this. How do you tell if the neckline is meant to be lower? Some McCall / Vogue patterns indicate lowered back neckline on the back pattern. This one doesn’t. But at least a couple of pattern-making books I have mention lowering the back neckline slightly for jackets & coats.

1-fitting_1f-2
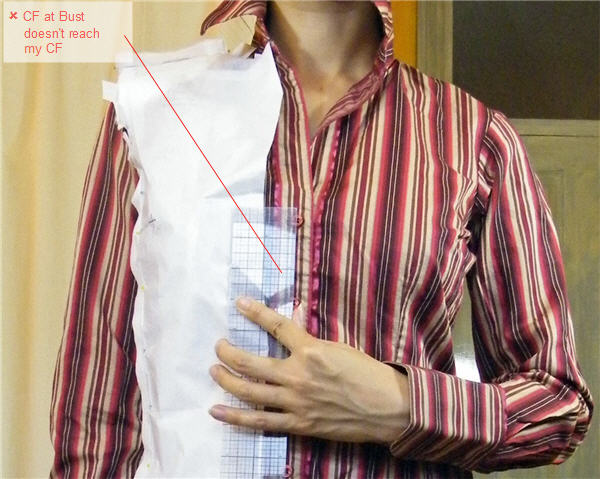
As the back width is wide enough, I’m OK to check the front width.

  • Finished bust is suppose to be 36″, which would already give me a 2″ ease. But CF at bust doesn’t come to my CF without pulling & creating drag lines. I measure about 1″ difference. Also, as this will be worn over other clothing, I reckon I’d need more bust ease anyway. This trench is suppose to be semi-fitted, which supposedly should have 3-5″ ease. I’ll aim for 4″ & maybe sew a wider SA if it seems too loose at fabric fitting stage.
  • 1-fitting_1s-2
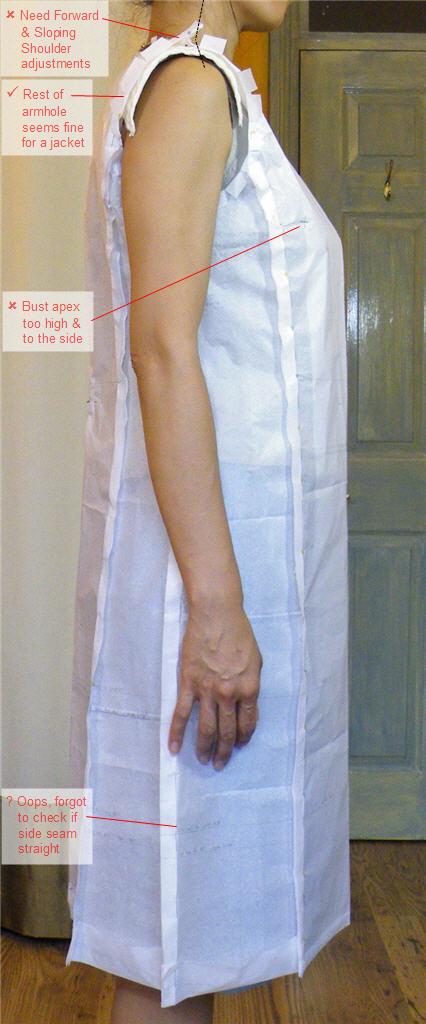
Armhole seems a little bit big at the shoulder seam & also to far to the back. From previous sloper fitting attempts I know I have slopping shoulders & forward shoulder (too much computer work). So definitely need adjustments here. Rest of the armhole looks OK to me considering that this is a jacket – ie need bigger armhole to fit over other garments.
  • From the side you can see the bust point is too high up and too much to the side.
  • Forgot to check if the side seam is straight. Oops.

First alterations I’m going to make:

  1. Rounded upper back adjustment
  2. Sloping & Forward Shoulder adjustments

Results tomorrow!

TNT Trench Odyssey: Part 2a Fitting detour to Shoulder Pad Land

No sooner have we started than we make the first scenic detour. This one is to Shoulder Pad Land.

I’ve been told that fitting needs to be done with the relevant shoulder pad in place – if I plan on keeping the shoulder pads that is. And although I’m no fan of footballer shoulders (that’s American football, not the World Cup variety), I thought maybe a sliver might give the jacket a more professional tailored look.

So to buy or to make. Well, as I had already cut out batting for the shoulder pads ages ago I thought I’d go down the homemade route. Isn’t it sign of better tailored garments anyway? She says snootily.

The only problem though…I’m not sure these homemade ones would be washable. Now my RTW trench‘s shoulder pads, while low-quality looking, is at least washable. And I hate garments that are dry-clean only. That was one reason I bought that particular RTW trench – it is machine washable. On the other hand, I’m not sure I’ll be able to find ready-made ones that are thin enough for my taste. So maybe I will make these detachable rather than sewn in.

v8817I’m using OOP Vogue 8817 for these shoulder pads. But as usual, I’m deviating from the pattern instruction to try out some fancy-schmancy instruction from my sewing books. This time it’s from Cabrera Meyers’ Classic Tailoring Techniques: Men’s Wear.

The V8817 instruction looked like it would have produced a hefty pad even for the thinnest, supposedly 1/4″ version.

1-shoulder-pad_2

So I…

  • Removed one of the two layers of the smallest piece.
  • Strip all the batting of the thin non-woven cover layers. (Did I use the right type of batting I wonder. These cover layers make it impossible to have smoothly transitioned layers.)
  • Half each layer again.
  • Feathered the layer edges for a smoother transition between the different sized layers.

1-shoulder-pad_1

The result looks more like the photo in the tailoring book.

Per that book I also replaced the hair canvas top and bottom layers with muslin – seems like it would feel nicer as canvas can be a bit scratchy to wear. And for pad stitching I ran these parallel to the concave shoulder edge like in the book rather than perpendicular like instructed by V8817.

Here’s how the finished pad compare with the foam pad from my dissected RTW trench:

1-shoulder-pad_3

And that concludes our detour to Shoulder Pad Land. You can wake up now!

TNT Trench Odyssey: Part 1 Inspirations & Pattern

So the trench. Well, it certainly has been long in the planning. In fact, a couple of years ago I wrote that “it has shot straight to the top of the sewing list” because of various items lost due to impractically shallow pockets of my RTW version. I’m sure you know by now to take my sewing plans with a pinch of salt: It didn’t happen then. But it most definitely is happening now.

And as we’ve already taken the scenic route, I thought I’d continue that glacial pace with piecemeal reports on the progress rather than one whopping review. Watching paint dry has never been more fun!

Inspirations & Pattern

Back in Sept 2011, I gushed about the Selfish Seamstress’ stylish renditions of the classic trench in delectable prints. If I may Mistress Selfish, here’s a preview of her fabulous results. Be sure to check out her blog for full technicolor details:

She used the ever popular but now Out-Of-Print McCall’s 5525. So I’m using the same as my starting point.

0-pattern_M5525-photos-de 0-pattern_M5525-tech-d 0-pattern_m5525-tech-e

I plan to make some tweaks because although the results look great on Selfish, the pattern envelop photos look slightly dowdy. Also, I want this to become my TNT pattern for trench – and I do intend to make more in the future. So time spent now to improve the fit will be well worth it.

The fabric I have in mind – a long in the tooth cotton twill from the stash – doesn’t have enough yardage for a full view E. Also I don’t want to emphasize my relatively wide shoulder. So I’ll probably end up combining views D & E.

One way I might be able to get view E length is to follow the example of this fabulous Louis Vuitton design from a while ago…

trench-inspire-05

I got a yellow velvet and a brown paisley cut velvet that I can use for the extension. It might make the trench less versatile. But if I’ll be making more, then maybe one with a designer touch would make my wardrobe less boring!

One detail I’m definitely changing is the sleeve. M5525 comes with one-piece sleeve. Even my high-street RTW trench has two-piece sleeve for a supposedly better fit. Surely I can’t let RTW beat a me-made in fitting standards!

Stay tuned for the next installment!

McCall 6501 Girls Dress A+E

Last but not least in the why-the-hell-am-I-Sewing for Kids Trilogy is the pile on the left.

The Pattern

My niece picked the black mesh fabric and had wanted a jacket out of it. But I was worried that a see-through jacket might be a bit too sexy / grown-up so I tried to J-Crewfy it. I thought the fabric would work well with a drapy design like this – the flounce especially. As added insurance against parental objection I also added the sleeves. The Franken-drawing looked alright to me. But of the 3 makes, I’m most meh about the result of this one…

Catalogue Shots

M6501_2

Is it just me or does this dress look dowdy? I’m wondering now if I shouldn’t have just made another gathered tier skirt with black lining.

Fabric & Notions Used

I was needlessly apprehensive about sewing the mesh knit and unduly confident about sewing the Lycra underlining. The mesh in fact sewed easily on the overlocker. The Lycra lettuced like crazy on both the overlocker (with differential feed turned right up) and sewing machine…until I spray starch the hell out of it. I even resorted to homemade starch when I ran out of the commercial one. Once it’s stiff like paper it behaved itself.

Size Used

Like with the Burda jacket I made a 12 – supposedly a size larger than my niece’s current measurements. But unlike the Burda jacket this one is L-A-R-G-E. Even I could fit into it. Not sure if it’s the typical over-generous ease problem that many have reported on the Big 4 patterns, or if the fault is with me for choosing stretchy fabrics.

I would have said “that’s OK as she can grow into it”. But of the 3 garments I think this is the most kiddy design. The other two could easily be teenage or even grown up fashion. This one looks too sickly sweet to be worn by anyone other than little girls & tweenies.

Changes Made

Frankenpatterned view A sleeves onto view E dress. And underlined the whole thing.

Verdict on the Instruction

I read the instruction but did my own thing because of the changes I made. Otherwise the instruction is pretty straight-forward (and easier to follow than Burda in my opinion).

Like with the cut-lace tier skirt, I treated the underlining as a separate layer for the main bodice. Only in the armscyes, sleeve hems, and back neck opening did I treat the layers as one.

M6501_2-d-1

As much as possible I kept the seams and hem stitching as light-weight as possible. So the mesh shell had narrow overlocked seam and roll hems – first time I did this and it came out without a hitch thanks to the easy-to-handle mesh fabric. The underlining had slightly wider seams with a machine-stitched single-fold narrow hem.

M6501_2-d-2

I was debating whether to finish the sleeve hems the same way, but decided to make it look more like the other upper edges – neck hem, back opening. This is to avoid distracting from the design line of the fluid flounce which flows into the fluid bottom hem. (There’s a bit of design thoughts going into this after all, even if the result isn’t quite as fashionable as I had hoped! }:-)

Would I sew it again / Would I recommend it to others

It is a sweet looking dress. And if you get the sizing right and picked the right fabric I think it would look good on young girls & younger Tweenies.

Somehow I don’t think I’ll be sewing this again though.  Unless this Tweeny Trilogy turn out to be unexpected mega-blockbusters I’m done sewing for kiddies. Back to regularly scheduled adult sewing next.

Kiddy Tiered Skirt Yeehaw…Gathering Hell

Excuse #4: Verdict on the Instruction, continued

OMG, how could I have forgotten about this other very important key make-my-life-harder feature…

You may gather (haha) from my previous projects that I’m not much of a gatherer. But this project has miles of gathering to do.

tiered-skirt_1-3I do own one of those weird contraption called a ruffler foot. But given the type of garments I tend to sew I’ve never used it on a project before.

I thought I’d try it out. Unfortunately, it eats fabric for breakfast, lunch & dinner. I’m not sure if I got a defective unit or not – it was a cheap eBay model – but even at the least-gathering setting, 18″ of test fabric was promptly reduced to 5″ at best. What with the calculation hell I was already in with this project, I had to abandon this route. It does make some lovely gathers though…(see bottom sample in the photo below).

tiered-skirt_1-2

The other route I’ve read about is using overlocker’s differential feed to gather & sew at the same time. Way too advanced for me – the second part that is. I tried the first part on a sample. The result wasn’t spectacular (see top sample in the photo above). Maybe 2-thread overlock isn’t the right stitch to do overlocker gathering – the instruction did specify 4-thread overlock stitch. But I was worried about having too much thread built up as I was going to gather, attach, then overlock again.

In the end it was back to good old fashion route of pulled basting stitch. Which of course took ages. Urgh.

So here’s a question for all you Master Gatherers: What’s your secrets for expert gathering? Is this one for Patience or am I missing out on some Fast Track Insider Tips?

BTW, a couple more styling ideas for this skirt if I had one in my size… Biker Chic with a leather jacket … Or Senorita style like this clipping…

tiered-skirt_3-1

Lucky for my niece this skirt doesn’t fit me. Otherwise she might not be getting this in the post!