
So let’s get back to Q. Yes, I’ve decided to christen her Quasimodo. Or Q for short (with a sideways nod to James Bond). She’ll be my smart cookie gadget girl, slightly deformed but still beautiful.
And what tricks has she got for us up her sleeves? Well, you already know about her hidden foam bra cups. This time we’ll check out her innards & leg. Yes, just the one. But she’s got one hefty hoof to keep her grounded…

And here’s the tidied up master plan with lessons learnt…
- With 11 layers of paper tape that amount to about 1/8″ she was sturdy enough to be left hollow. OK, you can’t take a sledge hammer to her or squash her with a heavy load. But draping & fitting don’t usually call for such tactics anyway.
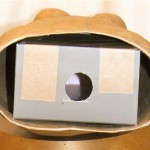
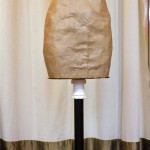
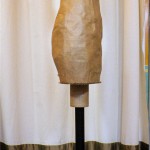
- To keep her PVC pipe spine vertical, I added the shoe box at the base and cardboard at the neck. Both have holes cut to exact diameter of her spine to wedge it in place. Hot glue gun comes in handy too.
- The holes – hem, armholes, neck – were then sealed off with 2-3 layers of cardboard, cut to the inside diameter of these holes, then glued & paper-taped in place. I plan to cover the outside layer of the neck & armholes with this craft metal mesh I have in the stash. Can’t even remember what I bought that for, but it’s preeeee-t-t-y.
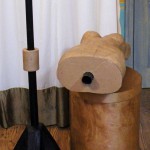
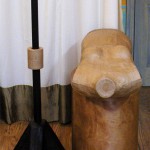
- Her spine goes over a narrower pipe in the stand. This makes her turnable – though the swivel caster wheels would have done this as well. More importantly for a dress form without collapsible shoulders, she can come off the stand. It’s handy for putting on pull-over garments that won’t easily pull down over her stiff wider shoulders but would happily pull up her underdeveloped hip.
- As for the stand…sadly for me in the UK many of the usual suggestions for stands (IV drip pole, swivel chair base, 2nd hand dress form, xmas tree stand, PVC pipes, etc.) are either not cheap or not pretty & sturdy enough. So I concocted something my limited DIY skills could just about manage with timber planks, PVC pipes, & swivel caster wheels. It’s based on a DIY xmas tree stand instruction that someone posted on Artisan Square. I made the wood base taller because I was worried that without enough support the PVC pipe might bend or tilt over time. The weight of the wood also adds to the stability of the stand. I was able to get most of the PVC parts in black & stain the wood so that the stand match other furnishing in my sewing room.
Next up, fattening Q up! It is coming up to xmas after all.
Love the way you have shown you construction details… very professional. It’s a lot of fiddling about, isn’t it? I need to do it as well but am baulking at all that time expenditure, for sewing, but not doing sewing.
Totally agree it may be an overkill, time better spent sewing.
But it bugs me to work with ugly looking tools. Especially as we live in a small apartment, so there’s no place to hide an ugly dress form. I’m hoping the end result would look a bit more like those vintage dress forms.
And that the stand and skeleton will last me for decades. The plan is to adjust padding and cover as I age and change shape. Fingers crossed I won’t get too much shorter!
The other thing is, without a dress form, I would have to constantly bug my DOH to help with fitting. And he’s a bit too impatient to be precise every time. Better to have his undivided attention for 2-3 hours of wrapping than to have lots of fight-inducing mini-fitting-episodes.
Also, I want to play with draping. So a dress form would be indispensable. In fact I just gifted myself a couple of glossy draping books with a birthday voucher I received!
If you’re lucky enough to have one who does DIY/woodworking, I’d get the Other Half to make the stand. Mine has zero interest in DIY. Sigh.
Ditto re. the DIY. I think I will be able to interest him in the wrapping though! I was thinking of doing a plaster one, and I wondered if you had any experience/reason for going with the paper version over plaster? Sorry if you have covered this elsewhere and I missed it BTW.
Your attention to detail (never mind the math) is amazing and inspiring. How much fun you’ll have when this is all finished!
One of my numerous procrastination tricks! 😉