Watch out! Psychedelic Leopards on the loose!

This one is dedicated to the MC of Junglist Massive,
a Ms Anne of Pretty Grievances.

I’m not convinced the 3 Psychedelic Leopard cubs want to play nicely together, nor with other regular leopards either. But seeing as I’m terribly late for Jungle January, I thought the least I can do is to herd all of them into the same room for some OTT Jungle Fever photo ops. So here goes…

First off:
Vogue Donna Karan 1282 Cowl-Neck Top
& Burdastyle 2012-05-113 Skirt,
with well-worn Joan & David Circa lizard skin  pumps.

Next up:
Modified McCall 6078c Cowl Neck Top,
Skirt restyled from old H&M Dress,
Mini-Beret restyled from old scarf (never blogged),
with threadbare Anne Klein leopard print pumps.

No birds were killed during the making of these pictures. Well, not by me anyway. I blame the friend who gave me the feathers.

Improv Tote: Finished!

OMG! I finished something! And it’s made purely from stuff in my stash! What’s more is that although it’s not perfect, I’m OK with it! Miracle. So, picking up where we left off…

Tarting It Up for the Big Day

As you recall, this Vivienne Westwood tote bag was sort of what I was aiming for. And I briefly flirted with the idea of finding a similarly graphic print and image transfer using one of those printable transfer paper or image transfer medium.

But it seemed way too much hassle. Especially with the fabric being faux suede, I wasn’t sure that (a) the image would transfer well, and (b) the fabric could handle the heat required. So I resorted to my tried and tested Jacquard Lumiere 561 Metallic Gold Fabric PaintJacquard Lumiere Fabric Paint.

Next question is what design.

Derwentwater Golden Hearts Blackwork Embroidery KitI wanted something stylized, and thought this Derwentwater Blackwork Embroidery design would look great. Boy was I over ambitious or what. On the faux suede I just couldn’t get fine enough a line to attempt anything so complicated. (I do love these Elizabethan looking blackwork embroidery kits though – I have 6 of the 7 Derwentwater kits. One of these days I will find a way to incorporate them into my fashion sewing. Just you wait!)

WIP-17WIP-20

Ambition hampered, I went back to variations of the royal orbs. I ended up with this slightly wonky VW style orb.  I threw in a few more flourishes inspired by the real deals to compensate for the lack of fancy branding.

What do you think? Chav enough for you?

Coming Altogether Now

Next up, sewing the bag and lining bottoms together.

WIP-17Zipper foot came in handy for getting as close to the seam line as possible without being hampered by the bulk of the bag and lining.

I sewn three sides first, then inserted a piece of 7-count plastic canvas to stiffen the bag bottom. I got this tip from U Handbag’s great bag-making tutorial blog.

The last side is then sewn up, and the bag flipped right-side-out over the lining.

WIP-18

The top of the lining is then sewn to the underside of the zipper. (I slip-stitched it by hand for better control, then edge stitched again for reinforcement.)

WIP-19

I stitched across both ends of the zipper before covering the ends with faux leather tabs like Longchamp Le Pliage tote bags.

Now the tabs, what a pain they turned out to be!

WIP-21

With faux leather on both sides and a bit of bulk in-between, they were rather difficult to sew on the machine, even with tissue paper underneath to help the feed dog feed properly.

In the end I resorted to hand sewing. So thank God for my thimble and hand-sewing needle grabber.Hand sewing needle grabber

I would have had blood spilled on my lovely new bag otherwise trying to cajole the needle through the bulk – and the gunk from the double-sided tape!

WIP-22The resulting tabs aren’t brilliant. With my thin and somewhat stretchy faux leather you can see the zipper bulk striking through clearly. Longchamp Le Pliage tote bags tabs also shows a bit of bulk, but with proper leather and professional stitching they stick out much less like a sore thumb.

But you know what, who in real life is going to get close enough to notice this little blemish? So for once I’m declaring this project Plenty Good Enough!

So here you go, the finished result:

Done-01 Done-03 Done-04

What do you think? Good enough for a Gym & Grocery Bag? 🙂

Improv Tote: WIP 2

Lucky you! An update within a week of my last post! 😉 Yes, a bit more progress was made on the tote. So, where were we?

The Handles Of Course

WIP-05

So I went with the D-Ring option in the end. I also removed the stiff woven interfacing from the cording – it was too stiff – and instead went with naked cording inside double layer of faux suede.

The part below the D-Ring ended up being a layer of vinyl leather over faux suede – for that fake leather thickness. I went for a Vivienne Westwoodish diamond shape cut out with the aid of a cardboard template. WIP-06

As you can see, plenty of double-sided tape was used in the process to hold the pieces in place. May not be what the professionals use, but it does the trick. And this bag is totally an exercise in using up the stash – decades old double-sided tape included!

So here are the finished handles. Don’t look too closely though. The sewing is all a bit wonky. But hey, for once it’s “Good Enough”!

WIP-08

Next up I sew in the zipper opening before attaching the handles to the bag.

WIP-07inspiration_longchamp

As you can see, it goes from middle of one side panel to middle of the other side panel. I plan to finish it off with two vinyl leather tabs like the ubiquitous Longchamp Le Pliage tote bags.

WIP-09 WIP-10

And the handles were “baste” in place again with double-sided tape before being edge-stitched. BTW, the Teflon Feet comes in really handy for these faux suede and leather! But it’s a bit wide, so luckily my machine can swing the needle either way up to 3.5mm.

Where the handles are attached I reinforced the bag panels with the stiff woven interfacing. Because I’m paranoid about handle failure, especially with those heavy bottles of Coke Zero that my Other Half have me buy for him from time to time.

Bottom Up!

Next up is attaching the bottom. I did the two long sides first, then clip the corners (reinforced with Dritz Fray Check wherever I clipped), and finally sew the two shorter sides.

WIP-11WIP-12

Now the Lining & Inside Pockets

Again in a stash-busting move I used whatever was in my stash no matter how inappropriate it might be. So standard dress lining it is then. Something tougher would have been better. But I’m being disciplined.

As a compromise, I fused the stiff woven interface to the lining instead of the bag fabric. I was going to use the stiff one on the faux suede and another lighter one on the lining. But extra layers means extra weight, however imperceptible it may seem while the bag is empty. Fusing the stiff interfacing also forced me to use up decades old Aleene’s Original Iron On Fusible Web.

WIP-14

The pockets are double layer lining interfaced with decades old Pellon Soft Shape interfacing. On one side I experimented with pleated pockets sewn into  the side and bottom seams. On the other side are flat edge-stitched pockets. We shall see which gets used more often!

WIP-15Rest of the lining construction is like the outer layer. With the addition of the stiff interfacing the bag stands up all by itself! I’m very proud.

And here’s a shot of the inside pockets. No zips inside. I don’t like too many hurdles to get to my junks.

WIP-16

Stayed tuned for the next episode, where the Bag and the Lining get hitched!

Improv Tote: WIP 1

Happy New Year all! Hope you all had a lovely Christmas and maybe even managed to get a fair bit of sewing done.

Sadly over here, hardly anything was achieved sewing-wise. Apart from over-eating induced coma I suffered a bout of Perfectionism. Hence the lack of activity here – it was just too depressing to write about!

But as the Sewing Princess reminded me, there’s a wonderfully supportive sewing community online, and I need not wallow in my fitting woes alone. So I’ll take some pictures of my Whack-a-Mole fitting problems on a sunnier day and maybe you’d join in with my Name That Fitting Gremlin Game. But not today. Today I want to talk about my first bag making attempt.

inspiration_originalA while back when I was traveling a bit, I wanted a replacement carry-on bag. The one I had was getting tatty in places and was a bit heavy once laden with all the modern-day gadgets. So I started cutting out fabrics for a replacement.  But when I measured the weight, my fabric pieces was working out heavier than the original bag. Some sewn products are best left to the professionals, who have access to special material that better meet the practical needs which we can’t easily get hold of in consumer fabric stores. Sigh.

Inspirations

So, what to do with the cut out fabric pieces? As they were originally destined for a rectangular bag, I decided to make a tote a bit like this £114(!!!) Vivienne Westwood tote bag:

Vivienne Westwood Battersea Print Bag Khaki

As my fabric is a polyester faux suede, I’m not sure how easy it would be to transfer printed images onto it. So I had to look for alternative ways of adding visual interests.

Hot Patterns Queen Of Hearts Bowling Bag & Hand Bag PatternI’ve always like corner patches like on Hot Patterns’ Queen of Heart Bowling Bag Pattern. So I thought I’d use some of scrap vinyl I have in my stash for this.

As you can see I don’t have a proper pattern and instruction to guide me. So I’m improvising as I go along.

One tutorial I am using bits & pieces of is this tutorial for a mini-bowling bag by Qazicat:

Qazicat Leopard Bowling Bag Tutorial …Like its instruction for the corded handle. Or how to stiffen the bag sides and bottom. Or order of construction. Useful stuff and clear instruction.

Love the leopard print example Qazicat shown as well. Would be perfect for Pretty GrievancesJungle January too (which I chickened out from – my slopers not being ready and all)!

Work In Progress

First off, attaching the vinyl patches to the bottom parts of the bag. As both vinyl and polyester don’t like high heat – and I’ve lost the instruction for the various interfaces and adhesive webs I have – I decided to just use standard double-sided tape in my stash. I’ll edge-stitch them as well just in case the adhesive tape lose its sticking power with age.
WIP-01

Here are all the patches – entire bag bottom, small strips on lower edges of the sides, and rounded bottom corners on the main pieces of the bag:
WIP-02

I’m using up decades-old stiff fusible woven interfacing on the back of the faux suede. I think they were for shirt collars and the likes. But again, heat issue with faux suede, so they’ll probably just be sewn in rather than fused.
WIP-03

I’ve also started on the handles. Here are thick piping cord wrapped in the same stiff fusible woven interfacing. The outer layer will probably be the faux suede. But I’m still pondering on whether to beef it up a bit with an extra layer. Or maybe even use thicker piping cord. At the moment it looks a bit wimpy compared to the size of the bag.
WIP-04

inspiration_handleAnd I’m also debating whether to attached the handles directly to the sides or to attach them via a D-ring so that they can hang down when not in use for more compact storage.

That’s it for now. For apart from fretting over fitting, I’ve also been busy stressing over our bathroom renovation, making endless plans and drawings to try to whip the builders in line.

New Bathroom

And of course now the builders have taken over a huge chunk of our apartment with inevitable dust everywhere, any sewing would have to proceed at a tortoise pace.

Hopefully it won’t be weeks for the next installment of this!

Fortuny Delphos Wannabe Dress

Since there’ll be no sewing done this month, let’s play “Here’s one I made earlier.” First up, my Fortuny Delphos Wannabe Dress.

The Inspiration

Mario Fortuny is a Spanish artist from the turn of 20th century whose lighting designs, Grecian pleated dresses and Renaissance velvet robes I really, REALLY love. Actually, my Gigli Wannabe Coat can probably be traced back to his influence via Romeo Gigli, Paul Poiret, and Ballets Russes.

He developed a way of permanently micro pleating silk which to this day no one else has figured out how to do. The closest modern equivalent would be crystal pleats or mushroom pleats.

Supposedly 70s designer Mary McFadden revived the use of these type of pleated fabric, but in polyester because they couldn’t figure out how to permanently pleat silk. Threads Magazine have a couple of articles on how to work with these type of pleats (10-11/1990 and 6-7/1993 issues, available on Threads Magazine Archive DVD). Both showed designs more influenced by McFadden.

Not really my cup of tea. (70s and early 80s aren’t really my favorite decades fashion-wise.) I much prefer the romantic Grecian style of Fortuny. To me, it’s not a fashion garment: It’s a timeless classic. In fact, my favorite image of a Fortuny Delphos is this one of an obviously very old lady.

Doesn’t she look majestic! (Photos from Fortuny by Deschodi & Poli, and Fortuny: The Life & Work of Mariano Fortuny by Osma.)

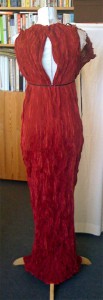
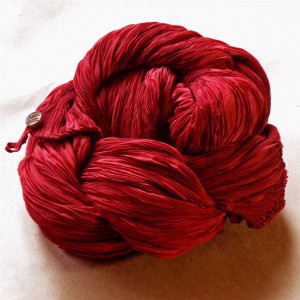
I really wanted to make one just like Fortuny’s Delphos, with bateau neckline and all. But my fabric from the Cloth House on Berwick Street, London was a bit too stiff. I think it’s a rayon crystal pleat. It doesn’t burn like polyester, but it doesn’t have the sheen of silk either.

In the end, I found in my clippings this alternative inspiration:

I went for the one on the left, a simple sleeveless chemise dress with underbust and waist shaping. Slimming while still preserving the elegantly simple and classic spirit of a Fortuny Delphos.

The Making

The crystal pleat fabric was a bit difficult to work with. The micro pleats make the fabric spongy, stretchy, and unstable. But I couldn’t use fusible to stablize it since pressing would flatten the micro pleats. Plus fusible would make the fabric even stiffer. I wonder if a different base fabric might be more fluid. This one, though thin, was a bit like China Silk / Habotai – floaty rather than limp and drapy like Charmeuse, Georgette, or Chiffon.

I ended up draping and designing on Big Bertha, then hand-sewing the whole thing. Yes, hand-sewing . Actually I don’t mind hand-sewing . The part of sewing I hate the most is pressing. Hot and boring. Hand-sewing is actually kind of meditative. Not that I’d deliberately turn to hand-sewing like the couture-loving crowd – my hand stitches are a bit too crooked for me to love them. But compare to having to unpick machine stitching, I’d rather hand-sew for better control with fabrics like this. Besides, the micro pleats hide a multitude of sins! 🙂

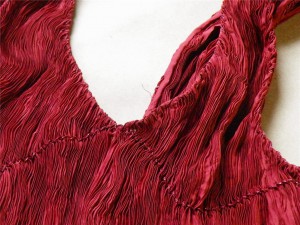
The fabric is cut in half for the front and back, pinned at the sides and shoulder, put on Big Bertha. Then style tape is laid on top to determine the neckline, armholes, and underbust shaping. I basted the tape to the fabric while it was still on Big Bertha to temporarily preserve the shape, then hand back-stitched along the edge of the tapes before removing the tapes.


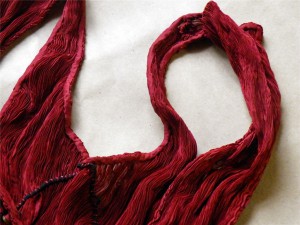
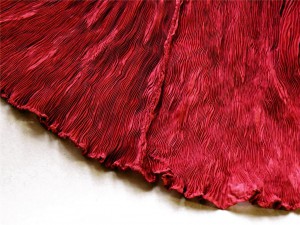
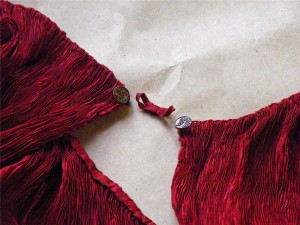
The neckline and armholes are cut to the stabilized edge with about 1/4” hem, then turned faced with bias tape made from off-cuts that were pressed flat. These edges were then overcast with decorative metallic knitting yarn for a more defined shape and rustic look like in the inspiration photo. The overcast along the front neck edge crisscross at CF and continue under the bust, then around the back. On the inside, the overcast couch the black elastic which I thought might help preserve a closer fitting shape while still provide enough stretch (like the pleated fabric) for comfortable breathing. But I’m not sure it works as intended. The shoulder and side seams are hand-sewn french seams, and the skirt hem hand-rolled lettuce hem.


While experimenting with the draping, I decided I quite like this open back look too. So for CB closure, instead of buttons on one side and loops on the other side of CB, I sewn buttons on both sides. Then I made separate double-loops to pull the two sides together for a more conservative look, or left the top double-loop off for a open back neckline.

Despite the hassle of hand-sewing the whole dress, I’m quite pleased with the dress. Especially when it packs like this…

fortuny-dress_2detail_10.jpg

Then unpack to this…

Style Shots & Mug Shots

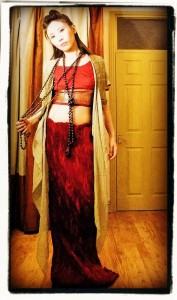
Yeap, this dressed made it to Maldives too. It’s not the most practical dress – not what you’d call a wardrobe builder. And not particularly practical for chilly London. But feels just right in luxurious Maldives! I felt like one of those Grecian ladies from an Alma Tadema painting.  🙂


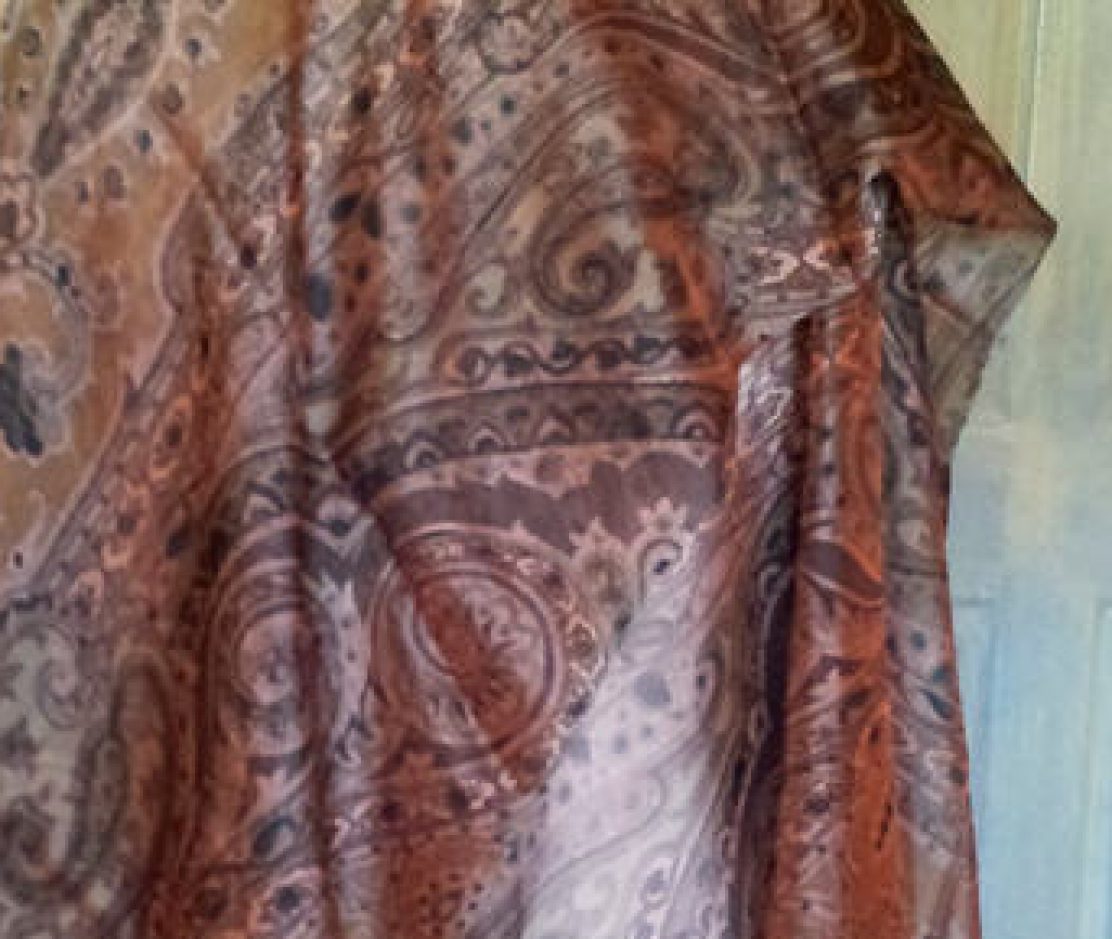
And for a slightly Medieval feel…with my beloved 1980s Comme des Garçons scarf – my first designer purchase back in High School and still in circulation decades later despite the moth holes. Plus the ceramic cross pendant my friend gave me – my Cow Bell I call it – dropped, broken, and glued back together again. I do get rather attached to some things. Not very Buddhist. Or with a slightly Indian flavor, worn as a skirt with another two old makes: a S/S 1989 Gigli inspired wrap top and a Indian choli (cropped fitted top).