I first read about the cling film method of creating Fitting Shell Blocks/Slopers on Fashion Incubator’s website.
- Fashion Incubator’s original instruction:
By that point I had already made my latest Blocks the long-winded way with lots of measurements, drafting, & a few rounds of fitting muslins/toiles. I used the ‘French Moulage’ method taught by Simmin Sethna and her students Kenneth King (“Moulage” CD book – what I used) & Suzy Furrer (“Patternmaking Basics: The Bodice Sloper” Craftsy Class – I haven’t tried, but assume it’s the same method.) So I haven’t been cling-film wrapped yet. But I thought that it would be useful when my body morph again with age & my existing Blocks no longer fit well.
Then recently I was invited to two wrapping parties where I got to practice wrapping and/or marking on 9 ladies. It’s all a bit of a haze as I worked frantically to avoid ladies fainting in their non-breathable sausage casings! But I want to jut down a few observations, learnings, & ideas for next time.
The Wrapping Parties

Photo from fabrickated.com
The first was hosted by Kate of Fabrickated & was my first bodice wrapping experience. I had been wrapped by Hubby for Duct-Tape & Paper-Tape Dress Forms, but I haven’t actually wrapped anyone myself. OK, I did cling-film wrap my Duct-Tape Arm Form, but that’s not quite the same as wrapping a live person. I fully wrapped & marked Kate’s bodice & helped out with the other two wrappings & markings (Elizabeth of Fab Dr. E’s Fab Blog & Megan of Pigeon Wishes). Kate has wrote a post about the wrapping experience & how her test muslin/toile of this 0-ease wrap came out. Marijana of Sew2Pro also didn’t get wrapped, but had tried this method with her Hubby wrapping her & wrote a post about her wrappee experience.
The second wrapping party was organised by Barbara of The London Dressmakers Club Meetup group. There were 10 guinea pigs, including one who wanted a pants/leg wrap. I think Barbara & I were the only ones who didn’t get wrapped, though again Barbara got her Other Half to wrap her at home. I wasn’t brave enough to do the leg wrap, so Barbara took up the challenge. But as the most experienced wrapper there (just!) I was in demand for the bodice wraps.
Learnings & Ideas
First my thoughts & suggestions for wrapping, then turning your wrap into a Moulage Block. I’ll share my thoughts & suggestions for using your Moulage Block in another post soon.
Goal
The wrap is meant to be a means to create a 2D map of your body, which you can then derive garment patterns from. If you’ve taken pattern-making classes you know that this is not meant to be your garment patterns, which can have all sorts of design details – like lowered neck, bust shaping with armhole princess seam or just darts, etc.
So the 2D map needs to capture some basic info about your body. Like where the base of your neck is, even if you don’t think you’ll ever wear a neckline that high. Then again you might decide to make a turtle neck or halter neck where this info comes in handy in preventing fitting issues or unintended “design features”! 😉
I like to capture as much info as possible because it’s easier to ignore unnecessary info for a particular design than to guess missing info or having to resort to generic recommended amounts. But if you’re scared of pattern-making, you can certainly get away with only those that you’d find in a basic fitting shell pattern & even ignore the cleavage when wrapping.
BTW, even if you don’t intend to design your own patterns & only to use this to check the fit of commercial patterns, the same guidelines will help you evaluate what’s going on with the commercial pattern – eg is that neckline going to be too low!
What should wrapee wear
Wear your normal underwear & supportive bra. Don’t wear old unsupportive or compression ones if that’s not what you normally wear. Otherwise the result might not accurately reflect your body & create fitting problems when you try to design or alter other patterns with your moulage. With care by the wrapper – eg no marking on your nice bra, use bandage scissor for cutting out s-l-o-o-o-w-l-y – your underwear won’t be destroyed!
If you really must wear a t-shirt & legging – or leotard – make sure they’re thin enough not to add bulk, nor so tight & restrictive that they compress your body into a different shape than your everyday shape!
Avoid black as it can be hard to see & trace black guideline markings against black underwear & bra.
Wrappee comfort
It gets really hot & restrictive in the wrap. Every single wrappees was sweating profusely, even with the less ambitious wrap (bodice to waist only). So to prevent fainting…
- Do it in a cool & ventilated room.
- Don’t be too ambitious on your first go. Try wrapping bodice (up to waist), bottom (waist down), sleeves (from armscye) separately. Just make sure you mark the boundaries (waistline, armscyes) clearly so you know where to pick up where you left off.
- Guidelines: If you are unfamiliar with pattern-making and/or cannot easily eye-ball where guidelines should be, try marking the guidelines on the body first before you start wrapping. As long as you don’t wrap too many layers you should still be able to see the guidelines through the wrap & quickly trace them onto the wrap with a marker. This allows you to take your time to get the guidelines right without wrappee discomfort. It also really helps with knowing how far up/out to wrap the neck & shoulder. For these pre-wrap guidelines you can try marking them with:
- Marker lines on masking tape. We tried this at Party 2. Unfortunately the tape didn’t stick well, so got moved in places during the wrap as the wrappee moves. So for the last few wraps I only taped the neckline & armscye, then eye-balled everything else.
- Eyeliner drawn straight on the skin. An idea I haven’t tried yet. On the plus side it shouldn’t move or restrict breathing. On the down side, you’d want to avoid marking any nice bra the wrappee is wearing. Maybe liquid liner would be less smudgy.
- Any very narrow tape that you can find – ideally no more than 1/8″ (3mm) wide. You can use draping tapes like the 3mm B&W fashion tape Marijana brought to Party 1. Old school graphic designers also use narrow tapes, so you might be able to find some in well-stocked art stores.
- A layer of strong clear packing tape is better than many layers of cling film. I’m not convinced that cling film by itself is stable enough to prevent us less experienced wrappers/wrappees from squashing & distorting the wrap once it’s off the body. So I treat the cling film like a less bulky version of the trash bag you’d wear for a Duct-Tape or Paper-Tape Double – ie protect your skin from the clear packing tape & enable you to get the wrap off. By wrapping only enough cling film to cover the body – 1-2 layers rather than many many layers – you can quickly move on to the stabilising with clear packing tape, marking the guidelines, & cutting out.
Supplies
The essential ones are:
- cling film: Kitchen cling films are ok, though not as stable & nor stick as well as industrial cling films. You may need to cut narrow strips to be able to mould to smaller prominent bumps (like breasts) more easily. Industrial cling films come in both narrow & wide widths if you’re feeling lazy! But it can be hard to pull off strips of the wide industrial cling films while avoid it clinging to itself before you’re ready. It can also be harder to cut out of as it clings more strongly to the Wrappee skin. Film dispenser will be quite handy!
- heavy-duty clear packing/parcel tape: Not the soft sellotape used for gift-wrapping, but the one you’d get from good stationery stores for closing parcels & moving boxes (at least 1.6 mils/41 microns, preferably 3 mils/76 microns). Make sure it’s not too thin & flimsy. It may be useful to have two sizes – wide ones for smoother areas of the body (so you can cover more area quickly) & narrower ones for the bumps and any narrow valleys like the cleavage (so you don’t have to trim or cut slashes to make the tape conform to your bumps). Tape dispenser will be quite handy.
- permanent marker: The one I use is staedtler lumocolor permanent marker. Other permanent markers may also work. Just test them on the clear packing tape first to make sure once dried they don’t fade or rub off.
- bandage scissor: Has smooth rounded tips that won’t stab your wrappee.
- tracing supplies:
- scissor to cut the seams & darts/slashes – can be the same bandage scissor if you’re cheap like me!
- large pieces of paper to trace onto – this will become your master moulage, so use some decent paper!
- pencil, & eraser if you must!
Other useful supplies, which were mentioned in above sections:
- pre-wrap guideline markers: masking tape OR eye liner OR very narrow tape
- guideline rulers: narrow 1/4″ elastic for the circumferences, plumb line / retractable tape measure for the verticals
Marking Guidelines
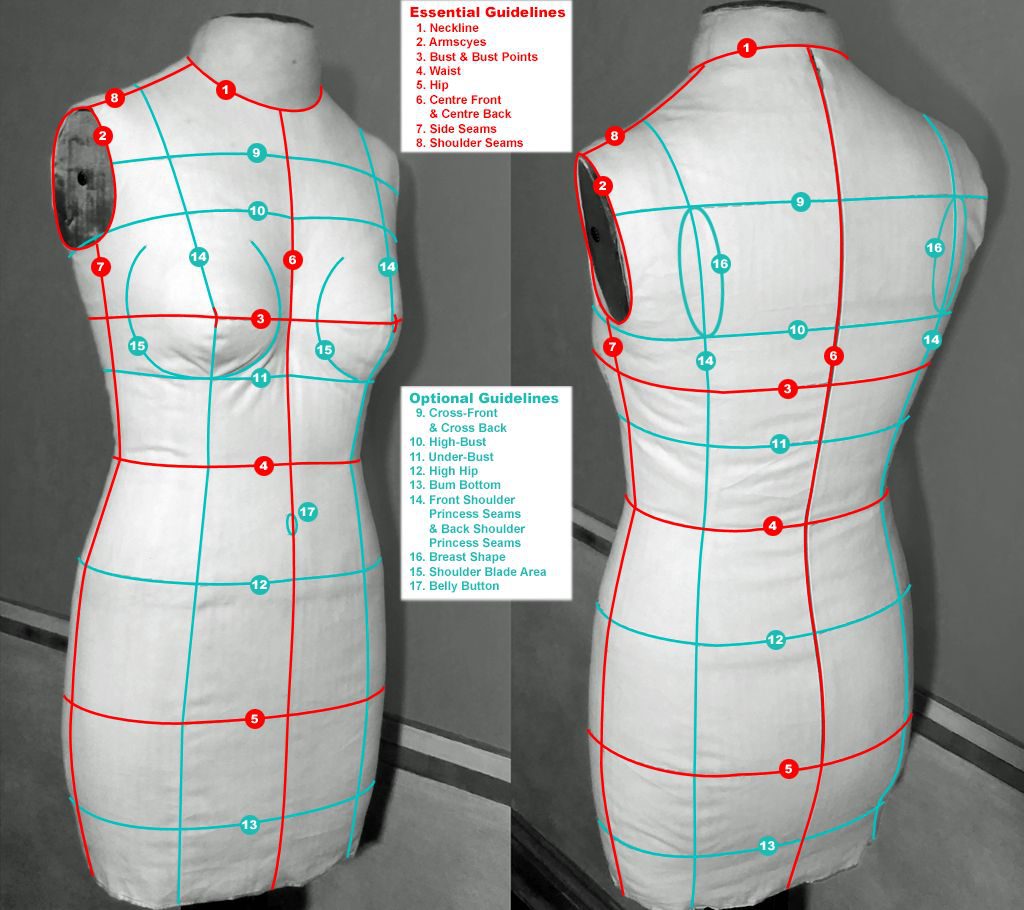
Minimum guidelines you need mark on your wrap:
- Neckline: You can use a choker chain necklace as a ruler. Make sure at the CB this is just above the bone that sticks out at the base of the wrappee’s neck & that doesn’t move when she bend her head forward.
- Armscyes (armholes): At underarm find how high the armhole can go without causing discomfort. Place masking tape horizontally under the arm. Have wrappee arms down to check if the tape’s top edge is cutting into her arms. Reposition if necessary. Then find arm joint at shoulder (ie end of standard shoulder seam – see #8 below). Mark from this point down, connecting it to the arm creases, then around the underarm – going no higher than the top of the masking tape at the side seam.
- Bust Points: You can also mark the whole Bust line. A narrow 1/4″ elastic that goes around the body can be used as a ruler. Try to keep the line level / horizontal.
- Waist: Again the narrow elastic can help & keep this line level too. If the wrappee normally wear her waist slanted – eg because of rounded tummy, you can mark this as a second reference waistline. Just make sure it’s easy to distinguish the two!
- Hip: Ditto with the elastic & keeping the line level.
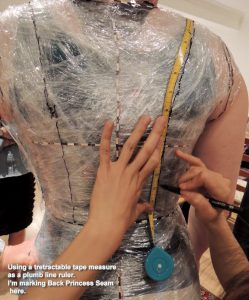
- Center Front & Back: You can use a plumb line or retractable tape measure as a ruler.
- Side Seams: Aim to have these start at the middle of the armpit so it will be easier to match the side seam to the sleeve’s seam. This point may not be exactly halfway between the front & back. From this point down it’s your choice how you want to the line to go – straight down or divide the torso evenly in half (this may slant towards the front at the waist, then slant back towards the back at the hip).
- Shoulder Seams:
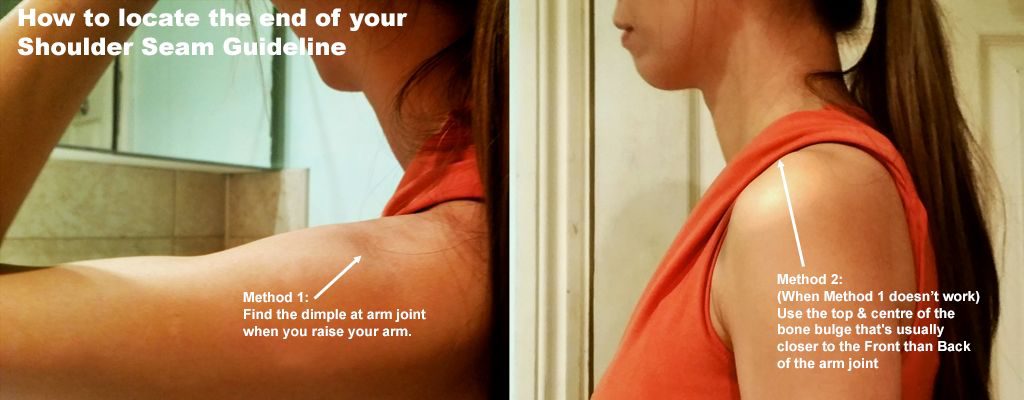 Aim to have these start at the centre of the neck base between Front & Back, and end at the dimple at the arm joint when the wrappee raises the arm. If you can’t see any dimple here, then aim for top & centre of the bone bulge that’s usually closer to the Front than Back of the arm joint.
Additional guidelines I use:
Some of these are useful for standard pattern alterations/designs, eg Princess Seams, Shoulder Blade Apex. Others are useful for checking specific designs – eg Belly Button & High Hip useful for low-rise skirts; High-Bust & Breast Shape useful for strapless, sweetheart neckline, bustier, wrap front; Under-Bust useful for empire waist.
- Cross-Front & Cross-Back: I eyeball this at approximately half-way up the arm joint – ie visually dividing the F/B armscyes height in half.
- High-Bust/Chest
- Under-Bust
- High Hip
- Bum Bottom: Absolute minimum bottom length!!! 😉 Just under your bum cheeks.
- Front & Back Shoulder Princess Seams: I start midway on shoulder seams (between neck & shoulder tip), slope down to the bust/shoulder blade apices, straight down to the waist, then slightly curve lines down towards the middle of each thigh on the Front & Back.
- Breast Shape: This does require you to wrap the cleavage. You can use the underwires of the bra as guides for the bottom edges of the breast shapes. For the top edge, you may or may not get a clear boundary between the flat bit of the chest & the mounds of the breast. If yes, great, trace that as guide. If no, just trace as far up as there are clear boundary.
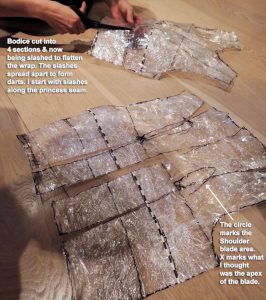
- Shoulder Blade Area: This can be hard to pin-point as some backs are fairly flat & the blades are weirder shape than breasts. I circle the most prominent region in the blade area. If you can’t locate this, leave it out. You may be able to determine this later when you flatten your wrap with slashes from the shoulder & the waist. It’ll be where these darts point toward.
- Belly Button/Navel
Wrapping process
Don’t wrap too tightly! The wrap should be a second skin, but should not compress the body. Otherwise, even after adding ease, your Block may be too small for standard woven fabric. Remember, we’re aiming to record your body in 2D, not making you shapewear!
The wrap doesn’t have to be even number of layers all over. It’s OK that some bits have more film layers than others. Just follow the curve of the body & work quickly. If you’re using a narrow film & wrapping continuously around the body, cut off & start a new strip wherever it becomes too difficult to continue with the same strip.
If wrapping dress length, for Wrappee comfort it’s probably best to wrap from bottom up so they can breath unrestricted for longer. It’s also easier to wrap the bottom up until the breasts start causing your wrap to go in all different direction!
If you can wrap quickly, wrapping to the bottom of the bum helps keep the wrap in place. I noticed that the wraps that only went down to the hip sometimes rode up because the Wrappee moved – they’re only human! When the wrap goes below the bum curve the opening is smaller, so can’t ride up.
For bust you can choose to capture the cleavage or not. If yes, criss-cross narrow strips of films (& later tapes) between the boobs (ie from Left Back Shoulder Blade to Right Front Waist & Right Back Shoulder Blade to Left Front Waist). The wrap might not stick well & conform to the boobs until you put tapes on them. If you don’t want cleavage, then just continue wrapping as you do the lower part of the body until you hit the armpits.
Armpits & up: If there’s not much curve here, just use larger film strips to cover the area quickly & move on to tape to keep the films in place. Because the film won’t go around the body it can be hard to keep them in place otherwise (unless your film has super sticky power). Make sure you go up & out far enough at neck & arm joint to reach the neckline & armscyes.
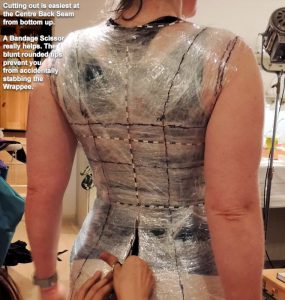
If your Wrappee feels constricted by cling film at the CF neckline, quickly stabilise the front neckline with clear packing tape, mark front neckline & top of CF line, then cut the top of the CF line apart with the bandage scissor (from neckline down). Continue with rest of the wrap.
As long as the body is covered, you can move on to the clear packing tape. Be careful of gaps in the film – patch these as necessary so the clear packaging tape won’t stick to the skin/undergarment, making it hard to take the wrap off later on.
It may be useful to have many strips of tapes pre-cut & one end stuck to edge of a table. Shorter pieces are useful for necklines, armscyes, boobs. One layer may be enough if your tape is stiff. Otherwise add another layer. Make sure all the guidelines – if you pre-marked these – are taped. This is especially important for cut (seam) edges like CF, CB, side seams, shoulder seams, neckline, armscyes.
You must either wrap enough layers of film if you don’t want the whole wrap covered by the packing tape, or wrap the whole thing with a layer of packing tape if you only wrapped a layer or two of film.
Next mark the guidelines on the wrap. If you have pre-marked these before wrapping you can just trace the guidelines. Otherwise figure them out now.
Cutting out is easiest at the CB, from bottom up – less risk of poking the Wrappee with the scissor! It may be necessary to cut the shoulder seams as well (from arm towards neck) for ease of getting out of the wrap. The film may stick to the skin, so peel off carefully. If bits of film won’t stick to the inside of the wrap, don’t worry, the important part is preserved by the outer layer of clear packing tape.
From Wrap to 2D Moulage Block
Once off, be careful NOT to squash your wrap. If your whole wrap has a layer of clear packing tape it should be harder to squash. But if there are areas that are just cling-film, it may be easily squashed.
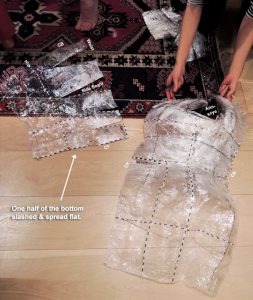
You need to flatten the wrap by cutting apart (seams) & slashing (darts), not by squashing the wrap.
Before you cut, label the Right Front, Left Front, Right Back, Left Back so you don’t get them confused once the wrap is cut into pieces. I’d label to bodice & bottom part separately – in case you end up cutting apart at the waistline as well.
If you’re not familiar with pattern-making guidelines, you may also want to label the other guidelines.
Where you cut initially doesn’t matter as much – just make sure you don’t cut off & discard any bits between the neckline to your hem/bottom line, and between the armscyes.
If you make a mistake or change your mind about where to cut, just put the pieces back together & tape over the cut.
Aim to cut & slash your warp so your 2D map looks similar to the standard fitting shell patterns used in pattern-making or fitting alteration books you have. Because then it’ll be easier to follow the book instructions to create other designs, or to add ease / grade up / compare your 2D body map with commercial patterns.
First the cuts, which will give you seams. A quick survey of the books & the commercial fitting shell patterns I have show that this is generally:
- Separate top & bottom pieces: so cut at the waistline
- Separate front & back pieces: cut at the side seams & shoulder seams
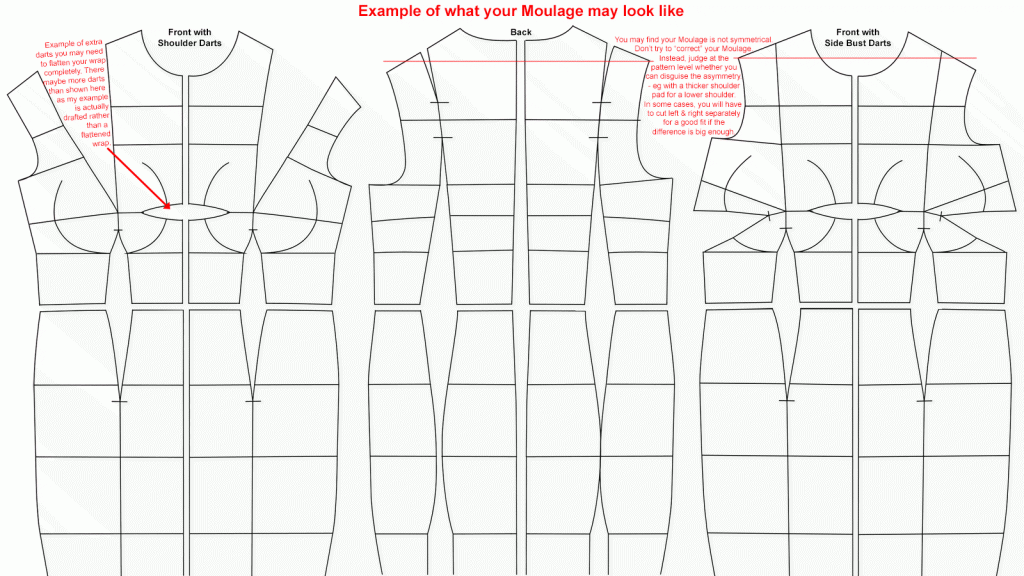
- Normally half a body: cut at the CF & CB seams. Most books will assume you have or are aiming for a symmetrical body. But your body may be asymmetrical, and there will be times when you won’t be able to disguise that asymmetry – eg very close fitting clothing or at openings (neckline, etc). So do keep both your Left & Right pieces if they are asymmetrical.
This should give you 8 separate pieces: 4 bodices (LF, LB, RF, RB) & 4 bottoms (LF, LB, RF, RB)
Next you need to flatten each piece with slashes that spread apart to form darts. Below are the standard darts used by books & commercial fitting shell patterns. But you’ll probably find that you have to slash in more places to be able to flatten the wrap without crushing it in places like the boobs. When you slash, only slash as far as needed to flatten the wrap, don’t cut all the way to the apex points (bust points, shoulder blades).
- Back Bodices generally have a Waist Dart & a Shoulder Dart:
- Slash from waistline straight up towards the bottom of the shoulder blade
- Slash from shoulder (say midway between neck & shoulder tip) towards the top of shoulder blade
- Front Bodices generally have a Waist Dart + either a Shoulder Dart OR a Side Bust Dart: The commercial patterns & alteration books generally uses the Side Bust Dart. Patter-making books varies in which one they use as the base pattern, but they generally will teach you how to pivot / rotate the dart to derive the other dart location.
- Slash from waistline straight up towards the bust points
- Shoulder Dart: Slash from shoulder (same position as the back) towards bust points
- Side Bust Dart: There seems to be no standard where this starts at the side seams. Commercial patterns seem to start about 1″ below the bust line, Mr King’s Moulage book suggest 1/3 way up from the waist line. Whichever you choose, slash from side seam across towards the bust points.
- Front & Back Bottoms generally have 1-2 Waist Darts each: The commercial patterns & alteration books generally uses 2 darts per piece (8 darts total). Patter-making books again varies, but 2 darts seem to be the more popular starting point. However, if you have small waist compared to hip, more darts may be needed to fully flatten your wrap with just slashes.
- Dart 1: Slash from waistline down towards the bulges – eg hip, bum, tummy. Start at the same position as the bodice waist dart if possible. Avoid slanting towards CF/CB. If this seems necessary – eg tummy at CF – start the slash closer to the CF at the waistline. If it’s visually more pleasing you can angle slightly towards the side seam – eg to echo your hip curve! On my wrappees I did mark the princess lines to guide this & I angled these lines so they end at the horizontal centre of each legs.
- Additional Darts: These are added on the side of Dart 1 that is closer to the side seam. Space these 3/4″ – 1″ apart depending on how many darts you need to flatten your wrap with just slashes.
If the standard slashes aren’t enough to flatten your wrap without squashing, slash where you need to. Normally these would start at an existing cut edge – eg the seams or outer edges like armscye or neckline – and point towards the peak of the area you’re trying to flatten – eg the boobs, rounded tummy, rounded upper back. I don’t had enough experience slashing wraps of other body shapes to know if you’d ever need to start from the leg of another dart. But slash where you need to to get the wrap flat without squashing the wrap.
All these extra slashes & any non-straight dart legs are like your personal Contour Guide Pattern. Personally I’d like to record these details in my Moulage in case they come in handy for particular designs. For example, for a very low neckline or a wrap front, the extra slashes/darts may tell you there may be gaps in the neckline if you don’t pivot / rotate the darts that crosses the neckline to somewhere else.
Trace the outline of your flattened wrap pieces to create your 0-ease Moulage. At this point you can test the fit if you like, or make a copy & add wearing ease before you test the fit.
Testing the fit of your Moulage
 Because your Moulage has 0 ease, if you’re going to test the fit you’ll need sturdy fabric & seams. You won’t be able to tissue-fit nor pin-fit. Use non-stretch fabric, say a mid-weight muslin/calico & machine basting stitches.
You’ll also need a long zipper for the CF. I recommend putting the zipper on the CF because it’s easier to zip up in this restrictive 0-ease fitting muslin/toile. If you have a helper you can of course put the zipper on the CB instead. It can be a separating zipper or an extra long one that goes from base of your neck to few inches below your hip.
Trace your Moulage onto your sturdy fabric. The outlines will be your seam & dart lines. For accuracy you do need these lines drawn on the fabric – don’t use fabric cut edges as your sewing guide. Up to you whether you also want to trace the other guidelines like bust line etc. I like them traced so I can check their positioning is right.
Where you have darts ending in the seams, bring the dart legs together & fold the dart allowances downward (horizontal darts) or towards the CF/CB (vertical darts), copy the seam line overlapping the dart allowances onto both sides of the dart allowance fold. When you unfold the dart you should have the familiar “dart extension” you see on commercial patterns.
Cut with wide seam allowances – say 1″ for shoulder, side, CF, CB, waist seams & the hems. For neckline & armscyes, use maybe 1/2″ hem allowances.
Stay-stitch the neckline & armscye with normal size stitches. Clip the neckline & armscye hems to the stay stitching.
Stitch rest of the standard darts & seams with a long basting stitch. Up to you whether you want to also stitch up the extra contour darts. Personally I would, just to test if they’re accurate. If you have any fisheye darts, you may need to clip the dart allowance for the dart to lie flat.
Baste the zipper into the CF or CB.
Try on your Moulage muslin/toile & check for fitting issues. You may feel unable to breathe & as constricted as when you were wrapped, but as long as there aren’t any clearly visible wrinkles & draglines, and no edges cutting into your flesh or joints, your Moulage should be OK.
If you do get wrinkles & draglines, consult a fitting alteration book for help with tweaks.
If you can’t even zip up the muslin/toile, then there might have been mistakes made during the wrapping (eg too tightly) or the flattening process (eg wrap squashed). You may be able to sort it out with fitting alterations, or you may have to try the whole process again.
OK, I’m exhausted. Some suggestions & ideas about using your Moulage next time! Hope this is helpful. Do keep in mind though I’m no expert – these are just my own observations & hypothesis.
Here’s a helpful hint if anyone wants to do their fitting with a CB zipper: get a zipper that is longer than you need it to be so you can reach the bottom easier to close it. Also, put a long piece of ribbon in the zipper pull – makes it so much easier to close the zipper, plus less twisting your body and distorting the garment!
Great advice!
Thank you, thank you, thank you! I have done this once & although the wrapping/marking were easy enough I had trouble properly flattening the form using darts appropriately. I also needed to make more markings on it for varying designs. I will be printing all your hard work & good advice & having another go at it, thank you again for sharing it!
You’re very welcome! Good luck with your next attempt.
It is difficult knowing how to cut & slash especially if you haven’t studied pattern-making. Plus our actual shapes have more bumps that most patterns ignore & gloss over using the wearing & design ease added.
Just try to slash towards the peaks. As long as you don’t throw away any bits (unless it’s below the hem or ouside the neckline & armscyes). You can always patch over mistakes.
Thank you for the incredibly comprehensive overview. It sounds like a lot of work but you got a perfect result.
You’re welcome. Thought I might as well share to make the knee blisters (from Wrap Party 2) worthwhile! 🙂
Yes, it is more effort than a lot of people are willing put in. If you have no trouble with the fit of commercial patterns out of the envelope or with simple alterations, OR you tend to sew loose-fitting clothing, then it probably isn’t worth the effort.
It may be helpful if you like fitted clothing & have trouble getting the fit right with commercial patterns even when you try altering the patterns.
It’s also helpful if you want to create your own pattern, but find the standard instructions for drafting a pattern doesn’t give you a great fitting result.
I think one of the ladies I wrapped was thinking of using her Moulage to make a cover for her dress form so it’ll be shaped exactly like her.
All things considered, it’s still a method that’s quicker than taking measurements & drafting a personal sloper from books.