Tigra-Zeber-Tiber-Zegra Skirt


I really should be sewing right now. A two-part shimmering black snake is hissing at me from the cutting table.

Productivity here still hasn’t recovered from Plutonian shake-ups of last year. But I want to make sure the one beast I did manage to hack together doesn’t miss the Jungle January 2016 Party.

JJ2016-fabric
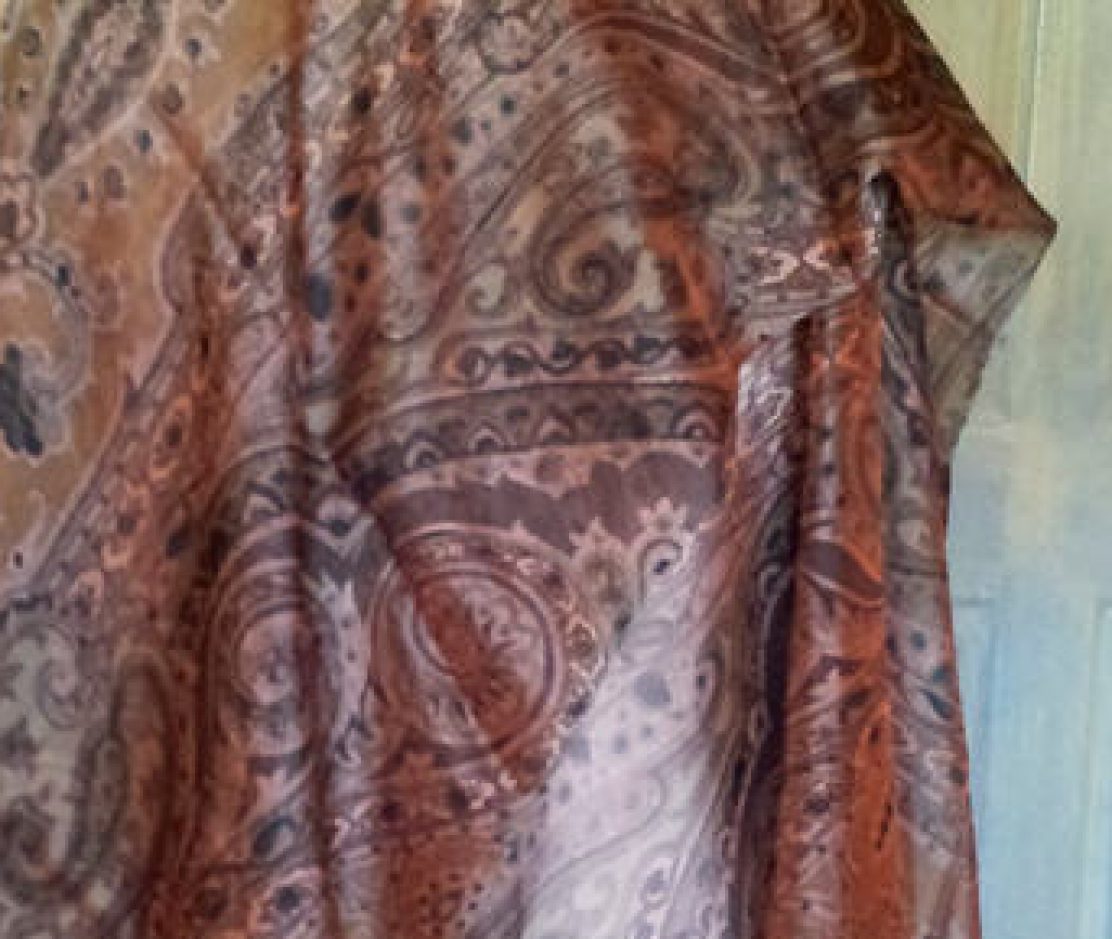
As I’m still grieving for Mom, this year’s Jungle January pets (and maybe others) will all be refashioning items from her closet. First up is this psychedelic purple top which is now a skirt & a sash scarf/belt. I can’t tell whether this is a Zebra or Tiger stripe. So Tigra-Zeber it is then. Or should that be Tiber-Zegra instead? Anyway, don’t Google “zebra tiger” – the first image that comes up is seriously disturbing!

Style Shots & Mug Shots

WORN WITH: Zara blouse.

WORN WITH: self-draped altered RTW top.

WORN WITH: Vogue Donna Karan 1282 top + RTW cardie from Mom.

Fabric & Notions Used

  • Mystery flocked knit top from Mom’s Closet. I can’t find any photo of her in this, but I vaguely recall it’s a top + skirt combo. She must had this for ages, as the top had all the vertical darts let out presumably to accommodate the middle-age spread. Sadly the skirt’s gone. Sadder still because it means less fabric for me to play with.
  • Lining: Skin color lightweight Power Mesh from Tissu Fabrics. These Power Mesh seem to have become my GoTo lining for knits.
  • Invisible zipper, hook & eye from the Stash.

The Design & Pattern

What design? What pattern! While I wasn’t as wantonly destructive as the contestants of The Great British Sewing Bee in my refashioning, nonetheless as there was preciously little fabric left for proper pattern-drafting, I too had to improvise as I went along. Key seams were all unpicked. I needed every millimeter I could get.

Changes Made

  • SKIRT
    • Swapped front & back. My waist shaping always nudges the back waist on skirts downward rather than stay level at the waist. So the lower front neckline of the top was better suited for my back bottom. Especially as it already comes with bum (formerly bust) shaping. Granted the darts are from the side seams. In a plain fabric I would hesitate to use such shaping for the bum – what can I say, sometimes I give in to herd mentality too. So thank god this busy print hurry your eyes away from the darts to whichever ways.
    • Widened & re-shaped neckline for waist.
    • Re-shaped side seams & hem for A-line skirt shaping as this wastes the least amount of fabric.
    • Added side invisible zipper & hook/eye at the top.
    • Added lining (using main fabric as pattern) & reused neck facing for waist facing.
  • SASH SCARF/BELT

    • Spliced each sleeves length-wise into 4 strips & joined the short ends to create 2 long pieces for double-layered sash. The sleeve caps became the shaped ends of the sash.

The Verdict

Yeah, I could have just left this purple psychedelic top as a top. But then I wouldn’t be able to sent her to the Jungle January Party.

You see, while documenting the top as is, I decided my Mom’s top deserved better than a mug shot. So I found some leopardy playmates for her…

0-fabric-MomsTop-1

I know, it’s crazy busy & not everyone’s cup of tea. I usually don’t wear so much busy prints in one go. I was trying to honour of our gracious hostess by going all out. But actually I secretly LOVE this combination. Something vaguely Italian about it.

The scarf is Mom’s too. I decided against refashioning it. Firstly there’s not enough of it. Secondly some memories should be kept as is, especially as it play nicely with others & fit perfectly into my Look Book anyway.

The skirt is another altered RTW from 2012 & it’s the best shade of leopard that’s not high on something or other. The golden yellow is the perfect match for the psychedelic purple Tigra-Zeber-Tiber-Zegra. ‘Complementary colors’ they call it right? Most yellow leopards are such dull beasts. Not this skirt.

But now that TZTZ is also a skirt they won’t play nicely together anymore. So the hunt is on. Oh, did I just find an excuse to expand my stash? Oops.

Finish It July: Candy Cane Halter Top

Yes, I’m done with fixing. Or at least I’ve had enough. But I’m still not in the mood for starting totally afresh. So my next project is a finishing project. As in finishing the last scraps of stripy knit I used for the Knit Top Block tests earlier in the year (Dartless Knit Top Block and Semi-fitted+Raglan Knit Top Blocks).

The Inspiration & Design

There wasn’t enough left for a normal T, even a sleeveless one. But there was just about enough for a strapless one, like the Bandeau Ruched Bust Top I just finished recently. My inspiration actually was an outfit from Burda 2013-13. (I already made a similar lace skirt. So now the stripy top. And yes, I’m plotting to eventually make the minty cardi as well!)

The stripy top isn’t available as a Burda pattern, and it looks like it’s a bustier top rather than a knit ruched bust top. But I thought the silhouette would be close enough. And I’m in no mood for drafting anything new & complicated. Being paranoid about tuby top over exposure, I decided to add halter straps as well.  This was partly inspired by 1953’s Butterick 6518 which is featured in Blueprints of Fashion: Home Sewing Patterns of the 1950s. (I plan to one day make something like that too!)

Style Shots & Mug Shots

WORN WITH: 1 & 4 Refashioned RTW pleated skirt; 2 TopShop Martha jeans; 3 Refashioned RTW A-line skirt; 5 Self-drafted lace skirt;

The Pattern

  • Block: Self-drafted Ruched Bust Tube Top
  • Design changes:
    • Added contrasting band at neckline: rectangle measuring neckline length x 3/4″ folded + SA, cut on crossgrain.
    • Added halter straps: rectangles 2″ folded x length required to tie around neck CB, cut on crossgrain. This is positioned from front princess line outward towards the side seam.
    • Added removable bust padding: pattern is based on shelf-bra bust area with the triangular bit at CF underbust removed, and no SA added.
  • Fitting changes:
    • Added back the triangle at CF underbust that I had cut off for the Mustard version. I originally sewn this up without any fitting changes, forgetting that knit fabrics can behave differently. The Mustard fabric had much more stretch both direction & was more susceptible to gravity. So the triangle was surplus to requirement & ballooned unattractively underbust. In this fabric however, it was needed to get rid of unsightly draglines. I was going to live with the defect, but then thought it would be better to test the fix on this wearable scrap muslin make.

Fabric & Notions Used

Construction Notes

  • The construction is mostly the same as the Mustard version, with the following differences:
    • Removable bust padding: Each pad is two layers. Princess seam in each padding layer is sewn separately using butted zig-zag stitches. The two layers for each pad are then overlocked together at the outer edges.
    • Shelf Bra: This time I varied the bust dart position for the Fabric vs Power Mesh layer to avoid a build up of layers that shows through the outer layer. Fabric side seam is sewn at top SA & lower 1″ only, leaving a gap for the removable bust padding to be inserted/removed. The front SA at the gap is top-stitched in place. The back SA at the gap is sandwiched between the F&B SA of the Power Mesh side seam. Rigilene boning is sewn to this Power Mesh side seam SA, so again sandwiched between the two layers of the Shelf Bra.
    • Neckline: The band is stitched to bodice neckline wrong sides together. The knitted elastic short ends are stitched to the CF double layer Power Mesh, then stitched to the seam allowances of the band/bodice neckline. The straps are stitched to the band at the inner SA (long side/upper edge in the photo) & at the fold line. Shelf Bra neckline is then stitched to the band’s inner SA, flipped inside at the fold line, and top-stitched in the band/bodice seam ditch. CF is then gathered / pleated, and the tab folded over the band fold line / top edge & hand stitched inside like with the Mustard version.

The Verdict

I’m pretty happy with the design. Love the visual interest the perpendicular stripes of the neckline band & straps add. It’s a nice variation for Breton stripe. But…

I’m not convinced these variations of strapless tops really suit my short-waisted torso. The proportion isn’t flattering when they are worn tucked in. The ratio of exposed chest vs bodice vs lower half makes the torso look even more squashed. This one is slightly better than the Mustard version because the wide straps breaks up that expanse of exposed chest & make this look less like a strapless.

And my attempt at sweetheart neckline in these ruched bust tops are just not happening. I should have paid more attention to Stretch Pattern School’s lesson on tension line. The elastic at the neckline simply cannot keep the top up and dip in the CF at the same time. I will have to find other ways of keeping the neckline up if I want a sweetheart neckline.

Otherwise a decent effort don’t you think? 😉 A- then!

Fix It July: the Mustard lot

This lot was a bit of a bother. They required lots of unpicking. And lots of PITA unpicking at that (because of the stretch stitch used). Hence the continuation of my Fix it marathon into July. Let’s start with the least troublesome of the lot…

1. New & Improved!
McCall 6078 Cowl Neck T

This one just needed taking in at the side seams and shortening. It was a case of:

  • Picking the wrong pattern for my short-waisted torso. A loose but not flowy silhouette does nothing for my squarish upper-half. And I did have to wear this tucked in at the waist most of the time because of this second problem…
  • Thinking that I can fight gravity. I had to use the stretchiest grainline for the length of the top because I ran out of fabric. It was suppose to be hip length. But it grew & grew, but not enough to pass as a dress.

2. Emami / Bradbury Endless Dress
Many-Faced Skirt

This one needed the Shar-Pei waistband/tube-bodice circu… shortened because…

  • The yoga-style Shar-Pei waistband look better on a pooch than on me.
  • The Mighty Weighty Skirt threatened the Tube Bodice with wardrobe malfunctioning.

I may have shortened it a bit too much. Originally I was still hoping for a Shar-Pei-less yoga-waistband wearing option, as well as a decent cowl/turleneck poncho wearing option. Needless to say that didn’t work.

In the end I had to end the Endlessness of this dress & commit to a proper waistband with elastic inside. I had a hard look at my lifestyle and decided that I’m never going to wear it as a Caped Crusading Poncho, nor as a more impractical version of Hammer Pants – imagine going to the loo in that! It’s still has some shape-shifting ability, but all are variations of skirts & apron skirts.

3. Self-drafted Bandeau Tube
Ruched Bust Top + convertible straps

Original

the Original bandeau

This one is the diva of the batch. It demanded a piece of flesh from both 1 & 2 above. Even then, parts of it still had to be laid out on the wrong grain.

The Inspiration & Design

inspiration

the Inspiration

design

the Design

Yes, I seem to have a thing for ruched bust. Maybe it’s because despite my psuedo-D-cup, I still manage to look rather flat chested from the front. No push-up bra has ever managed to give me a cleavage. While the bandeau band reinforces my lack of curves, I do like this Victoria Secret ruched bust bandeau bikini top. The cinching at CF adds the illusion of a much needed curve. So I modeled my remake on this, but added a panel below to turn it into a more practical tummy covering top.

  • I also added a shelf-bra with clear elastic at top (neckline) & bottom (underbust) as insurance against wardrobe malfunction. I wanted a pull over top, but I don’t trust this fabric to recover from putting on/taking off the top.
  • To further prevent sagging I copied the VS inspiration & adding boning to the shelf-bra’s side seams.
  • The shelf-bra has vertical bust darts which are suppose to be more supportive, but unfortunately they’re kinda visible through the top layer.
  • I wanted to add bust padding for more modesty. But I couldn’t figure out figure out a way to do so without restricting the stretchability.
  • I also copied the VS inspiration’s option for detachable strap. But as usual I couldn’t decide and end up with two adjustable length straps to give me more options.

The Mug & Style Shots

The Pattern

  1. BLOCK: Stretch Pattern School Tankini Block for Stretchy Knits (-12%/0% ease). Since I want this wearable strapless, I thought the -12% ease block based on Stretch Pattern School instruction would be safer. BTW, I just managed to tracked down the author of Stretch Pattern School (patternschool.com). He’s writing a book that will contain all the info from that now defunct site plus more. I’m waiting for info on how to get on the notification list. Will let you know when I find out.)
  2. Pivot side seam bust dart into CF bust dart. Pivot additional 1cm from neckline to CF bust dart to ensure snug strapless fit (like the Stretch Pattern School instruction for ‘Palette Line Maillot/One-Piece’). CF bust dart will be gathered instead of sewn.
  3. Establish F&B neckline, hemline, & F underbust styleline.
  4. Separate F bust bandeau piece at underbust styleline, but extend CF up & down for additional CF gathering. (So both neckline & underbust styline become straight lines.) Remove additional 1/4″ width at CF to increase bustline tension & prevent saggy bust ruching.
  5. (During fitting, I had tweak the F bottom piece’s underbust styleline because I was getting excess fabric / bagging at CF underbust. I removed the pointy bit – what would be the bridge piece in a bra. The resulting underbust styleline is straight on the F pattern pieces, but curved when sewn up as intended by the design.)
  6. Drafted shelf-bra per Stretch Pattern School instruction forTankini shelf-bra:
    1. Using the same Tankini Bloc, pivot the side seam bust dart to waist seam bust dart.
    2. Establish neckline (this time CF curves down to busline) & hemline (underbust line).
  7. Rectangles for tab to cover the CF bust gathering / ruching, and for the detachable straps.

Fabric & Notions Used

  • Fabrics: All recycled from thebandeau tube + 1 & 2 above.
    • 4-way Stretch Viscose Cotton Lycra from Tia Knight/Tissu Fabrics.
    • Shelf-bra underlining: Lightweight Power Mesh from Tia Knight/Tissu Fabrics.
  • Clear elastic for neckline, shelf-bra bottom, and detachable straps.
  • Rigilene boning for shelf-bra side seams.
  • Strap notions: Bra hooks & sliders recycled from old VS bra. Hook loops at neckline: 3/8″ Satin Woven Elastic from Pacific Trimmings.

Construction Notes

  •  This is my first time using Rigilene boning. It’s not recommended for corsets with require sturdier construction to keep the soft bits tightly compressed. But for a stretchy top like this I just needed a little bit of shaping, so it seems good enough. Besides, I already had it in the stash.
  • To prevent the cut ends from poking I went overboard and used both options mentioned in Linda Sparks’ ‘The Basics of Corset Building’p21:
    • I slid the fabric portion down a bit to expose the plastic rods. Their tips are then melted using a tea light candle. The tips didn’t actually touch the flame – they started melting when they got near the flame. I flattened the melted tips a bit while they were still warm, then slid the fabric portion back up.
    • I also used scrap fabric to cover the ends after the boning has been sewn to the shelf-bra’s side seams.
  • To prevent the shelf-bra from flipping out, I had to tacked its bottom edge to the outer layer at the side seams and the bottom of the CF gathering / ruching tab. The loops for the straps to hook onto are sewn on before this is done so the stitches will be hidden from the outside.
  • I didn’t have bra straps in a matching color, so I had to make self-fabric straps. But as the fabric stretches in all direction, I added clear elastics inside to prevent them becoming too loose. I find this tricky as sometimes the elastic doesn’t lay flat & the strap gets a bit wavy. But once it’s on the body & slightly stretched this waviness isn’t so visible.

The Verdict

Was it worth all the trouble unpicking stretch stitches? I hope so. All three are more wearable now. Even the strapy top might be fine under a cardi or jacket for my relatively casual workplaces.

Yes, the fabrics are a bit ratty. But I like the color. And it makes the Environmentalist in me happier. We complain a bit about fast-fashion RTW being bad for the environment. But sometimes I wonder if we’re not just as bad since the process of learning to sew well may involve lots of failed projects and discarded fitting muslins. Plus the scraps from our projects might be harder to recycle especially if we sew with lots of different fibers. You don’t get the quantity of the same fabric that you’d get in RTW production waste. It makes me sad. So where possible I ‘upcycle’ my own makes despite having a huge fabric stash still waiting for their turn in the limelight.

Unravel-video-linkSpeaking of recycling…one of the sewing bloggers I follow (sorry, can’t find the post again for proper credit) shared a link to a fascinating documentary about an Indian community recycling our unwanted fast-fashions. It’s a short film by Meghna Gupta called Unravel. Some of these recycling ladies’ comments about the West are rather funny.

Watch it on a tablet or desktop as you’ll need to read the sub-title, but on a smartphone the timeline blocks the sub-title rather than disappear like on YouTube. Very silly.

Bust Ruched Raglan T

Not to let the little scraps from my latest muslins go to waste, I used them up wearable-muslining yet another raglan T remake. The original was Burdastyle 2010-02-122 first in a Breton stripe with hardly any alterations, then again in a scratchy glittery pinky number with alterations based on a previous knit block. This time I decided to recreate the style-lines using my own blocks.

Style Shots & Mug Shots

WORN WITH: 1-2 Self-drafted pencil skirt

The Design & Pattern

Block Used:

Dartless Raglan Fitted Knit Top Block (Bodice & Sleeve)

Because there’s slight difference in shoulder slope between my Darted and Dartless Knit Blocks, I decide to draft the Dartless Raglan separately rather just cover over the style-lines and hope for the best. The approach is exactly the same as for my Dartless Raglan Block Test 3.

Design Changes Made

  1. Lowered necklines and shorten sleeves & hem.
  2. Added underbust seam. The back one wasn’t really necessary, but I didn’t have big enough scrap to cut the back as one piece.
  3. Added a little bit ease to side seams and sleeve seams for a skimming not tight look.
  4. Pivot the side bust dart to CF.
  5. Slash and spread the front bust piece. With my current Do-It-With-Conviction mindset, I decided that the Burda original’s bust ruching was too wimpy and the mostly horizontal ruching risk a repeat of the mono-boob look which I rejected in the guise of Burda 2013-03-113 (now given away). So I spread the splashes the full arch from raglan seam to underbust seam for a startburst effect (rather than just to the side seam). The Burda original had curved CF. Mine came out rather straight. And since I was also worried that CF neckline might gap, I curved my CF an extra 3/4″ and shorten my bust pieces neckline by easing 1/2″ into stablizing Vilene Bias Tape.

The result of these changes, as you see in the first fitting above, wasn’t pretty. My overzealous bust ease + side seam ease + front neckline shortening resulted in a deflated PVC balloon look. By this point I had already finished the neckline, and my eye-sight too old to cope with unpicking. The only things I could do were:

  • Tighten the bodice by removing the side seam ease and the bust CF curved ease.
  • Unpick the CF seams from the neckline down just enough to lengthen the neckline back to what it is in the pattern.

These seem to have helped a bit. The bust doesn’t look so bad now.

Fabric & Notions Used

Construction Notes

  • Only the neckline was stablized with Vilene Bias Tape. The Burda original have you stablize the raglan seams as well. Unlike with normal shoulder seams for long sleeve knit garments, I never found any conclusive advice whether raglan seams need stablization. Since my armholes feel a bit on the tight side I decide to leave these seams stretchable for more comfort.
  • My sewing order: CF bust seam > Underbust seams + Raglan seams > Finish neckline > Hand pleat bust & tack CF loop in place at neckline and inside underbust seam > Sleeve – Side seams > Hems
  • 2-detail-bustRush For bust ruching I prefer irregular hand pleating rather than machine gathering. I find with fabric that aren’t heavy/drapy gathering result in unsightly puffiness. Irregular hand pleating produce more natural looking drapes.

The Verdict

Again a very wearable muslin. But I’m still on the fence about my over-zealous bust ruching. I will have to study photos of this type of design detail more carefully and figure out how exactly I’d like bust ruching to look. As Clio commented on my Instagram preview of my first fitting…

There really is a “just right” amount when it comes to ruching on the bust, isn’t there?!?!

Dartless Raglan Fitted Knit Top Block the end

Warning, more boring hair splitting / fit tweaking ahead. So let’s get the style shots out of the way first. Then you can tune out if you’re so incline!

Problems recapped

My complaints about my Dartless Raglan wearable muslin Test 1 were…

  1. position of the raglan seams looked off and unbalanced
  2. armholes felt a bit tight
  3. more sleeve drape at underarm than I would have liked

Tests 2 & 3

First, I started with my latest revised Dartless Fitted Knit Top Block and its re-drafted from scratch sleeves (turned into Camden Kids Wannabe top). I had hope the new sleeve draft would magically make my mis-matching bodice vs sleeve raglan seam lengths go away. No such luck. So the question is how to increase the bodice raglan seam length and/or reduce the sleeve raglan seam length. The problem is partly caused by the sleeve cap height.

  • In Test 1 I reduced the sleeve cap height by allowing it to overlap the bodice armscye.
  • For Test 2, I tried simply extending the bodice raglan seams at the side seams. But this caused unsightly bagginess on the bodice under the armpits.
  • So for Test 3 I tried lengthening the bodice raglan seam by lowering the underarm 1/2 the overlap amount from Test 1, and shortening the sleeve raglan seam by raising the bicep the remaining 1/2 of the Test 1 overlap amount. This has the added benefit moving the position of the raglan seams so that it’s more diagonal and to my taste.

Test 3 Mug Shots

The Verdicts

Problem 1 (weird raglan seam positioning) I think I solved.

Problem 2 (tight armholes) is marginally better. I think my base block is probably just such close-fitting pattern that any derivatives will have the same claustrophobic armholes unless I lower the bodice underarm further and increase bicep width. My uneven shoulders also don’t help – I haven’t made any adjustment for this in these muslins…because I was lazy and hoped the stretch alone would be enough. Again, lowering UA would probably help if it continues to bother me.

Problem 3 (too much sleeve drapes at underarm) I tried to solve, but I don’t think it’s any better. Re-reading Stretch Pattern School’s instruction again, I think the problem is the fact that I removed the negative ease which keep the sleeve and bodice under balanced tension to prevent tension draglines. Once the negative ease was removed, the shallow cap / arms up horizontally sleeve draft inevitably shows the natural excess of fabric that bulk up under the arms when the arms are down.

Now this last observation about the effect of holding the garment under balanced tension is fascinating and mind boggling. I still don’t completely grasp the principles. But I have definitely seen in my recent test how frequently the muslins with more ease actually look worse (more draglines and seemingly random bagginess) than the tighter fitting muslins. Even breathing in vs out affects draglines from waist side seam to bust point. With breathe in (ie rib cage expanded & garment under more tension) the draglines disappear, but with breathe out (ie rib cage contracted & garment hangs looser) the draglines appear.

And as I mentioned before, the fiber content also seem to affect this, with rayon / cotton more accommodating and molding to the body, but then staying stretched and baggy under it’s steamed out. That’s even with decent amount of lycra content. The polyester-lycra I tried on the other hand recovers easily, but also shows the tension draglines more easily.

Mind twisting isn’t it? Hopefully with more experience I will eventually grasp the tension concept and know how to adjust patterns to create the fit I want for each garment and fabric. But for now I think that’s enough fitting tweaks for a while, don’t you?