Slim Pants/Trousers Block

I wish I could tell you that turning a 0-ease Pants Block into a Slim Pants Block is as simple as adding ease to the side seams & inseams. It was not. At least not for me. I did eventually get a block that I’m OK with. But it took many many muslins & I’ve lost count of the tweaks.

So no tutorial. Just some mug shots demonstrating the effect of key alterations I tried. You be the judge of what you would be happy with if you try to do the same. Keep in mind that variable natural lighting may have affected how the muslin looked in the mug shots. And of course the same alterations may have different effect on different body shapes. Hopefully you will get to your happy point more quickly than I did.

Since this is a long & tedious road, let’s start with the destination – then you can skip the journey if details send you to zzzz…..

Slim Pants Block (for non-stretch wovens)

the road from 0-ease Pants Block

Apology for not giving step-by-step rationale for why I tried certain tweaks. The road was too windy & the journey too long ago. Plus I’ve threw away the WIP patterns in a fit of tidying up. In general, I was trying to get rid of wrinkles and add enough wearing ease. I’ve listed all the steps I noted down. The one crossed out were tweaks abandoned, mostly because they didn’t seem to make any difference.

the prep before the journey

Comparing old RTWs & pants made so far…

  • Best fit seems to be the high street wide leg pants in drapy wool crepe. Torso & crotch was still quite fitted, but the legs were loose. There was hardly any puddling. Interestingly the back crotch fork area is stretched. Not sure if this was stretched during wears or if it was part of the design.
  • The designer fitted pants in stretch wool doesn’t fit so well. I got the usual draglines in the crotch & thigh area front & back. Even with stretch fabric, the thigh is still larger than my wearable muslins. But the drapy fabric helps make the legs look slimmer. BTW pardon my hot cross bum. Gotta sort out new undies now my behind has gotten more droopy & squishy }:-)
  • Both RTW pants have shorter crotch height, crotch length, shallower back crotch curve (not so scooped) than my wrap. Yet they still feel comfortable enough. Actually they’re closer to my crotch height measurement. For some reason the wrap derived 0-ease pants block ended up about 1″ longer in crotch height than by measurement.
  • My previous Burda 2015-11-107 fits better than the designer pants, but this was achieved through over-tight waist-to-hip + back princess shaping. Even then slight wrinkling in back thigh, not to mention weird pooling at front crotch – thigh inseam.

Research trouser fitting on Cutter & Tailor…

Granted, most discussion are about men’s trousers. But some of the basic fitting principles probably still apply. These influenced my decision to shift the knee match-points in most of my muslins & subsequent makes based on this Block. In my wrap, the front knee level is lower than the back knee level. I don’t actually manage to match the wrap knee levels precisely, I just try to reduce the difference as much as possible with iron work stretching-shrinking the side seam & inseam lines.

Pattern 1

Don’t ask. This was a stillborn. Didn’t even made it into muslining.

Pattern 2


0) 0-ease Pants Block
1) Add ease at side seam (1/2″ total at waist, widened to 1-1/2″ total at hip)
2) Add ease at darts / princess line instead, with bigger darts (same amounts)
3) Lowered crotch 1/4″
4a) Back hip tilt – pivot at side seam at hip level 1/2″
4b) Curvier & lower back crotch (dotted line)
5a) Back hip tilt – pivot at side seam at bum crease level 1/2″
5b) Add crotch inseam ease 1/8″
6a) Back hip tilt – pivot at side seam at bum crease level 1″
6b) Curvier & higher back crotch + Add leg ease at inseam (1/4″ with extra from thigh up)
6c) Right leg no shifting of match point / ironwork
7a) Straighten legs + Add more ease at inseam from knee up + Curvier Back crotch
7b) Right front add 1/2″ more ease above mid thigh with deeper dart


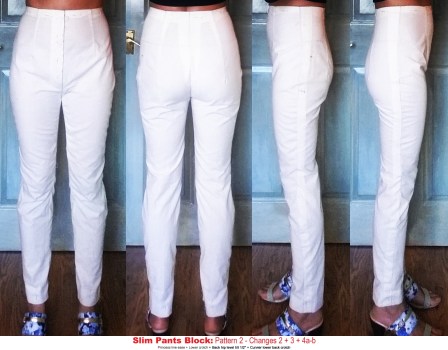


Pattern 3


8a) Add more ease at inseams (1/4″ – 1/ 2″) + Split darts into 2 per quarter + Increase Back dart width (1/4″ & shift side seam above hip to compensate) + Add more Front waist ease (1/8″ at side seam & decrease inner dart width by 1/8″)
8b) Right side raise waist 1/2″ at side seam
9a) Tried fitting book prominent calf adjustment (effectively deeper back crotch curve + lowered CB waist). No improvement.
9b) Legs straightened even more + Right side pivot at crotch at high hip level to increase side seam length
9c) Testing lengths & high-low waistline
9d) Final lengths for Wearable Muslin 1

⇒ Wearable Muslin 1

Gingham Capri with belt loop – Design Changes:

  • Lower F waist (1″ difference between CF & CB)
  • Contoured waistband 1-1/4″
  • Capri length
  • Fly front
  • Slant-front pockets
  • Belt loops

Assessment after days’ wear:

  • bum-thigh become saggy, waist seem to tilt front up & back down
  • knees baggy & twisted in front & excess pool in back just above knee – excess fabric from drooped back + angle of thigh vs calf too great & stacking of my upper over lower legs too wonky for slim but not skin tight fit to drape smoothly


Pattern 4


10a) More Back Hip Tilt pivoting at side seam bum crease additional 5/8″ (1-5/8″ total) + deeper curve (CB back to curved)
10b) Straighter CB above hipline
10c) Right raise waist 1/4″ at side seam
10d) Shift back thigh ease to inseam, increasing crotch length slightly + more ease from knee down, redistributed between F/B so both F/B knee down are straigher

⇒ Wearable Muslin 2

Gingham Capri without belt loop – Design Changes:

  • Lower F waist (1″ difference between CF & CB)
  • Contoured waistband 1-1/4″
  • Capri length
  • Fly front
  • Slant-front pockets

Assessment after days’ wear:

  • back crotch curve scoop seems too low


Pattern 5

11) Shallower back crotch curve + Less ease at thigh inseam

⇒ Wearable Muslin 3

Brown High-waisted Capri – Design Changes:

  • Lower waist equal 1/2”
  • Contoured waistband 2″
  • Capri length
  • Side invisible zip
  • Side-seam pockets

⇒ Wearable Muslin 4

Brown Mid-rise with Hem Zips – Design Changes:

  • Lower waist equal 3”
  • Contoured waistband 1-1/4″
  • Extended length
  • Fly front
  • Slant-front pockets
  • Hem zippers

Assessment after days’ wear:

  • Weird pooling at front crotch
  • Waist still seem to tilt front up & back down.
    In high-waist version, this caused waist to stick out in the back
    In low-waist version, this caused more bagginess in bum-thigh area
    This problem made these 2 rather uncomfortable to wear.
    Possible causes…
  • waist to high hip ease + contoured waistline (low front high back) that enlarged waist further = waistline sits lower than intended
  • waist ease + full tummy + flat lower back = waistline level even out front-back or even tilt towards skinnier parts – higher in front & lower in back, resulting in back crotch not sitting as intended, drooping causing excess length further down


More hypothesis to test…

  • Not adding ease at waist-to-high-hip OR assume ease means pants will hang lower on waist evenly, so shorten evenly above hip
  • Try 0 ease back + front with pleat – ie all ease on front ???
  • Don’t do high-low waist unless waist-to-high-hip is skin tight & relies on fabric give for ease in this area.
  • Wider legs especially back thigh to calf so fabric doesn’t have to bend to conform to leg shape & ending up with fabric puddle instead above the knee & front twist at the knee – wide enough cone to skim over all curves
  • Reduce back crotch scooping, stretch back crotch fork if possible, raise crotch level a little

Pattern 6


12a) Reduce Back Hip Tilt at crease level by 3/8″ (1-1/4″ total)
+ Add Front Hip Tilt at hip level 1/4″
+ Shallower Back crotch curve
+ Reduce Back inseam thigh ease
12b) Front Hip Tilt at hip level 3/8″ more (5/8″ total)
+ Remove Back ease above high hip
12 c) Testing flared legs
12 d) Testing high-low waist & different rise…settled on:
CB 3/4″ higher than CF
mid-rise = 1″ — 1-1/2″ — 1-3/4″ lower than high-rise (waist)
low-rise = 1″ lower than mid-rise
ditch the extra-low-rise (1″ lower than low-rise)
+ Reduce Front ease above hip to 1/2″ at waist when lowering waist


Pattern 7 (final)

I thought I was done after Patter 6. Unfortunately shortly after I grew my donut waist. So a bit more adjustment was called for.

13) Shift crotch inseam 1/4″ to Back tapering to nothing at mid-thigh
+ shave 1/8″ off thigh side seam
+ increase Front flare 1/8″ below knee at inseam & side seam
+ straighten CF crotch adding 1/4″ ease at Front hip
+ straighten CB crotch adding 1/8″ ease at waist & deeper curve

Assessment after days’ wear:

  • Although there’s still slight bagging under the bum, I’m calling it done.
  • At least front crotch now looks normal.
  • It’s not as slim as I would have like, but can’t be helped if I want to be able to sit down.

Finishing up

  • Traced these onto card paper.
  • Broken the Front & Back pieces into components so I can mix & match style – eg different rises, dart options, leg styles below knee. This also make the Block easier to store in a small place. I don’t have the luxury of a rack of hanging full Block/Pattern pieces.
  • No seam allowance so that I can trace the combination I want to create fashion patterns.

Unfortunately I made a mistake when tracing. Instead of the high-low waistline of Wearable Muslin 5, I traced even level waistlines. No wonder the two pants/trousers I made using this Block came out less comfy than WM5. I only discover this as I prepared the illustrations for this post. Oops. Thankfully with the component approach I only need to redo the above hipline components.
Closet Case Ginger Jeans High- & Mid-rise

My RTW jeans are on their last legs. So it’s Ginger Jeans time again. The last couple of pairs – my first jeans-making ventures – are great success judging by how frequently I wear them. But this time I need black versions. Actually I would have preferred grey. But the stores just don’t seem to want to sell me grey. So black it is and I’m hoping they’ll fade fast.

The Pattern

Mug Shots

Size Used

Size 4, as recommended by the sizing chart.

Changes Made

Fitting changes

The last two pairs I made were pretty good. So the fitting changes I made last time were the starting point of this batch. I did tweak a couple of things:

  1. Crotch: There was slight pooling at the front crotch on last two pairs, though after washes the pooling disappeared temporarily. This time I tried taking a small wedge off at thigh level (1/4″ at inseam tapering to nothing at side seam). The tilting made the front crotch extend beyond the leg a little bit & I end up shaving this little bit (made Front  Crotch shorter). Shaved off similar amount from Back Crotch as well for my thinner thigh.
  2. Lower legs: The last two pairs twisted slightly & was very snug because of my big calf & how X are stacked. I widened Front Leg below the knee – a bit more on the inseam than the side seam.
Design changes
  • I didn’t like the constantly falling down feeling of the low-rise jeans, so this time both pair were based on high-rise View B. But for one pair, I lowered the waist by 1″ for a mid-rise version. Front Leg (A) was shortened at the waist. Back amount was split between the Yoke (C) and the Back Leg (B).
  • For the mid-rise version I also added flaps to the back pockets based on one of my soon-to-retire RTW jeans.

Fabric & Notions Used

Construction Notes

  • Mostly same as last time. But I revised my construction order slightly as it wasn’t as efficient as it could be (see updated PDF Consolidated Jean Sewing Checklist). There was also extra steps for the back pocket flaps (not in the PDF checklist).
  • For back pocket designs I used the Reinforced Straight Stitch (triple stitch) on my Husqvarna Sapphire to make the black-on-black design stand out a bit more.
  • For button holes I went with keyhole shape this time. The thick stem of jeans buttons didn’t like the straight slits of the Heirloom Buttonhole stitch I used on my last two pairs. (That is the stitch on my sewing machine recommended for Jeans.) They wore the stitches out too quickly. The RTW jeans all seem to have a slender tear-drop shape. I don’t have anything similar on my machine. So this time I went with a keyhole shape using a combination of Heirloom Buttonhole stitch for the straight portion of the keyhole & hand buttonhole stitch for the round hole bit.
  • My button & rivet attachment skills are still a bit rubbish. The button tool kit that came with the buttons I used this time did help with the button setting. But I didn’t have any tool kit for the ring rivets, so wasted several pairs when the posts went in slanted. Thankfully I didn’t have the problem of the post poking through the ring rivets that I had last time. These posts are less pointy, and maybe using the button die base to support the rivets also helped a little. I did also added a couple of scrap denim layers to deal with problem of the posts being too long instead of trimming the posts. However for some reason I always seem to have problem with the left front rivets. It came off one of my last batch, and same thing happened again with this batch during the first wash. Come to think of it, all the wasted rivets were for the left front too! Next time I’m going to try donut buttons & nipple rivets I bought from Citron Jeans in Japan (also available on Etsy). They both come with hand tool kits. If that doesn’t work better I might try DM Button’s Jeans Button/Buttonhole & Rivets service. – it seems like London’s answer to NYC’s Jonathan Embroidery Plus that the NYC sewing circle raves about.

The Verdict

Not so great. These new pairs are too tight! Because I did gain a bit of waist flab recently, I made sure to try these on before top-stitching the inseams & side seams. They were fine then. But after I finished them, threw them in the wash at low temp & line dried them, they came out too small. I couldn’t even button up. And this was before I even worn them once! Arrghhhh. (Yes I did pre-wash & even tumble-dried the fabric at least a couple of times before making these Gingers.)

After a few days of torture attempting to wear them in, I was able to slowly zip further & further up, and eventually button up. But I’m definitely getting the muffin-top with these, unlike with my previous Gingers. And they’re also not as comfortable as those old pairs either. These sit much closer to the body at the crotch giving me that constant wedgie feeling. Not sure if it’s the slightly shorter crotch or the fact that the too tight waistband went seeking for a smaller circumference further up (the waistline on these are not at the smallest bit of my waist), thus pulling the crotch up with it. The front waistband also twist a bit.

I think my woes may partly be caused by interfacing the wrong part of the waistband. Unlike last time, I interfaced the quilting cotton facing instead of the stretch denim outer. The quilting cotton is probably already stable (ie not stretchy) enough. This may have left the facing too constrictive & the outer unstable enough to twist.

Unfortunately there’s no easy way to alter these pairs. Because the waistband is cut with no side nor back seams, there’s no place to let out. I would have to replace the whole waistband if I want more comfort. Or do more waist exercise to lose the flab!

Note to self for next time:

  • Use the stretch denim for both waistband facing & outer, and interface the outer with knit interfacing. Hopefully even with top-stitching the stretch denim will be more accommodating than interfaced quilting cotton.
  • Cut waistband with CB seam to allow alteration in case waist continue to spread.


Closet Case Files Ginger Jeans A+B

Gosh it’s been a long time since I finished anything wearable. And even longer since everyone else made their Gingers! What can I say, I have a streak of the anti-fashionista, a refusal to wear a trend while it’s still trendy. Can we make that a new trend?

Anyway, converting my 0-ease Pants Wrap Block into one with ease took 1 step forward & 2 steps back. I needed gratification sooner & thought  making my first pair of jeans would at least put that 0-ease Pants Block to some use, ie by pointing to where I might need to alter commercial skin-tight pants pattern…like Ginger Jeans.

The Pattern

I actually bought this as a PDF bundle with 3 jeans patterns (Ginger Skinny, Ginger Flares, Morgan Boyfriend) + Sewing Your Own Jeans ebook + bonus back pocket top-stitching design templates (can’t remember how I obtained this, sorry). Too impatient to wait for paper patterns to cross the pond & be held hostage by customs!

As I’m a tracer & reuse back of old A4 printouts, PDF patterns don’t bother me, even if they run over 30 pages (view B). (Copyshop printouts not really an affordable option in London.) Having said that, because I’m a tracer, I would have preferred if the pattern pieces can be overlapped like on Burda magazine pattern sheets, so fewer pages would be needed. The other hairy moment is trying to trace the correct line when the 11 sizes merge or cross-over! It would have been great if each size was on a separate layer so you can hide the sizes you don’t need. I’ve suggested it to Heather. It’s too late for Ginger, but she said she would consider this for future patterns.

I’m not a jeans connoisseur. Apart from opinions about fit & practicality I don’t really pay much attention to the details. So Heather’s guidance was really helpful – lots of things I wouldn’t have thought about otherwise like back pocket positioning, etc. The pocket top-stitching designs came in handy too as I didn’t have enough brain cells to come up with my own. I did have to adjust these designs slightly though because they seem to be for generic back pockets rather than Ginger back pockets. I also took inspiration from one of my RTW jeans & worked the rivets into my pocket top-stitching design.

Style Shots & Mug Shots

WORN WITH: 1-3 Ginger B + Self-drafted Choli Blouse; 4-5 Ginger A + Self-drafted pre-embroidered Choli Blouse;

WORN WITH: 6 Ginger B + Self-drafted Stripe T-Shirt; 7-8 Ginger A + agnes b homme shirt;

WORN WITH: 9-11 Ginger B + Self-drafted Peplum Top; 12-13 Ginger A + Self-draped Crinkle Pleat Top ;

WORN WITH: 14-16 Ginger B + Burda 2015-10-109 Sweater; 17-18 Ginger A + Burda 2012-05-109 Lace AppliqueTop ;

Size Used

Size 4, as recommended by the sizing chart. For once I didn’t have to second guess the size recommendation. Yeah!

Changes Made

Fitting changes

Must say the combination of this pattern & the stretch fabric fitted me pretty well even without much changes (just 1 & 2 below for initial fitting). But as I’ve just completed my pants wrap 0-ease Pants Block, I thought I’d tweak the pattern anyway to see if I can get it to fit even better. Also noting Melissa of Fehr Trade‘s advice – she has sewn many more jeans after all – I aimed for a skin-tight fit down through the thighs to counter any future ageing denim sagginess.

  1. Shorten legs at knees
  2. View A’s Stovepipe leg width for both A & B to accommodate my bigger calves
  3. Crotch curve – initially just scooped more. Later tilted at bum crease level & shortened the inseams at the crotch in the process. Originally I thought maybe the negative ease (compared to my 0-ease Pants Block) should be distributed evenly between side seams & centre seams. But I get a little bit of bunching/excess fabric at the crotch – especially the front. I could pinch out a wedge at the crotch tapering to nothing at the side seams. I didn’t want the crotch length to become too short, so I took the wedge at the top of the leg/inseam. This also tilt the angle of the crotch curve / centre seams to match my 0-ease Pants Block more closely. So now the negative ease is at the side seams.
  4. Leg tilt – my knees seem to rotate inward slightly, so that my knee bulges are closer to the inseams & my calf bulges are closer to the side seams. I ended up slanting the front legs towards the inseam like on my 0-ease Pants Block, & bulge out the back leg side seam slightly at the calf level. Strangely my alteration is the opposite of the one recommended for inward rotating knees in the Fitting & Pattern Alteration book!!!???
  5. Skinny thighs – this only affected the back of my legs. I curved in the back thighs on both inseam & side seam. The front was left alone as my prominent front-thigh needed the full width. I think this help reduce the back thigh wrinkles slightly.
Design changes

Originally I was going to only sew the high-rise View B as I hate how low-rise jeans feel like they’ll falling off my hip. But having a Scottish wallet 😉 I was going to squeeze 2 pair of jeans out of >2m of denim da**it! So pair two had to be the shorter length View A.

  1. Shortened View A legs to Capri length – I do love my Capri length RTW jeans after all.
  2. Raised View A waist slightly – to minimise that pants falling feeling.

My Scottish wallet also demanded that I fit with my final denim rather than source a cheap substitute. So I cut the main pieces with extra wide seam allowances: 1-1/4″ for inseams & side seams, 2″ at CF/CB waist tapering to normal 5/8″ at the crotch fork (where the crotch starts to curve). I had compared the original pattern to my 0-ease Pants Block before cutting to ensue these seam allowances were enough to accommodate changes should I needed to alter the pattern to match my Block with minimum 3/8″ final seam allowance.

Fabric & Notions Used

Construction Notes

  • Both the instruction & the sewing guide were excellent.
  • I did deviate in places. Eg for the crotch seam I tried a trick suggested by Baste & Gather Birkin Jeans to get the top-stitching centred between left & right sides. If you just stitch as usual, press to one side, & top-stitch on that side, then the top-stitching would be slightly off centre.
  • The denim I was using is on the thicker end of the recommendation. So I also didn’t double fold the hems for the pockets. I was worried my machine would choke on so many layers, especially as the pocket hems are interfaced as well.
  • Clamps to flatten bulk quietly!

    To flatten bulky seams I had to use clamps instead of hammering because it would have been anti-social in my urban neighbourhood! It’s also quite satisfying to squeeze the bulk down hard! It helps to steam press the bulk first, & clamp asap. Also protect the visible right side with a scrap, otherwise the clamped area may acquire a circle of unwanted sheen.

  • Hazard of straightening denim – not enough fabric left!

    BTW, DON’T try to straighten your denim grain by neatening the cut ends along a crossgrain/weft thread!!! The weft threads will always be slanted. I didn’t know this & did my usual cut ends straightening. Ended up losing a bit too much of my 2m of denim to make 2 pairs of jeans, even after shortening my patterns & using the pocket fabric (instead of the denim) for the waistband facing. I had ordered more of this denim.

  • For waistband I settled for the denim + stretch interfacing + pocket fabric facing option. The pocket fabric does have a slight give crosswise. So I hope the waistband won’t be too restrictive. But also won’t stretch out so easily like my RTW jeans. Hate that falling pants feeling.
  • Because I don’t have an extra machine to dedicate to top-stitching & I didn’t want to constantly switch threads, I re-ordered the steps so I can do as much regular / top-stitching as possible in one go before switching threads (Jeans-Consolidated-Instructions.pdf). It does make for more confusion for first attempt at jeans making. But once I get the hang of it I hope it’ll speed up the sewing.
  • My top-stitching still need a fair bit of work. I couldn’t get consistent stitch length. Plus even with my thinner top-stitching thread, I had trouble getting the tension consistent, especially when going over humps or back-stitching. The top-stitching thread slacks & loops on the underside in places. I didn’t want to increase the upper thread tension since in other places the tension seems just right. Strangely zig-zag bar tacks didn’t cause me much trouble.
  • For shortening the metal zipper after sewing the fly, I followed the Zipper Ladie’s metal zipper shortening YouTube tutorial. Basically you clip the protruding teeth with Diagonal Wire Cutter then the teeth are much easier to pull off.
  • My button & rivet attachment skills also need a bit of work. I banged a bit too hard, causing the button shank to slant a bit. One was so bad I had to replace it. The ring rivets middle splits quite easily too even with the extra length of the backing tack clipped to 1-2mm. But I just couldn’t get the rivet front to attach to the tack without the heavy hammering. I wasted a few rivets trying to get it right. Eventually I found that if I dull the clipped tack tip by hammering it into a placeholder (ruined) rivet front first, then replace this placeholder with the real/final rivet front & hammer it hard, the rivet middle doesn’t split as much. Good thing I ordered a few extra buttons & rivets!

The Verdict

As these are my first couple of pairs & I didn’t really stress-test at the fitting stage (eg by sitting etc for long period of time), they are really still wearable muslins. So I’m also cutting myself some slack for the less than stellar construction of these learning jeans. And boy were there plenty of oops. It got quite chaotic & somehow I ended up with one coin pocket practically hiding inside the right front pocket. Oops.

So if the stress-testing goes well, these will become my Skinny Jeans Blocks & I’ll have plenty of opportunity to improve my jeans sewing skills. I already bought enough denim over the last few weeks to make another 14 pairs probably! OK, maybe not all Skinnies – I still have Flares & Boyfriends to try out! Then I shall be victim of fashion trends no more mwahahaha!

Pants/Trousers Wrap – Flattening & Tweaks

So now that you have your cling film + clear tape pants wrap, let’s talk about flattening the wrap, converting it into pattern, & tweaking the muslin(s). While everyone’s body is slightly different & not all my learnings may apply to you, hopefully my notes will help you figure out how to turn your wrap into usable tight pants pattern.

As mentioned before, if you wrapped both legs, to keep things manageable you may want to start with just one side (left or right) – maybe the bigger side. If this one side works well for both legs in your muslin, then you’ve saved yourself unnecessary extra work. If it doesn’t fit as well on the other side, then convert that side into pattern as well & make up your asymmetrical muslin to see if that fits better. If it does, you will have to decide how much effort you’re willing to put into making your pants and what minor fitting flaws you’re willing to live with: If perfection is non-negotiable, you’ll have to make asymmetrical pants. If minor fitting flaws are acceptable, go with the better side or try an average (line in between the lines of your two sides) to see if that fits even better.

Now the flattening process itself, let’s start with my biggest lesson:

Darts better than Princess Lines for flattening

For normal pants at least. Unless you plan on making all your pants with princess seams, don’t cut your wrap apart on the princess lines like you might with a bodice wrap. Because if you do, when you put the pieces back together to form your front & back pattern pieces you’ll inevitably add ease along the curved princess lines like this…

See the big gap / fisheye dart at the back thigh? If you don’t sew it up, it will cause saggy back thighs. This ease allows the pants leg to hang away from your back thigh, making the length along the back princess line slightly too long. You can see the excess length in my Wrap 1 Pattern 1 Muslin 1 below. When I sew the princess seams up (remove the ease), then the back looked fairly good. But as I don’t always want princess seams in my pants, I tried to pivot some of the ease into a bigger waist dart & remove a bit more from the side seams & crotch/inseams. The result looked and felt awful.

Which is why I had to pester MR to wrap me again. For Pattern 2 I tried a different approach and refined it a bit further in Pattern 3. Both of these were based on Wrap 2.

  1. Preserve the princess line lengths by slashing a whole bunch of darts along the side seams & inseams/crotch instead.
  2. To flatten the wrap, let these darts spread or overlap as needed.
    • Pattern 2: I initially tried to keep the marked princess line on the straight grain. This resulted in different spreads/overlaps on the side seam vs the inseam. It might have skewed the angle of the legs, which may in turn be partly responsible for extra wrinkles on the back thigh that I just couldn’t get rid of. So not recommended.
    • Pattern 3: This time I kept the spreads/overlaps the same on both side seam & inseam -ie balancing on the mid-point between the two seam lines which may be slightly off to one side of the marked princess line. This approach seemed to work out better with less back thigh wrinkles.
  3. Next tally up the spreads & overlaps along the side seam & inseam to see if they have become too long (excess) or too short (shortfall).
  4. Correct the excess/shortfall to restore the original side seam & inseam lengths while making sure no extra length is added to the princess lines – especially on the back:
    • Overlap excess/spread shortfall as necessary. This can be above, below, and/or at the leg-bum crease depending on if the excess/shortfall is in the torso or leg portion or both.
    • Above the legs, excess/shortfall can also be pivoted to/from the waist dart.
      Remove excess length by pivoting the side seam/crotch dart into the closest waist dart. This removes the dart in the side seam/crotch & make the waist dart wider.
      Add shortfall length by pivoting the closest waist dart into the side seam/crotch overlap. This removes the overlap in the side seam/crotch & make the waist dart narrower or close it completely.
    • If necessary to preserve the back princess length, you can overlap back inseam up to an extra 1/2″.  A slightly shorter back inseam is one method some tailors used to improve the fit of closing fitting trousers (see Cutter & Tailor’s thread on German slim cut trousers ironwork , another debating where ease & shaping should be, & Canadian tailor Jeffery Diduch’s explanation for why he does these ironwork shaping.)
    • In my Pattern 3 front, I only needed to pivot a crotch overlap into a waist dart. The leg portion had no excess or shortfall. The back was more guess-work: The leg was 3/8″ too long & the torso side seam & crotch also have small darts at the hip level which I didn’t want to pivot into even wider & deeper waist darts. I experimented a bit to see what would preserve my back princess length the best. The result was overlapping at the thigh line the leg excess (3/8″) + extra 1/2″ on the inseam. This leave a 1/2″ fisheye gap at the bum crease which is compensated by a 5/8″ fisheye overlap when I close the hip line darts. So princess line 1/8″ shorter. I can live with that. Interestingly even with the extra 1/2″ overlap on the inseam, my back inseam ended up only 1/4″ shorter than the front.
  5. If the crotch sticks out too much over the leg inseam, slash the lower crotch curve from the bum crease end, leave hinges on the crotch line, & spread/reshape the crotch curve so that the end point of the crotch curve doesn’t stick out too much & you’re able to smooth the inseam line without adding too much ease to the thigh.
    • I didn’t have to do this on the front thanks to the less faithful 2nd layer of wrap I did for the front crotch. But my back had this problem, and I ended up with a weird back crotch curve & shaved 1/4″ off the back crotch length at the thigh. I tried to make sure this new back crotch curve is close to but doesn’t dip below the back thigh/bum crease line. For such tight trousers I didn’t want there to be too much nor too little fabric in that back crotch area.
  6. Add ease below the calf so that the hem is wide enough for your feet to pass through (measure the circumference around your heel to front of ankle then back to heel).
    • Mine was only added to the back to de-emphasize my big calves.
  7. Establish the grain line: I’m not entirely sure the correct method that will work for everyone. Standard advice for slim pants is to fold the pattern pieces in half lengthwise from knee to ankle. The straight line that continues up from this foldline is the straight grain line. But one source I found claims that this may not work if you have knock-knees or bow legs.
    • Note that your hip line for this tight-fitting pants will probably not be on the cross grain, especially in the back. It will slant up on the crotch end, & more so in the back than the front. Front may be close to or even on the cross grain. I’m guessing this prevents the front & back legs from being on drastically different grain which may cause twisting in the leg due to the different behaviour of the fabric at different grain?
    • Pattern 2: This was before I researched the “correct method” – me bad. I used the thigh line as my cross grain & a line perpendicular to this cross grain that run through the centre of the knee as my straight grain. It was at a slightly different angle to my marked princess line as well as to the mid-line between the side & inseam. Maybe this incorrect grain is partly responsible for the back thigh wrinkles that I couldn’t get rid of?
    • Pattern 3: I tried the “correct method” and it worked out better for my legs, which are relatively straight though my knees do rotate slightly inward.
  8. Establish match point notches: If your back inseam is shorter, the stretching should be in the thigh length & not from the hem up. This help the tight pants mimic the actual shape of the legs along the princess lines – back thigh generally shorter than front thigh, whereas below the knee the back is actually longer than the front because of the calves. In fact, this is true of the side seam as well. And the tailoring references mentioned above do stretch & shrink both the side seam & the inseam in different places. Mr Diduch even says that in their factory “to control the amount of stretching and shrinking, we shift the knee notch up by 1/4 to 3/8 inches on the back panel- this has the effect of introducing fullness into the calf area and shortness in the back of the thigh. When we press the seams open and crease the trouser we then stretch the back thigh and front calf, eliminating any ripples of fullness in the seam and doing the same shaping.” So establish your match points for the legs:
    • Top: thigh/bum crease line at the side seam, crotch line at the inseam.
    • Bottom: hem line for both seams.
    • Middle: either use the front knee line making sure both seams below this line is the same length on front & back (ie shorter back inseam is only above the knee), or move the back knee match points 1/4-3/8″ up on both seams as Mr Diduch suggests.
    • Pattern 3: This was before I found the tailoring references. I moved my back knee match points up 1/2″ on both seams. I saw that my back knee guide lines was actually 1″ higher than the front & was worried without some manipulation there would be too much lengths in the back thigh causing fabric pooling there, while there won’t be enough length for the back calf causing dragline there & raised back hem. So the 1/2″ was a compromise because I wasn’t sure I could stretch the relatively straight grain of the side seam & inseam too much. Also, I moved the knee match points to below the knee rather than kept them at mid-knee, again trying to cox the fabric to mimic my curves.

So here are my muslins for Pattern 2 & 3 before the fitting tweaks, plus Pattern 1 muslin for comparison.

While not perfect, I think both are better than Pattern 1 muslin without the princess seam sewn up. So I think the darts flattening approach definitely worked better for me than the princess seam flattening approach.

Muslin Tweaks

Both patterns based on Wrap 2 had similar problems in the crotch area. I managed to fix the crotch area with Pattern 2 tweaks, but it resulted in slightly different left & right – a pain for further pattern designs. Pattern 2 muslin also had a bit more problem in the legs which I just couldn’t get rid of. I made 3 muslins in total for Patter 2 & each had mini tweak experiments – 10 photographed tweaks in total, some of which made no difference & were ditched. Here’s the last of the Pattern 2 muslins:

Pattern 3 was started after I gave up on Pattern 2 muslin tweaks. Thankfully there was less problem in the legs. So I focused on the problem in the crotch area that appeared in both patterns, copying & comparing Pattern 3 to my fixes to Pattern 2 as shortcuts, but tried to avoid asymmetrical left & right. Please note that although I’m summarizing the tweaks by symptoms, the fixes were in done different order & some may have only worked in conjunction with other tweaks (see photo sequence below the tweaks summary). In other words, it’s not a straightforward process. So have patience when you tweak your own muslin!

  • Front crotch wrinkles & pool of fabric (camel toe?):
    • I did try Fashion Incubator’s fix for camel toe by scooping out the front crotch – ie moving some width from CF to the side seam. But it didn’t fix my problem (sorry didn’t take photos).
    • From Pattern 2 muslin, I knew that taking a horizontal wedge out at front hip level tapering to nothing at side seam did the trick for me, so that’s what I did again. Perhaps my wrap had wrapped in a pre-Xmas feast – my front hip line was slanted up at the CF in the trace. Or maybe it’s just that the undulating landscape in my front leg crease created more surface area in the wrap than the fabric can handle. Anyway, the wedge removed basically brought the hip line down so that it’s on the cross grain.
    • Also comparing to Pattern 2, Pattern 3’s front dart was not as deep, hip width a smidge too narrow, & inseam a smidge too long. So a smidge width was added to CF (which now falls right in between my Pattern 2 left & right CF crotch lines), the dart deepened, & crotch point lowered a smidge to match Pattern 2.
    • The resulting fix looks a bit like the opposite of Fashion Incubator’s fix for camel toe. So maybe my unsightly front crotch problem wasn’t a real camel toe even though it looked like one.
  • Minor excess fabric in back crotch area:
    • From Pattern 2 muslin, again it seems like for the best tight-pants fit my hip level should angle up about 1″ at CB crotch. Pattern 2 muslin had a bit more excess fabric below the bum, which is why I tried taking a wedge out (like with the front) & discovered this fix. But note that the fix didn’t properly worked until the front wedge was also removed.
    • Also pinched out CB a bit which resulted in a deeper scoop at back crotch. This lifted my aging droopy bum a bit, minimizing that coach-potato-bum-spread look, & seemed to improve that pooling of fabric under the bum a tinsy bit as well.
  • Legs too short:
    • Maybe the wrap was a bit short to begin with as it’s difficult to cover the ankle bone which goes below where the feet jut out of the legs. The tight fit + knees bent as you walk + my big calves also probably push up the hems a bit (& deposit the extra wrinkles at the knees). The legs were lengthened by 2″. Not sure the extra length will be needed if the legs were widened.

And the actual order I did these tweaks, or at least the ones I remembered to take photos…

Where next

Maybe a wearable muslin in heavier fabric? My muslins so far were made from old sheets, so have no stretch & are perhaps a bit too light-weight for tight pants. This could have caused some of the wrinkles you can still see at the front crotch, under the bum, and around the knee areas in both front & back. Then again maybe my lower body is just impossible to fit perfectly in non-stretch fabric. Or I’m just no good (yet) at pants fitting! Anyway, I’m calling this GOOD ENOUGH & hoping it’ll look better in heavier fabric.

Hopefully this 0-ease Pants/Trousers Block will work for jeans in 100% cotton denim or other mid- to heavy-weight stretch woven. But it probably won’t work so well for stretch denim with 2% or more of elastine – especially not the light-weight (<10oz) jegging variety: Most of the jeans patterns for stretch denim seems to have at least 1″ of negative ease.

BTW why do denim stretch out over time? A “denim expert” from Baldwin Denim said in an GQ article that “dry, 100% cotton denim expands anywhere between 1 to 1.5 inches over a 3 month period of daily wear.” Closet Case Files’ post on sourcing denim says that’s because the twill weave relaxes over time. Do other twill weave fabrics “relax” & stretch out as well? And if I plan on washing the jeans in luke warm water & hang dry, do I still need to pre-wash & dry the denim 3+ times? (Trying to do my bit for the environment!)

I will also need to modify this block to make looser Pants Blocks like…

  • Slim Pants Block that doesn’t hug the bottoms so tightly
  • Loose Pants Block that hang straight down from the hip at the back

For these I’m sort of applying the theory outlined in Catfork’s Work-In-Progress PDFs on “Drafting a slim-pant block (basic pattern) from a skirt block”.

So the self-flagellation quest for the perfect pants/trousers patterns marches on! 🙂

Pants/Trousers Wrap – Wrapping

So for those of you who want to have a go at making tight-fitting pants/trousers block via a pants wrap, here are my notes. Keep in mind it’s still all trial & error. But hopefully this, along with notes from Fabrikated’s pants wrap & So-So Sewist’s pants wrap, will help you avoid mistakes & get even further!

Today I’ll cover the wrapping. These are in addition to my previous general tips on cling film tape moulage wrapping, which are still useful. Flattening & tweaking of the pattern will be in the next post. BTW, I’ve formatted my posts to make it easier print out for reference: Only the content & comments will be printed – all the useless on-screen navigation etc are hidden so that less paper are needed.

Guide lines

  • I had MR pre-marked me in khol eye-liner before we wrapped. Made it a lot easier to correct & direct while I was still mobile.
  • Guidelines we marked:
    • Waist, High Hip, Hip, Thighs, Knees, Calves, Ankles
    • Crotch (CF-CB), Side Seams, Inseams, F&B Princess Lines
    • Optional: Belly Button, Hip Bones (at front high hip), Bum Bottom & Front Leg Creases (like leg holes of a full bottom brief).
  • For the side seams & inseams I used lines perpendicular to the floor that pass through the visual centre of my thigh. For the princess lines I used the visual centre of my legs rather than lines perpendicular to the floor.

Avoid cheap flimsy tape

  • Not all clear packing tape are the same. I thought my previous heavy-duty one was from the Post Office. Turned out I was wrong. These were soft as gift-wrapping tapes. Too squashable & stretchable. Made flattening & tracing rather inaccurate. Luckily a lady gifted me her leftover heavy-duty Scotch 3M tapes from Ryman stationery store. So I was able to pester MR to do a 2nd leg wrap with this better tape. We end up with about 1-2 layer of cling film & 2-3 layers of tape. The stiffer tape is definitely easier to work with once the wrap is off – easier to see where slashes are needed to flatten the wrap & less prone to stretch out of shape.
  • I used clear tape to make it easy to trace the pre-marked guide lines. If you want to eyeball your guide lines you can use coloured tape to help you see where you have already taped. Also avoid tape that might stretch out too easily – eg electrical tape. You want your wrap to be dimensionally stable.

Wrapping comfort & order

  • We used full width of the kitchen wrap to quickly cover the legs & move on to taping. We patched the wrap protective layer as needed during taping – eg in the crotch & inner thigh area.
  • I read online that to prevent fainting it’s best not to lock the knees when standing for extended periods of time.
  • We wrapped from waist down to the hip
    > then crotch
    > taped the crotch
    > then wrapped & taped one leg (with weight on that leg & the other leg slightly back to facilitate access to the inseam area)
    > then the other leg (shifting weight to this leg)
    > then taped the hip area & patched any missed bits in the crotch-thigh-bum area.
  • If you’re shy about someone else getting too close to your private bits, you can tape the crotch yourself as long as you can reach your back without twisting your body.
  • Stand on a low table made it easier for the wrapper to do the lower legs. Just make sure it’s stable so you don’t fall down!

Don’t wrap too faithfully

  • I had both legs wrapped in case my bottom half is also asymmetrical. Still not sure if this is a good idea as you then have double the trouble if your two sides turned out quite different once traced. Tiny shift in the angle of a line – eg the inseam – could magnify over the length of the legs! You then have to figure out if you’ve made a mistake flattening & tracing out, or if your two halves are really that asymmetrical! If you only have one chance to get wrapped, then maybe do have both legs wrapped, then start with just one leg when flattening & converting into pattern. That way if the leg you choose – eg the larger side – works well then you finish faster; but if it doesn’t fit your other leg just as well, then you can go back and flatten & convert the other leg. If you decide to only wrap one leg, maybe wrap the larger leg & the whole waist to bum crease for both sides (to stablise the crotch wrap/tape). I ended up using my left side in the end because it seemed to fit both my right & left sides better (I tried on the initial asymmetrical muslin inside out to swap sides).
  • Another area where wrapping too faithfully caused me headache was the crotch. Specifically the bum cleavage & the front crotch area where I have varied landscape thanks to tummy + pubic bone shape + protruding front thighs + slight inward rotation of my knees (from bad posture?). These are details that seem to get glossed over in a typical pair of non-stretch pants. Too much details just made it difficult to turn the wrap tracing into usable pattern, or one that bear any resemblance to a pants patterns.
    • So for my 2nd wrap I told MR to not go into the valley of the bum – above the hip line at least.
    • For the front crotch, after the wrap was taken off I added a 2nd layer with masking tape that smooth over the valley at my leg crease (between the torso & the protruding front thigh). I ended up tracing this 2nd layer for the front crotch instead of the closer fitting base layer.
  • Something I didn’t do but maybe you want to try (if super tight pants isn’t your thing, or just to make converting into pattern easier) is to also wrap your legs less faithfully. So aim to have your wrap + tape fit like skimming slim pants rather than like a second-skin. Ie drape your plastic wrap more loosely, tape more tautly from small peaks to peaks in gentle curved lines, rather than let the tape sink too closely into the valleys in between. Eg, on the back from bum peak to 2-3″ below bum crease to calf peak to loose hem circle at the ankle; on the front from tummy peak to thigh peak to knee to loose hem circle at the ankle. You can also try this for looser pants that hang straight down from hip line, but the steeper valleys may make it more difficult to keep the tape from folding over & sticking to itself.

Marking guide lines & Cutting out

  • We found that Sharpie markers – especially the ones made for CD/DVD labelling – works well on the extra strong clear packing tape. It’s hard to mark them with normal pens & markers. We simply trace the pre-marked guide lines so I could get out of the wrap ASAP.
  • For cutting out, again, I recommend using a bandage scissor for safety. We cut on the two side seams this time.
  • Before you cut, maybe mark a series of short cross-lines down the cutting lines. This makes it easier to match the two sides of cut line in case you made a cutting mistake & need to tape the cut back together to try again. This applies to all the cuts when flattening out in the next step.

Next time, flattening the wrap, converting into pattern, & muslin tweaking.